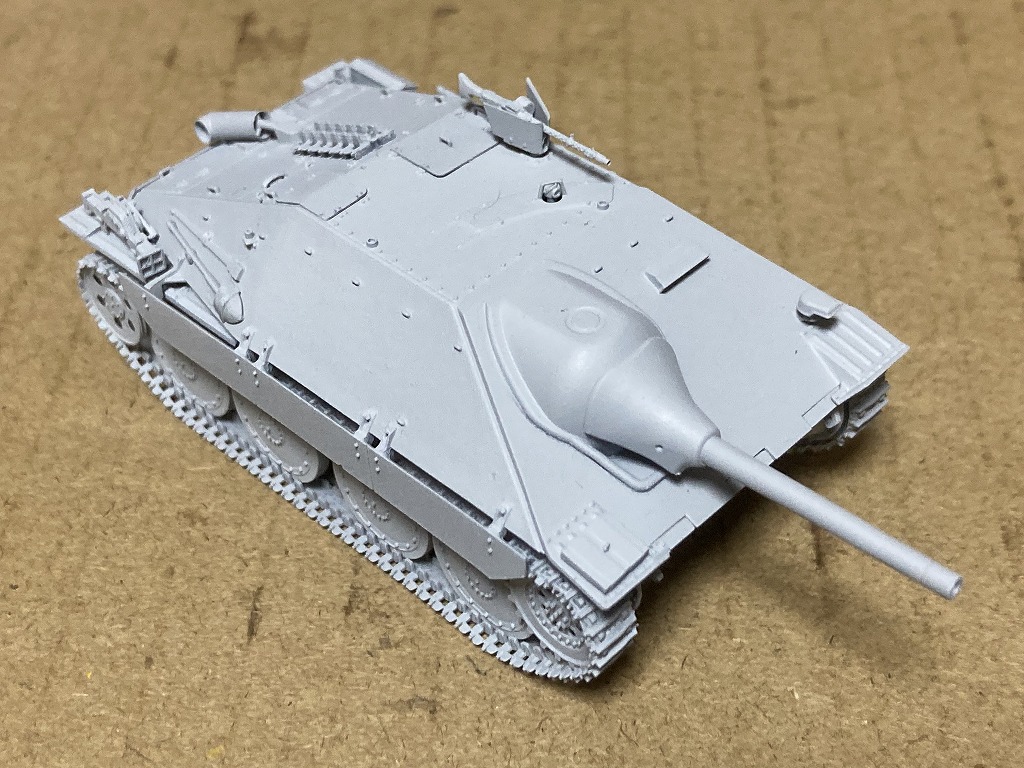
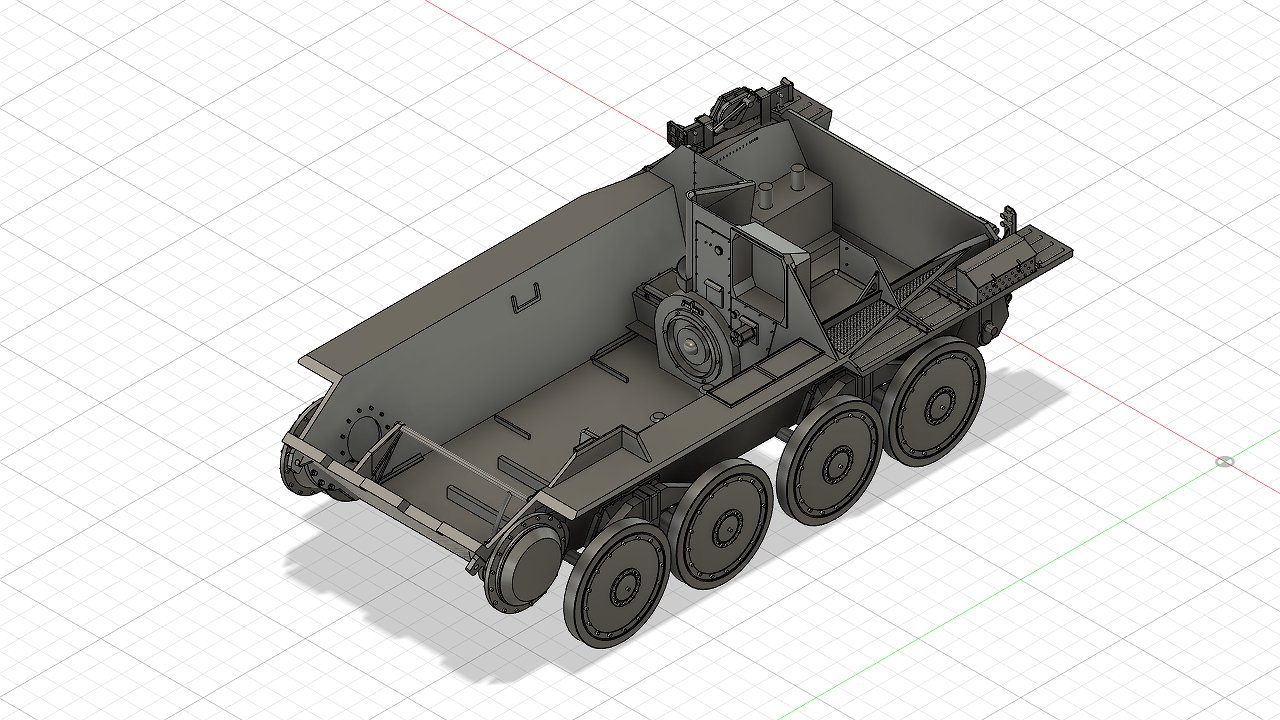
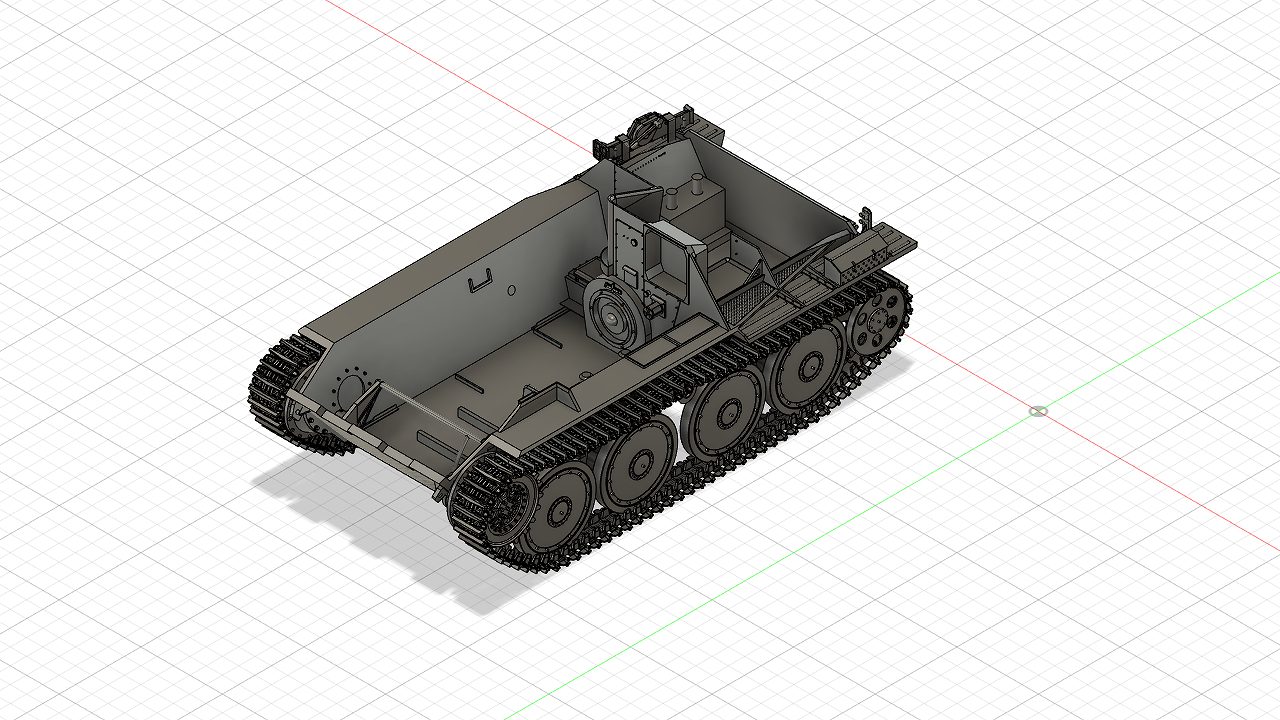
- 1/72 ヘッツァー ノンインテリアキット(3Dプリンタ)の作り方 How to assemble 1/72 Hetzer Non Interior Kit
- 3Dプリンタキットの基礎について
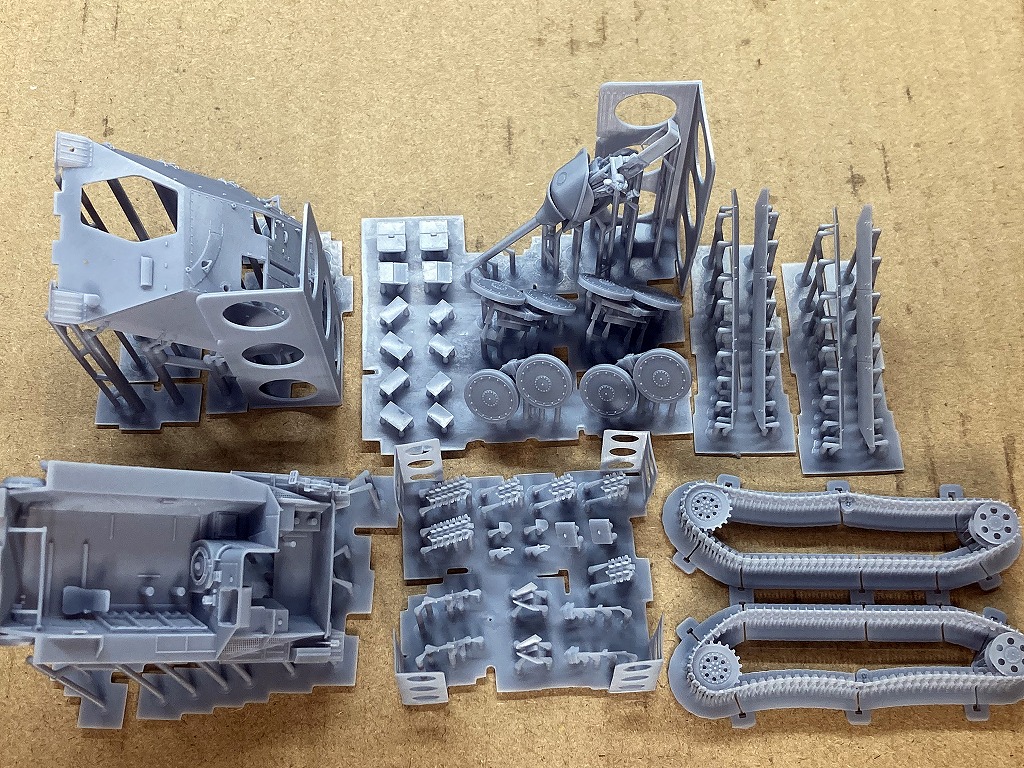
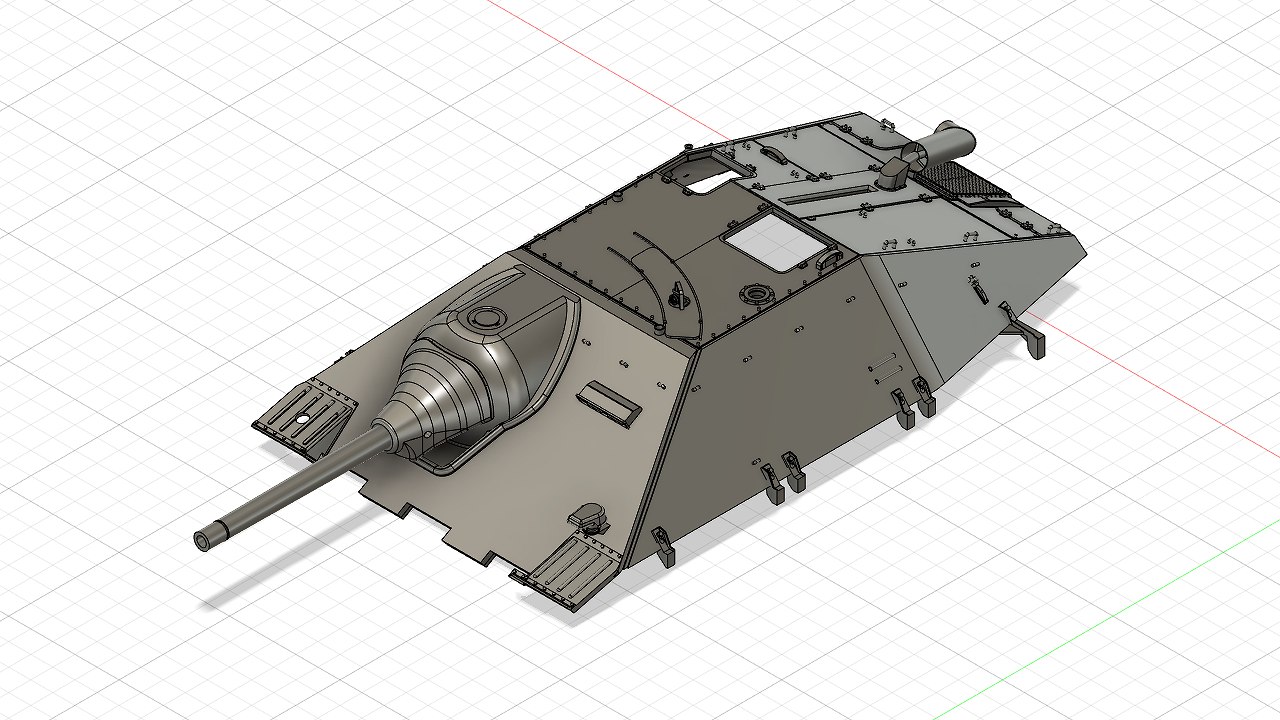
- パーツ構成 Parts composition
- 組立(Painting and assembly)
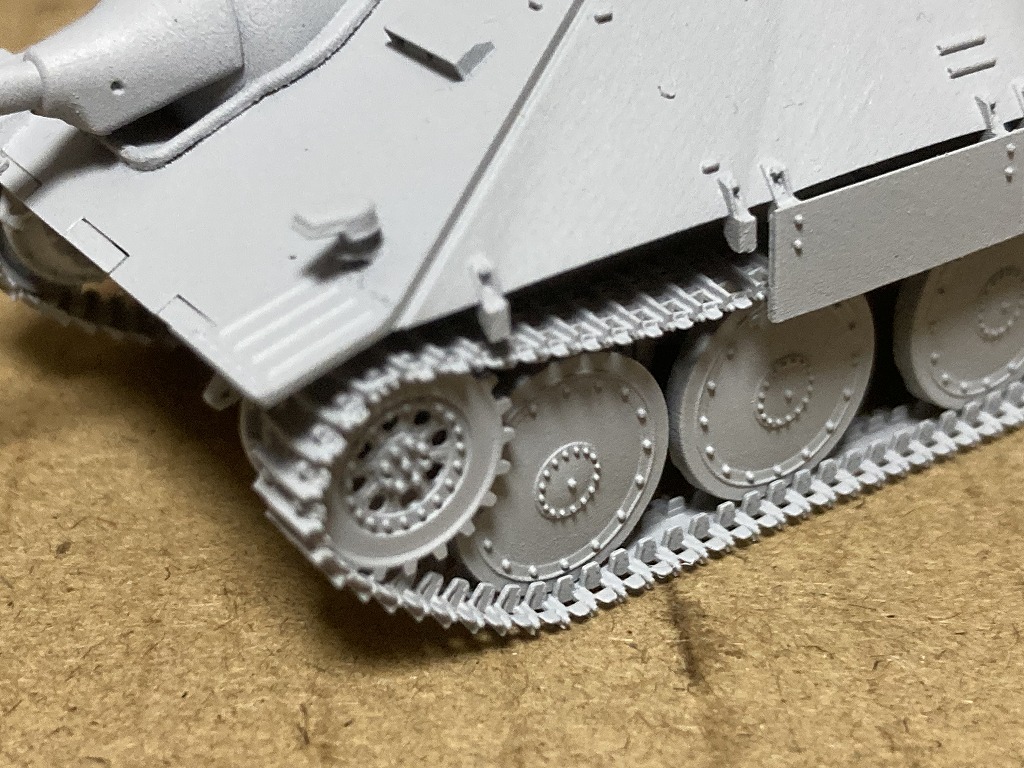
- 転輪の組立て Assembling the wheels
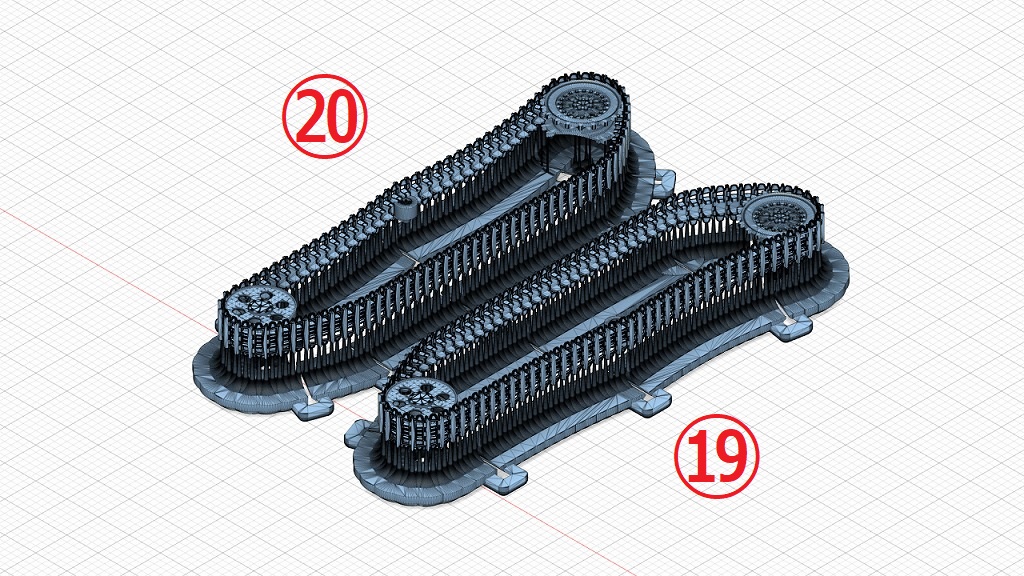
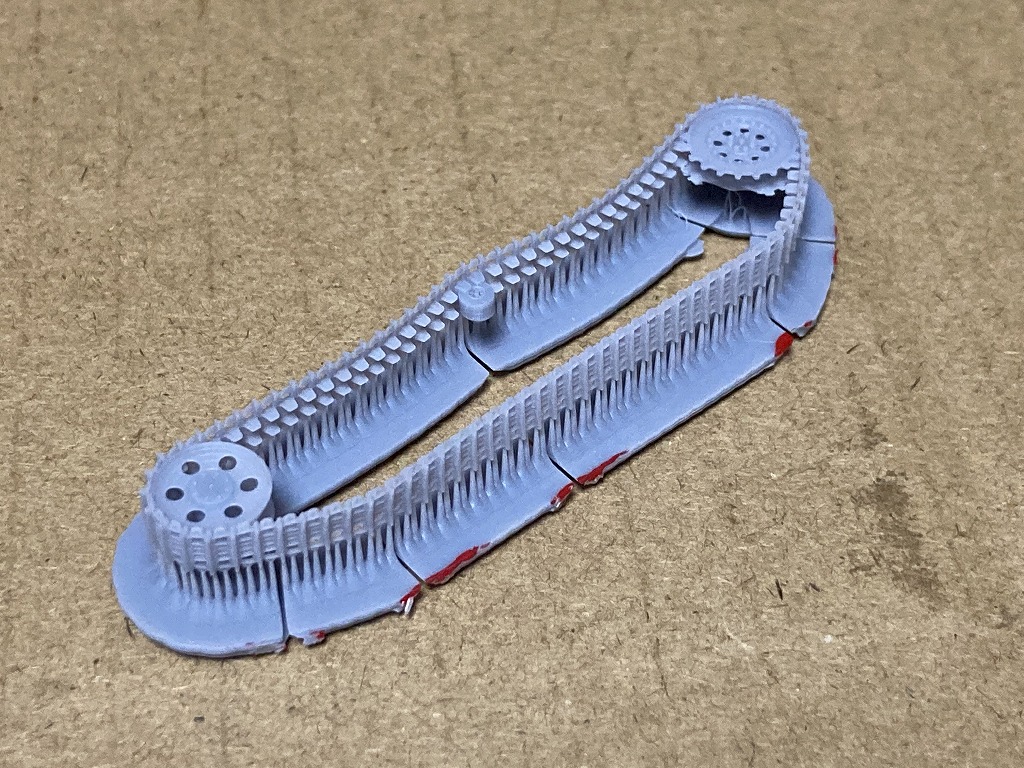
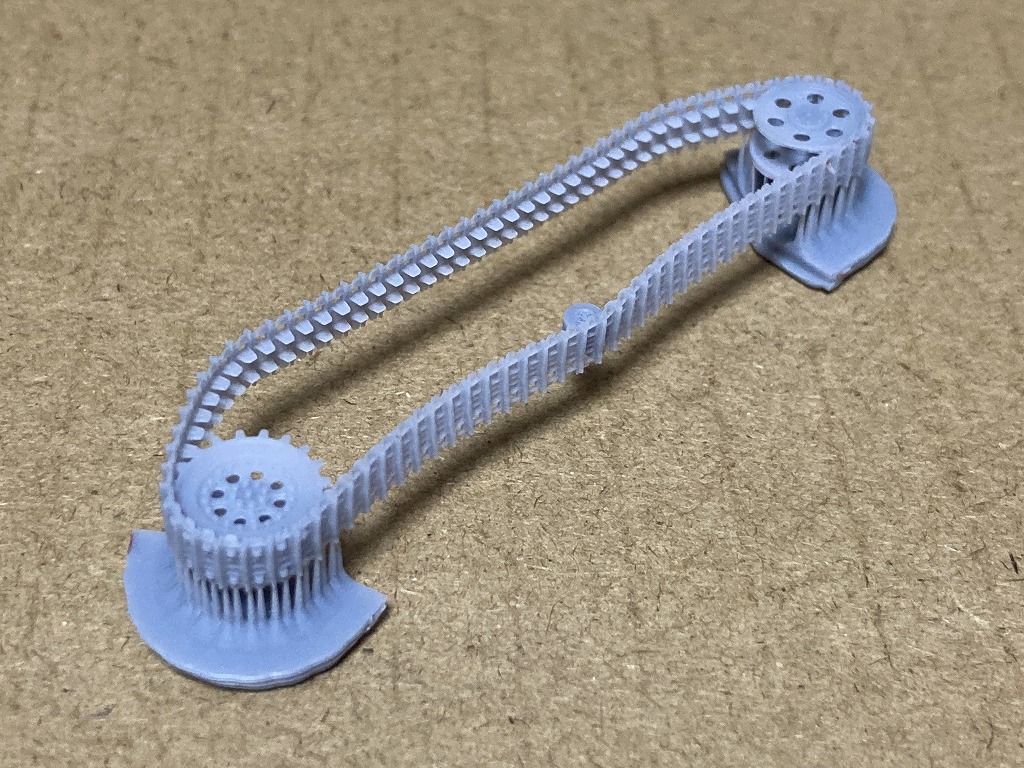
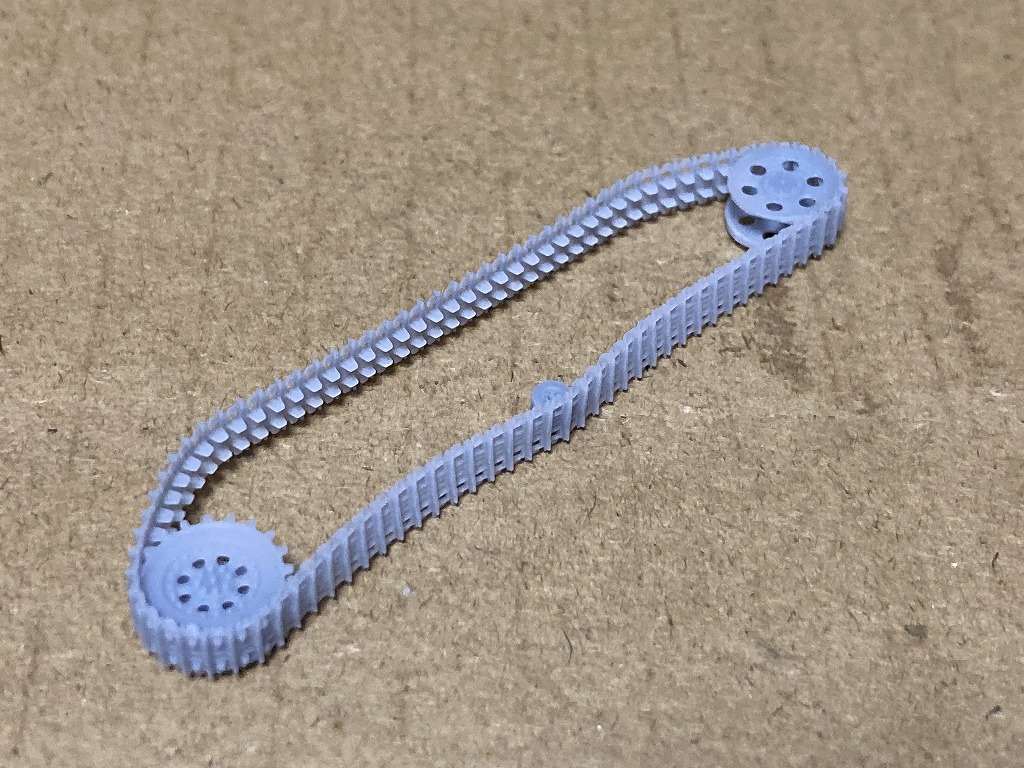
- 履帯の組立てAssembling the Tracks
- 予備履帯の組立てAssembling the Spare Tracks (Upper)
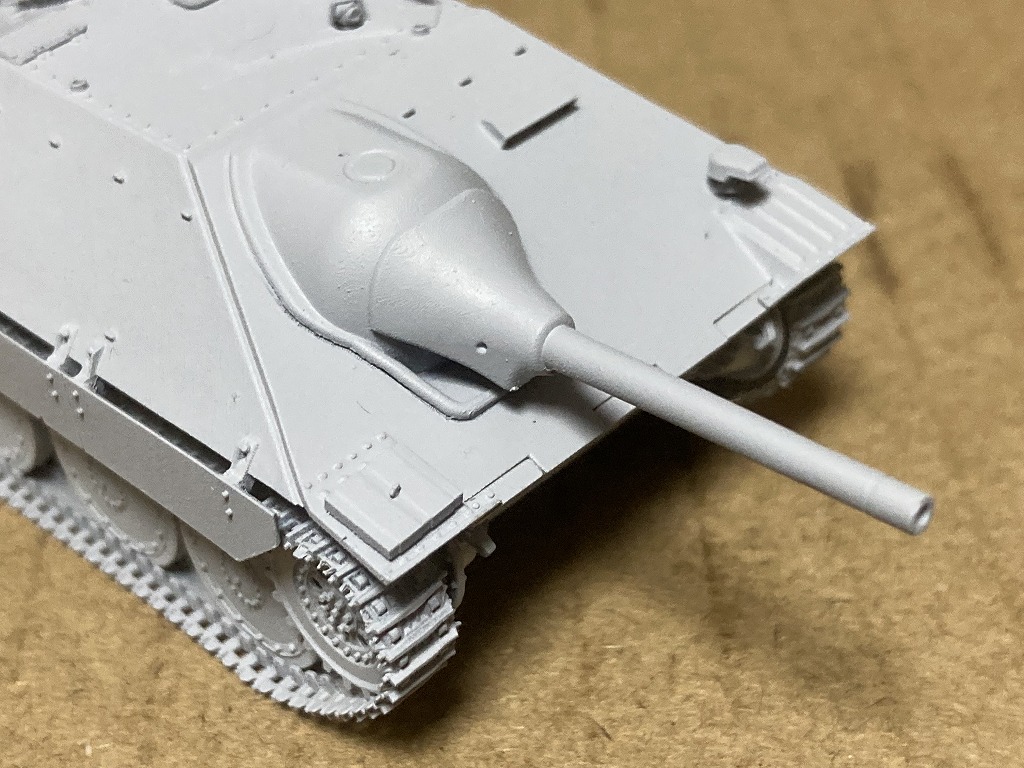
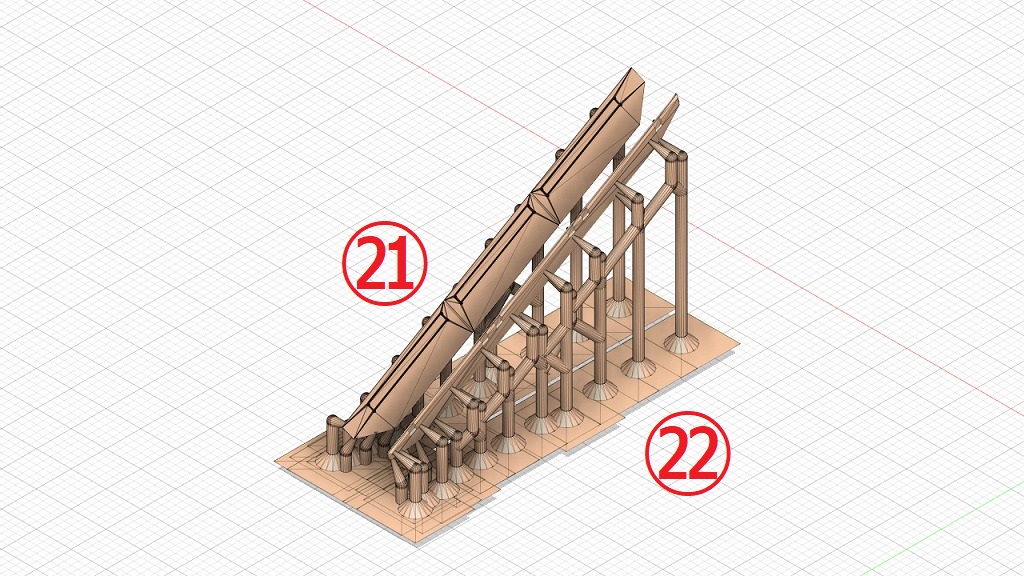
- 主砲の組立てAssembling the Main gun
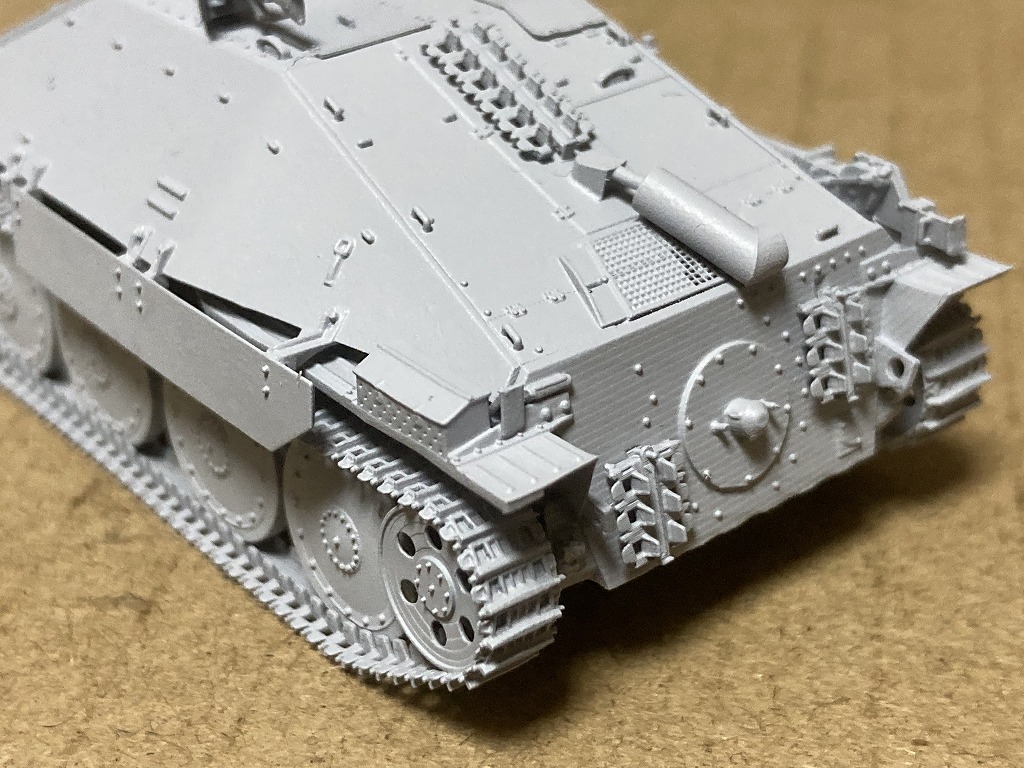
- シェルツェンの組立てAssembling the outside the Side skirt(left) & Side skirt(right)
- ハッチの組立てAssembling the hatches
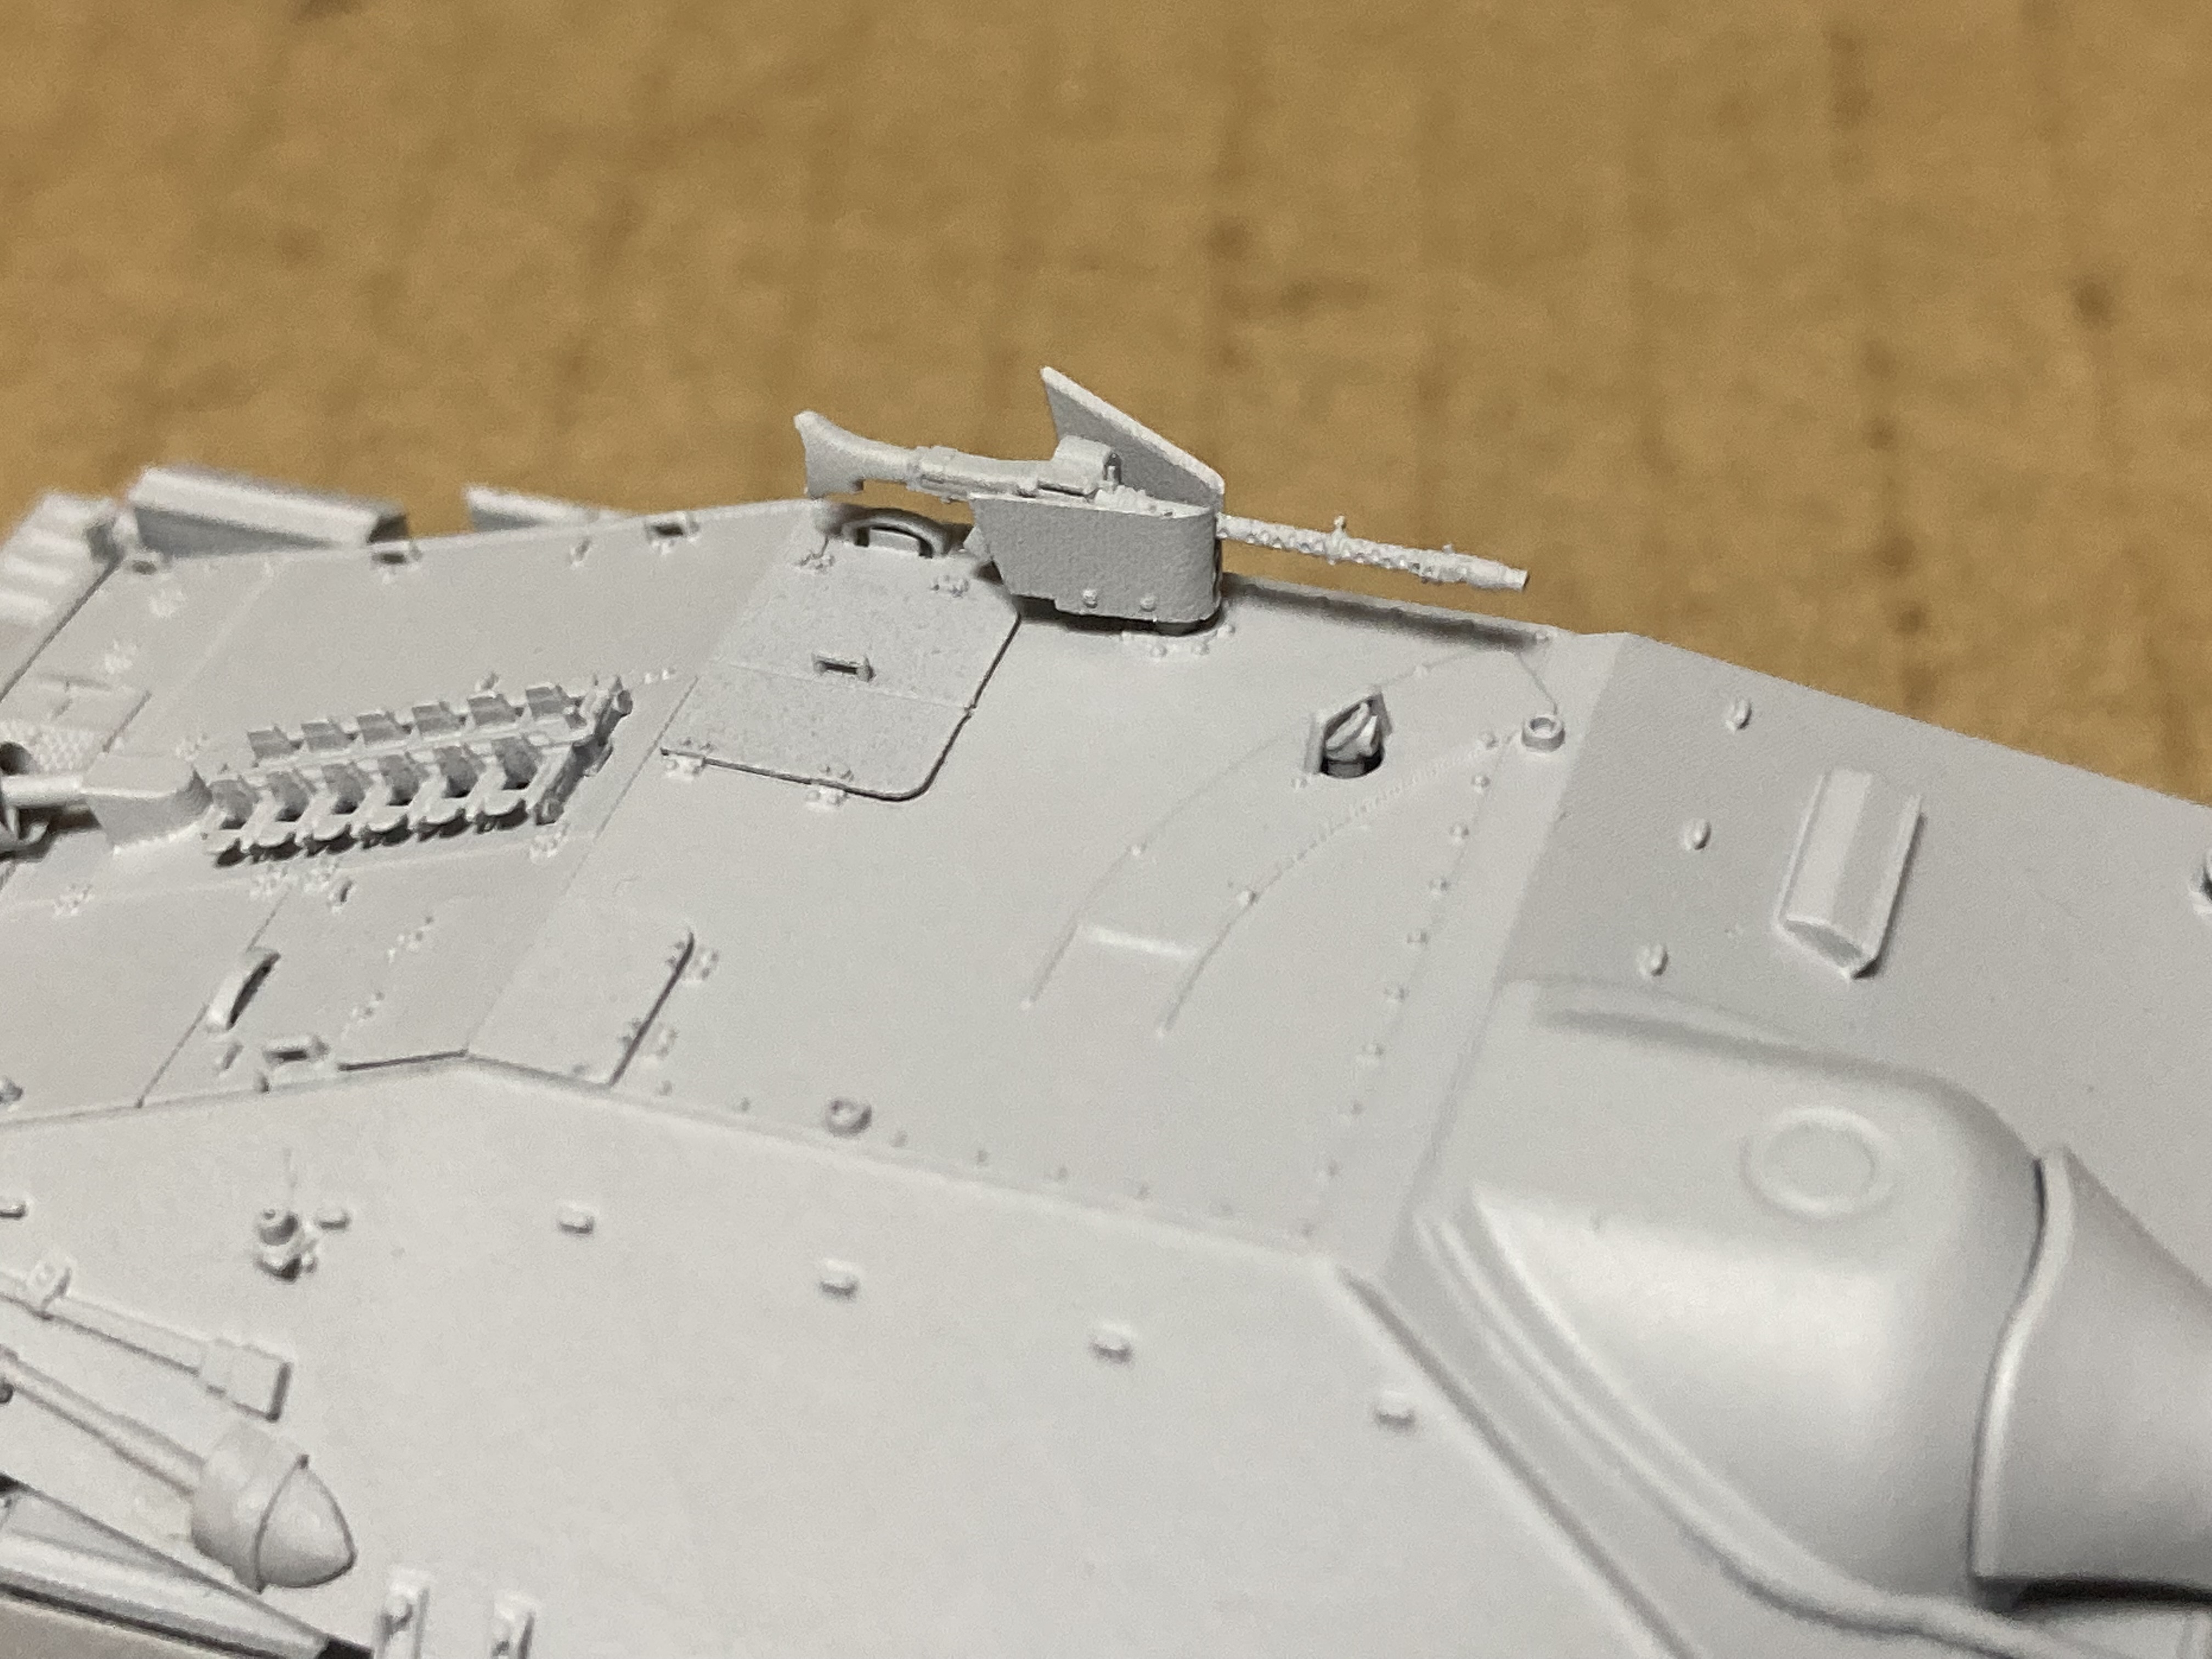
- MG34の組立てAssembling the MG34
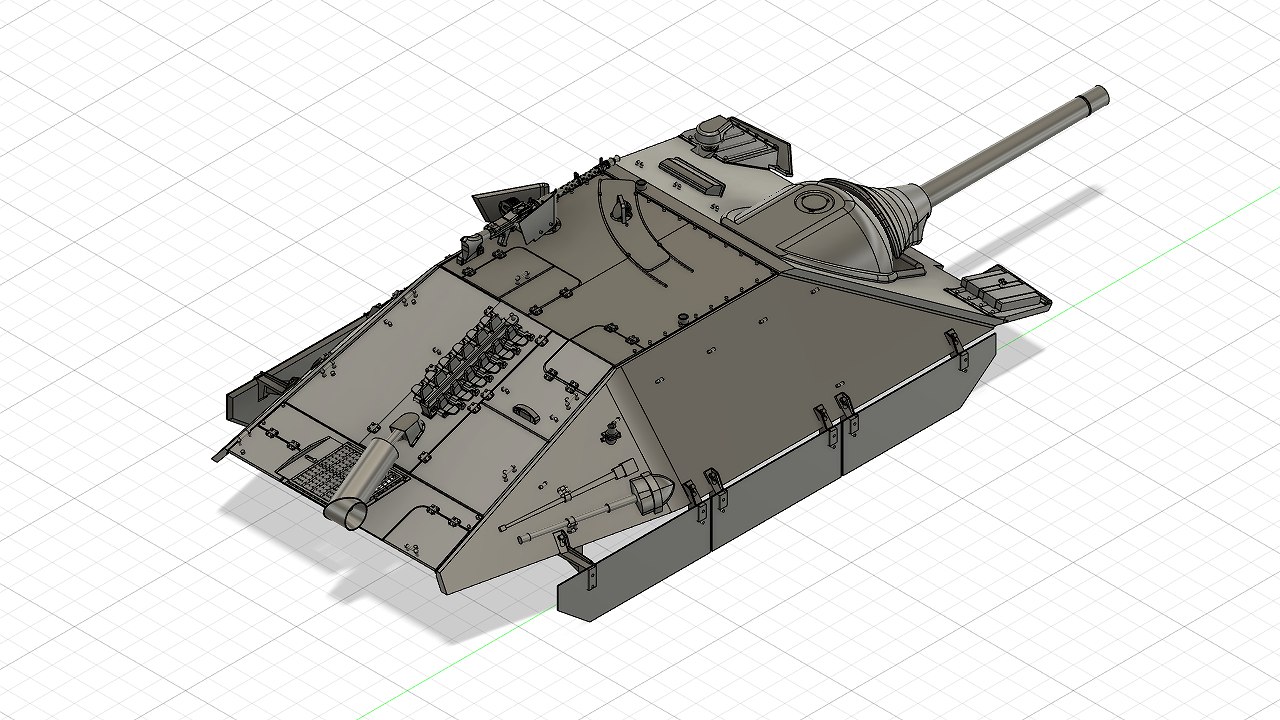
- 戦闘室外部の組立てAssembling the outside the body
- 車体上下の組立て Assembly of upper and lower body
- 組立のポイント Precautions for assembly
- ご購入者による作例 紹介
- 最後に
- 販売サイト
1/72 ヘッツァー ノンインテリアキット(3Dプリンタ)の作り方 How to assemble 1/72 Hetzer Non Interior Kit
本ページは、自作野郎工房の開発した3Dプリンタキット「1/72 ヘッツァー ノンインテリアキット(3Dプリンタ)」について概要をまとめたものです。
本キットはフルインテリアではありません。エンジンやトランスミッション等の内装は一切含まれておらず、その分価格を下げてご提供差し上げております。
フルインテリア版をご要望の方は、「1/72 ヘッツァー フルインテリアキット(3Dプリンタ)」をご購入ください。
1/72 ヘッツァー(Hetzer) フルインテリアキット(3Dプリンタ)の作り方
3Dプリンタキットは市販のプラスチックモデルと異なり、取り扱いに特徴があります。
本キットを完成させるために必要なポイントについて解説致します。本キットはフルキットであり、3Dプリンタキット特有の難しさがあります。本サイトをよく読んで、慎重に組み立てを行ってください。
This page outlines the 3D printer kit "1/72 Hetzer Non Interior Kit (3D Printer)" developed by the self-made bastard studio.
This kit is not a full interior. It does not include the engine, transmission, or any other interior components, which is why we are offering it at a reduced price.
If you require the full interior version, please purchase the "1/72 Hetzer Full Interior Kit (3D Printer)".
How to assemble 1/72 Hetzer Full Interior Kit
Unlike commercially available plastic models, 3D printer kits are unique in handling.
We will explain the points necessary to complete this kit. This kit is a full kit and has difficulties unique to 3D printer kits. Please read this site carefully and assemble the kit carefully.
販売サイト Sales site
ヤフーオークション Yahoo auction
Amamzon Japan
eBay
製品概要 Product Summary
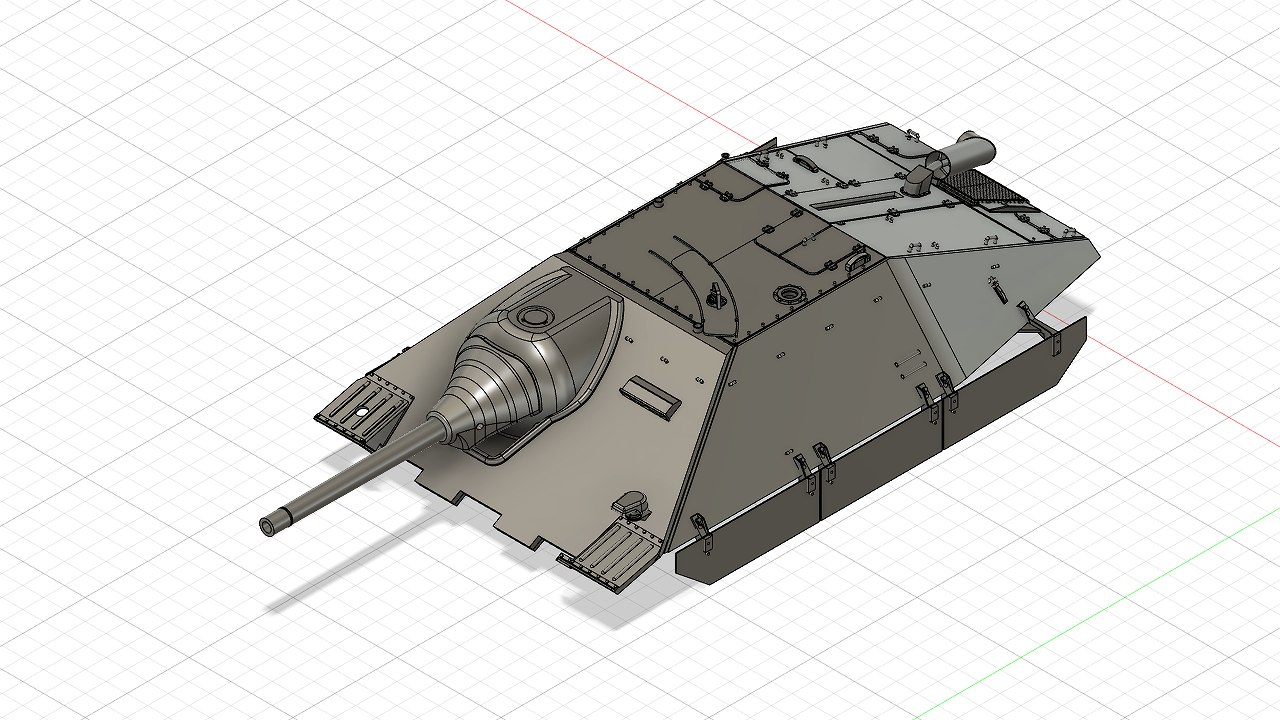
- 1/72スケールのWW2ドイツ軍戦闘車両 ヘッツァーのキットです。インテリアは付属していません。
- 本キットはフルキットです。他社製のベースキットは不要です。
- MG34、履帯などがリアルに再現されています。車体の形状は最新の図面を参照しており形状は比較的正確です。
- 塗装の容易さ、リアルさを追求するためパーツ分割がなされています。
- 本キットは上級者向けです。3Dプリンタキットをすでに作成した経験がある方を対象としています。できる限り、弊社の他製品で3Dプリンタキットに慣れて頂いてから、本キットをご購入されることをお勧めいたします。
- This is a 1/72 scale WW2 German combat vehicle Hetzer kit. Interior is not included.
- This kit is a full kit. No other company's base kit is required.
- The MG34, crawler and other parts are realistically reproduced. The shape of the vehicle body is based on the latest drawings and the shape is relatively accurate.
- Parts are divided for easy painting and realism.
- This kit is intended for advanced users who already have experience with 3D printer kits. If possible, we recommend that you become familiar with our other 3D printer kits before purchasing this kit.
特徴 Features
- 3Dプリンタ初心者の方のために、練習用として小さな部品、壊れやすい部品は計2セット同梱しています(練習用のパーツはサポートが割れている等のB級品が梱包されている場合があります)。
- 底面には3Dプリンタ特有のサポートが多数あるため丁寧な作業が必要です。また、レジンは一般のプラモデルの素材と比較し欠けやすいため、サポートの除去は薄刃ニッパー等で丁寧な除去が必要となります。
- モノクロ8Kの高解像度3Dプリンタに、有名メーカーの水洗いレジンを使用して出力しています。
- 丁寧に専用機材を使用しきちんと2次硬化を行っています。3Dプリンタ製品にありがちなべたつき等はありません。
- For beginners of 3D printers, a total of 2 sets of small parts and fragile parts for practice are included (Practice parts are packed with B-class products such as broken supports. There may be).
- There are many 3D printer-specific supports on the bottom, so careful work is required. In addition, since resin is more easily chipped than general plastic model materials, it is necessary to carefully remove the support with a thin blade nipper or the like.
- A monochrome 8K high-resolution 3D printer is output using a water-washing resin from a well-known manufacturer.
- We carefully use special equipment to perform secondary curing properly. There is no stickiness that is typical of 3D printer products.
注意事項 important points
- このキットに含まれるのは以下の写真にあるパーツです。
- 本キットは3Dプリンタキットであるため、3Dプリンタによる出力で避けられない細かな段差・ゆがみがある程度発生します。その状態は商品写真でご確認ください。
- 塗装されているものは作例です。
- This kit includes the parts shown in the picture below.
- Since this kit is a 3D printer kit, there will be some small steps and distortions that cannot be avoided when outputting with a 3D printer. Please check the product photo for the condition.
- The painted one is an example.
3Dプリンタキットの基礎について
3Dプリンタキットは市販のプラスチックモデルと異なる素材・製法で作成されています。
3Dプリンタキットの特徴や注意事項は以下にまとめてありますので、そちらをご覧ください。
The 3D printer kit is made with a different material and manufacturing method from the commercially available plastic model.
Please refer to the following for the features and precautions of the 3D printer kit.
ポイント1 3Dプリンタキットについて Point 1 About 3D printer kit
ポイント2 パーツの切り出し Point 2 How to cut out parts
パーツ構成 Parts composition
1/72 ヘッツァー ノンインテリアキット [3Dプリンタ出力品]のパーツ構成を解説します。いくつかのパーツは、壊してしまったときのために予備が入っています(梱包ミスではありません)。
I will explain the parts composition of the 1/72 Hetzer Non Interior Kit [3D printer output product]. Some parts have spares in case they break (not a packaging mistake).
1:車体装甲 Armor
2:車体 Body

3:予備履帯(後方) Spare Tracks (Rear)
4:ジャッキ台 Jack base
5:予備履帯(上部) Spare Tracks (Upper)
6:ライト lamp (parts for repair in case of damage)
7:照準器ガード Sighting device guard (repair parts in case of damage)
8:シャベル Shovel
9:MG34架台 MG34 base
10:MG34 MG34
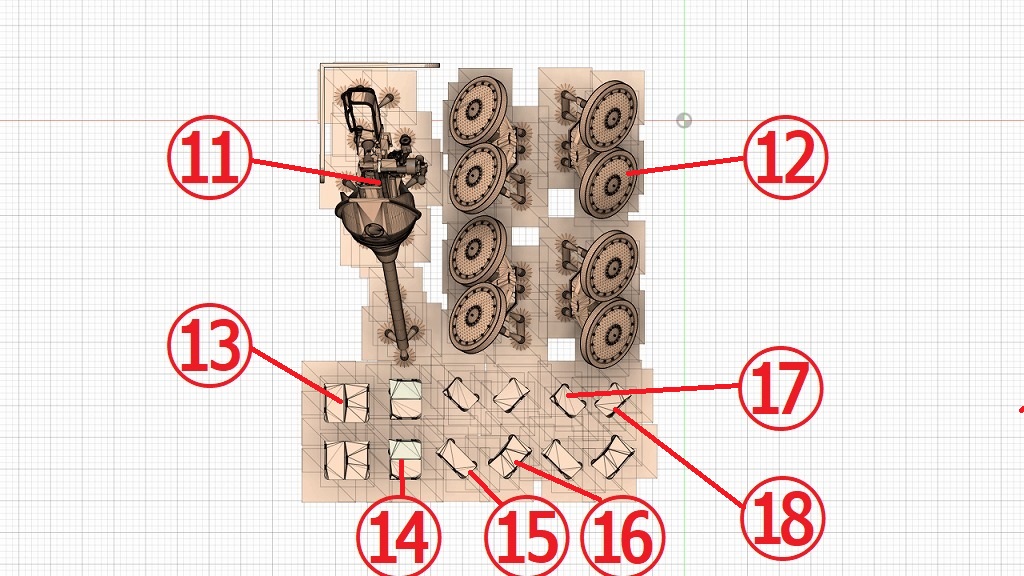
11:主砲 Main gun
12:転輪 wheels
13:搭乗員ハッチ(閉) Crew hatch (closed)
14:車長ハッチ(閉) Commander Hatch (closed)
15:搭乗員ハッチ(開/右) Crew hatch (open/right)
16:搭乗員ハッチ(開/左) Crew hatch (open/left)
17:車長ハッチ(開/前) Commander Hatch (Open/Front)
18:車長ハッチ(開/後) Commander Hatch (Open/Rear)
19:履帯(左) Tracks(leftt)
20:履帯(右) Tracks(right)
21:シェルツェン(左) Side skirt(left)
22:シェルツェン(右) Side skirt(right)
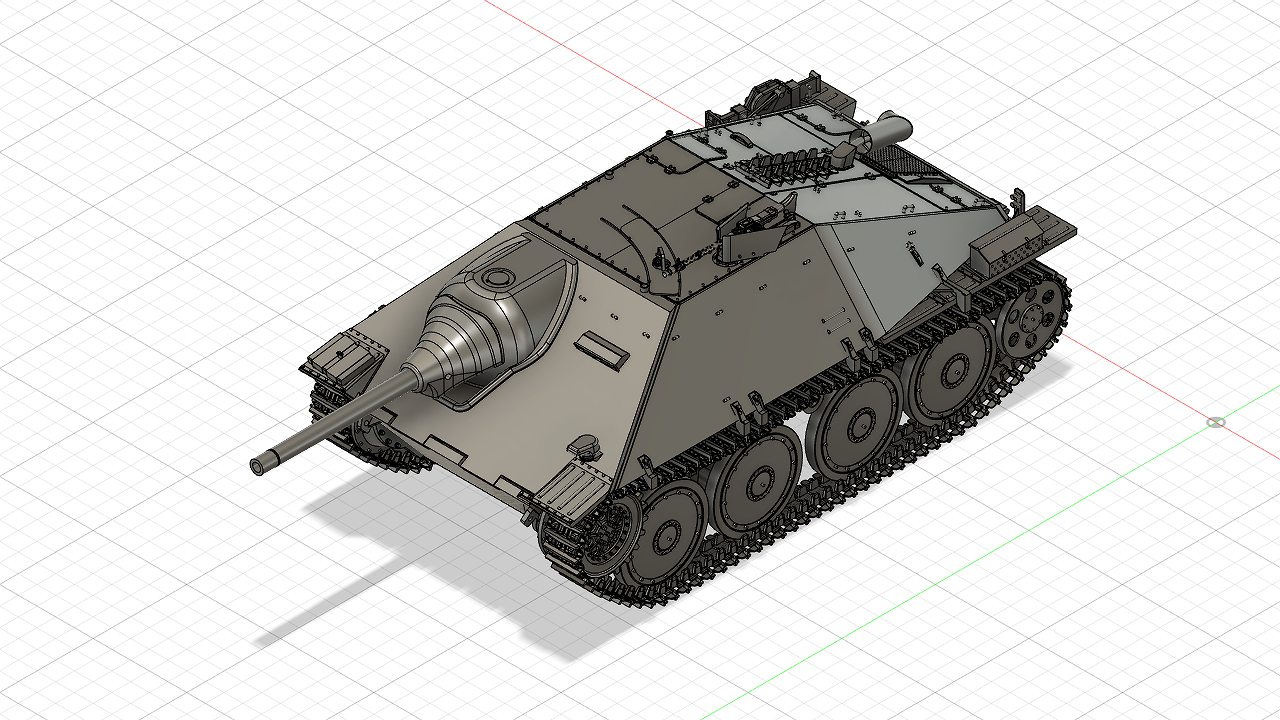
組立(Painting and assembly)
それぞれのパーツを、組み立てる前に全て塗装します。その後、各パーツを組み立てます。
素材がレジンであるため、事前にサフェーサーを塗布することをお勧めします。
Since the material is resin, it is recommended to apply the surfacer in advance.
以下の画像をクリックすると、大きな画像を開くことができます。
You can open a larger image by clicking on the image.
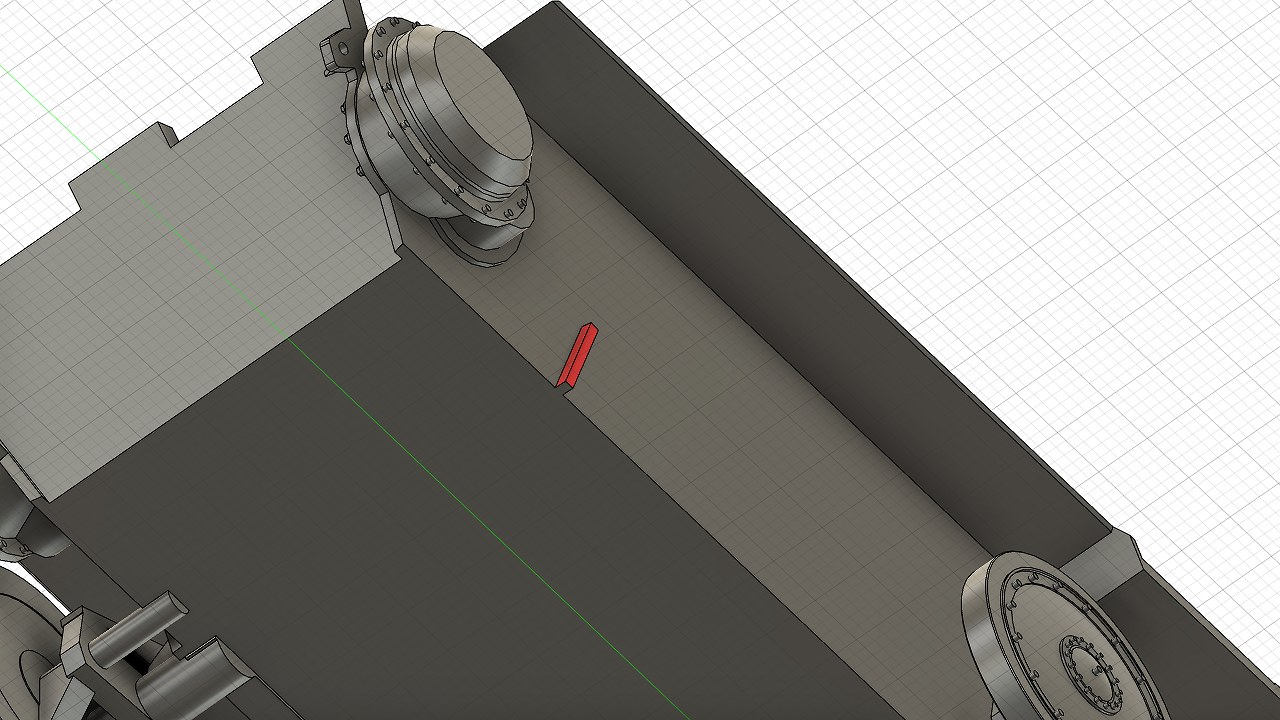
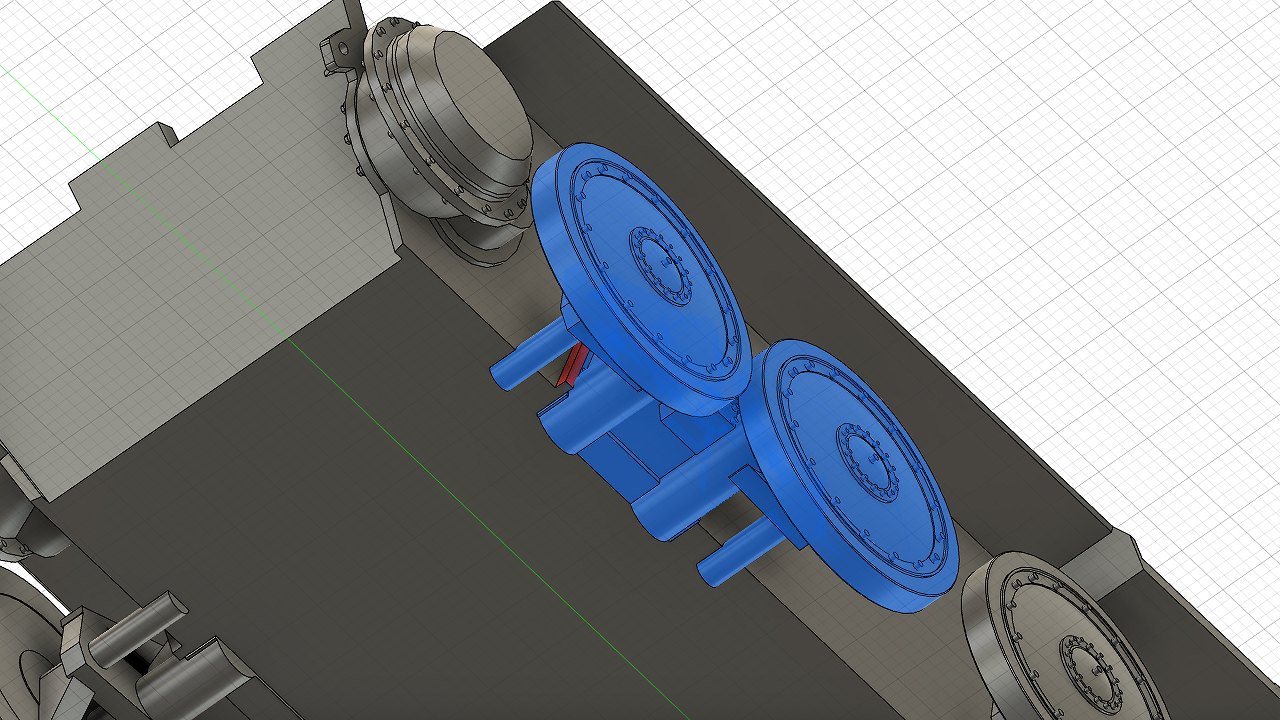
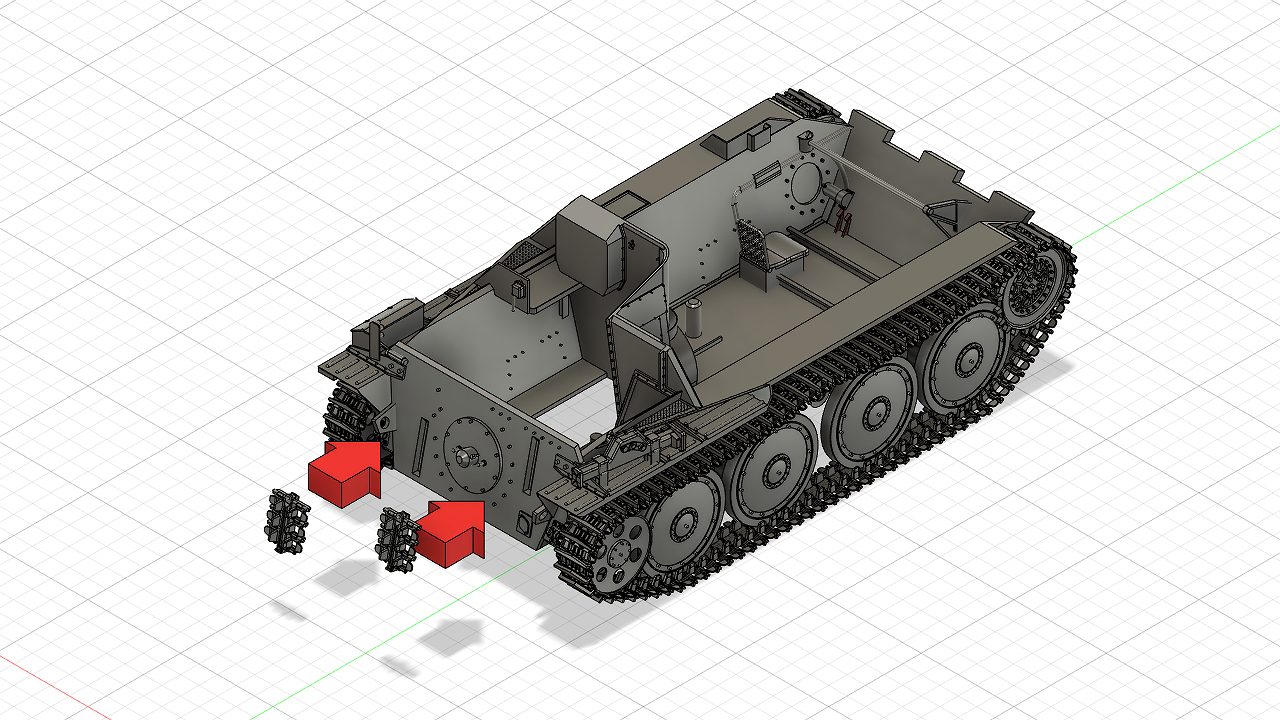
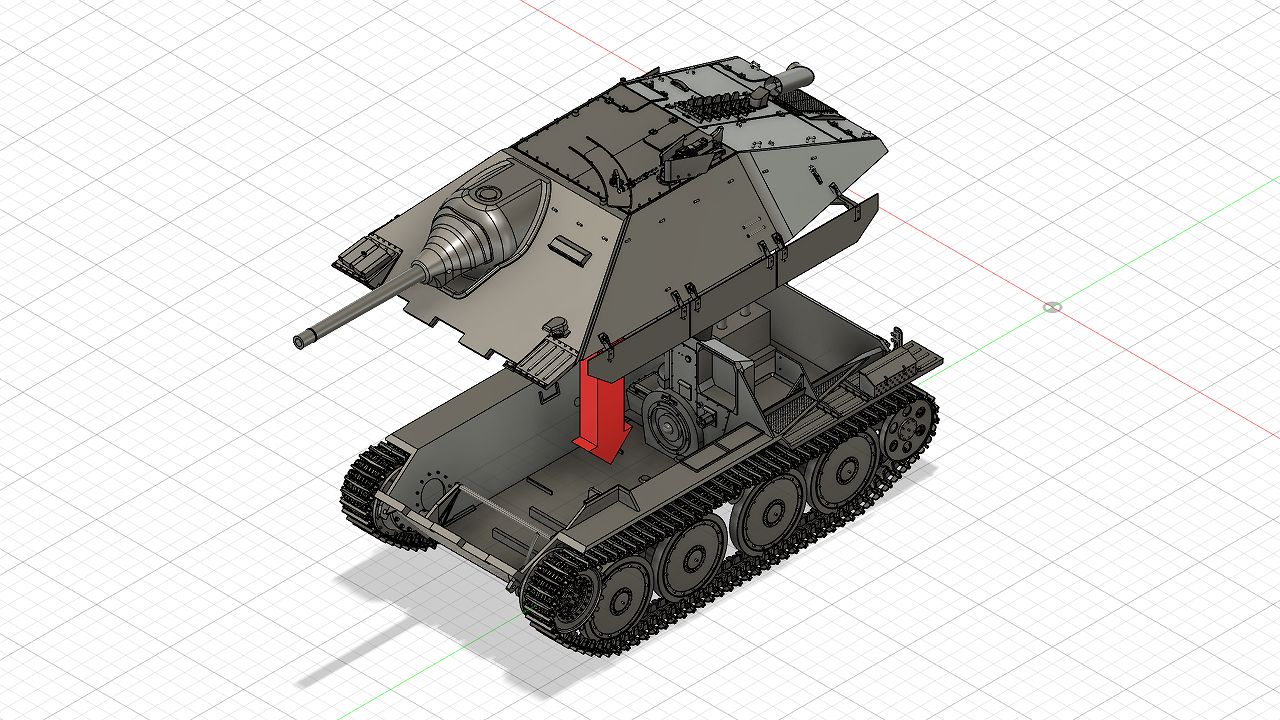
転輪の組立て Assembling the wheels
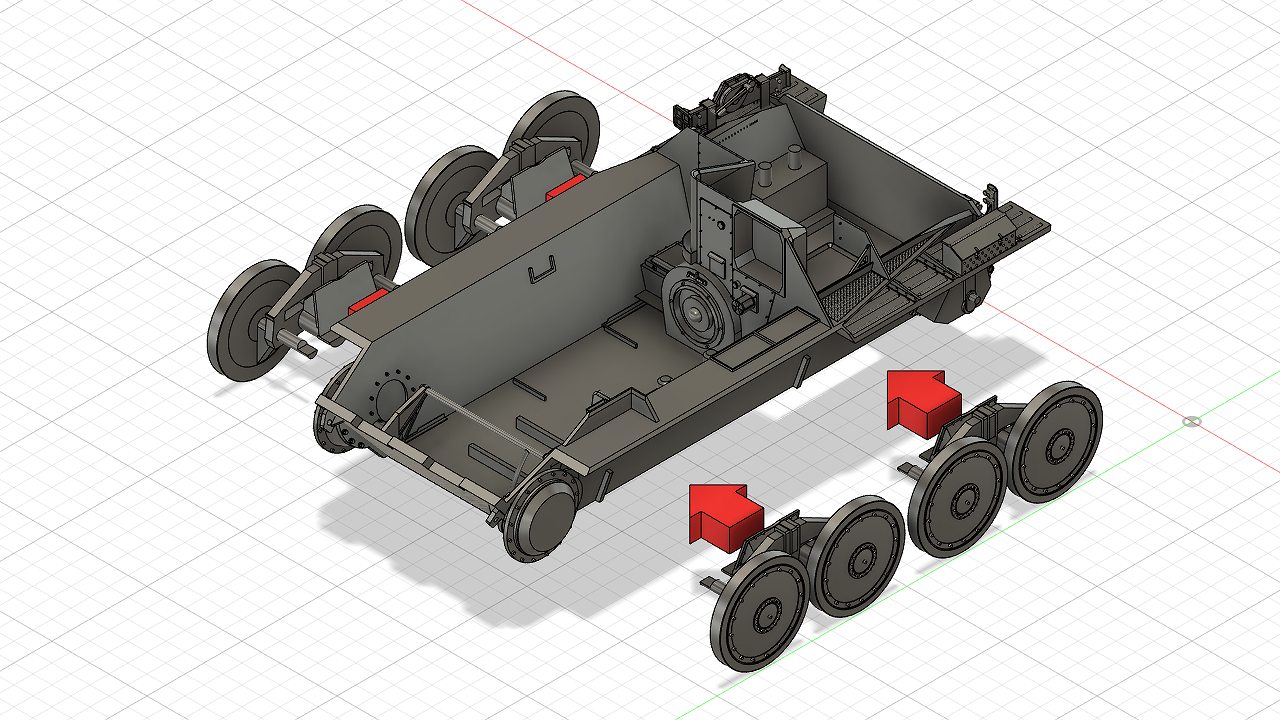
転輪は車体のガイド(赤い部分)に合わせて接着します。The wheels are glued in line with the guides (red part) on the body.
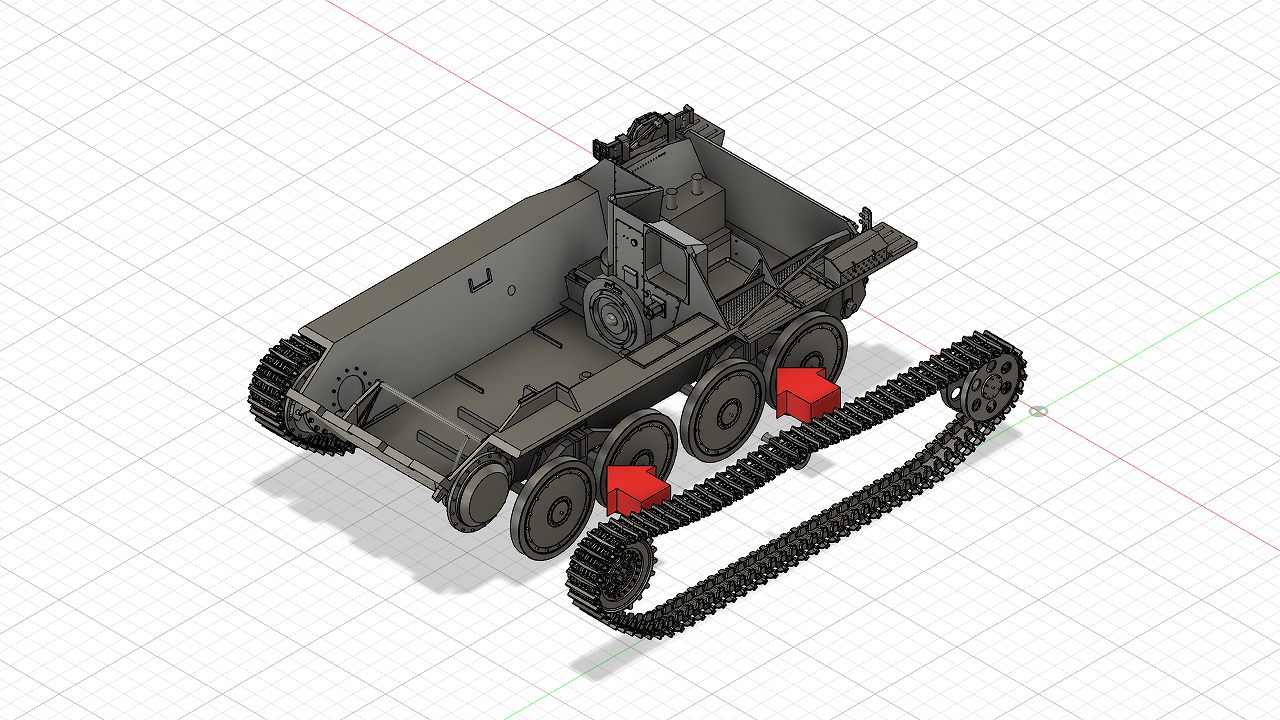
履帯の組立てAssembling the Tracks
予備履帯の組立てAssembling the Spare Tracks (Upper)
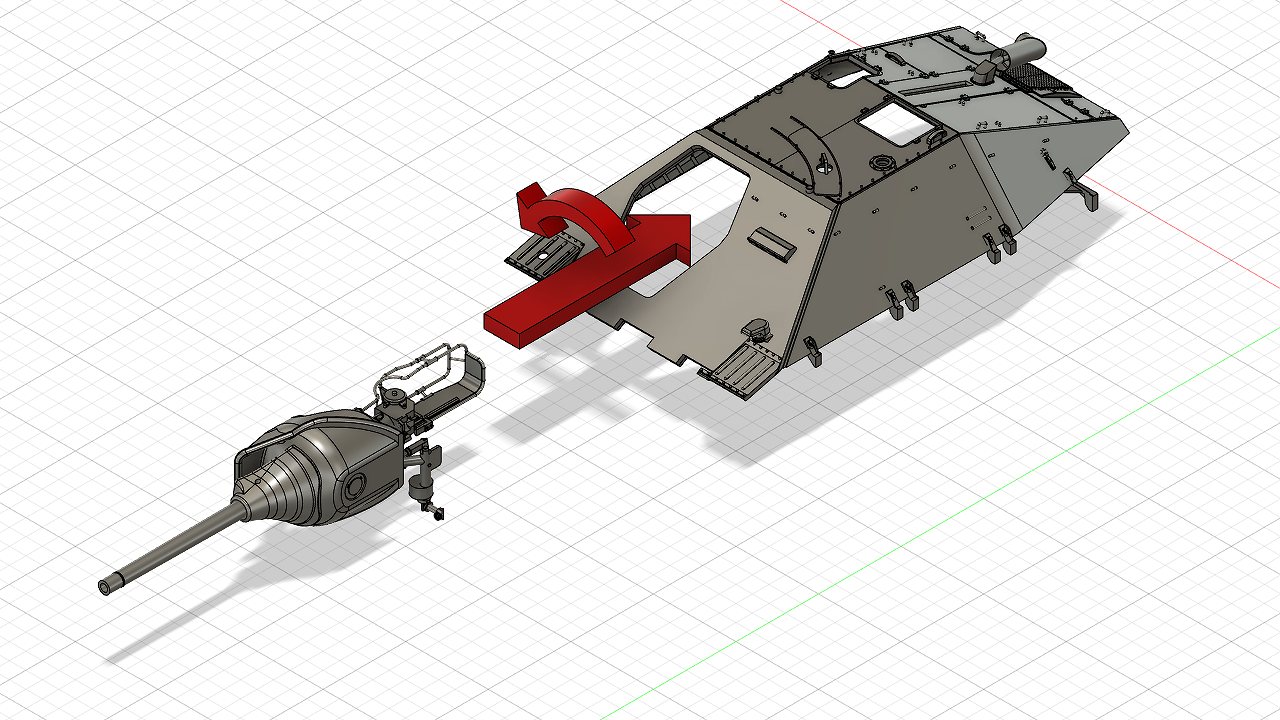
主砲の組立てAssembling the Main gun
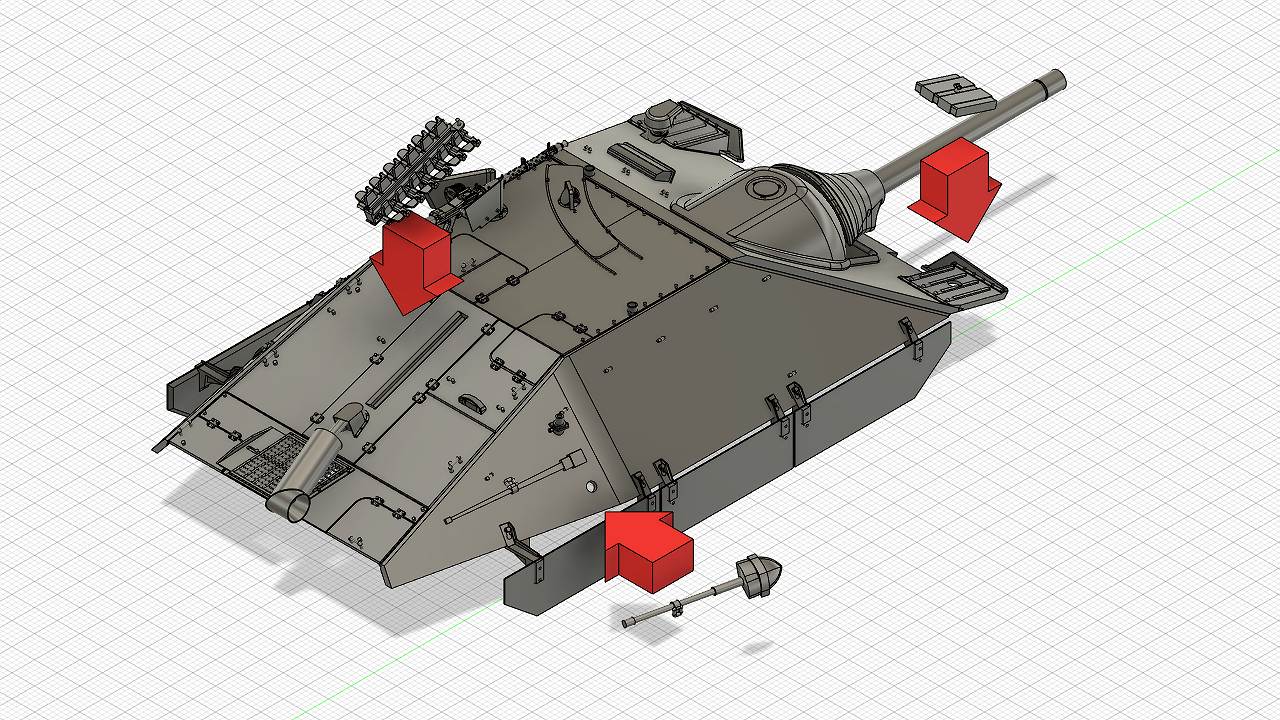
主砲は90度傾けた状態で車体の穴通します。その後主砲を回転させ、照準器を車体の穴に合わせます。破損しやすいので丁寧に作業を行ってください。
The main gun is tilted 90 degrees and passed through the hole in the body. Then rotate the main gun and align the sights with the holes in the body. Please work carefully as it is easily damaged.
シェルツェンの組立てAssembling the outside the Side skirt(left) & Side skirt(right)
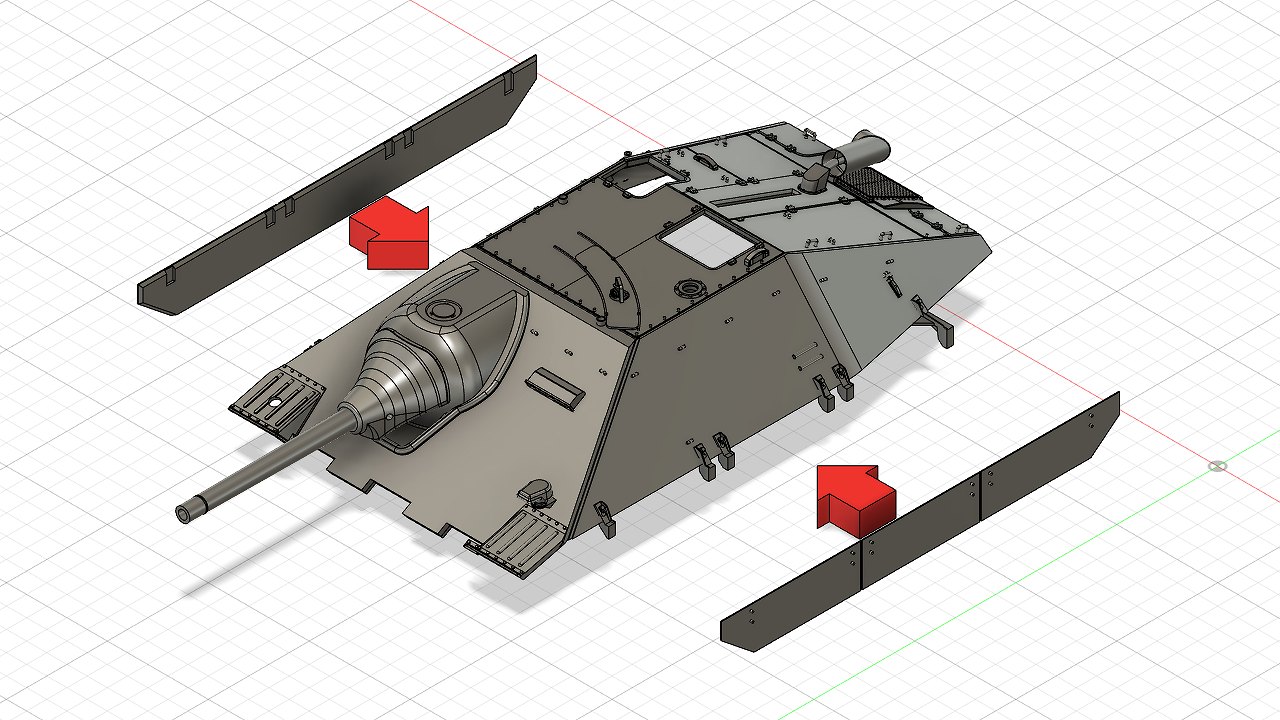

シェルツェンのパーツには前後があります。一番最後の取り付け用の凹みは他の凹みより長いので、それを目印にしてください。
The Side skirt parts have a front and a back. The last mounting recess is longer than the others, so use that as a guide.
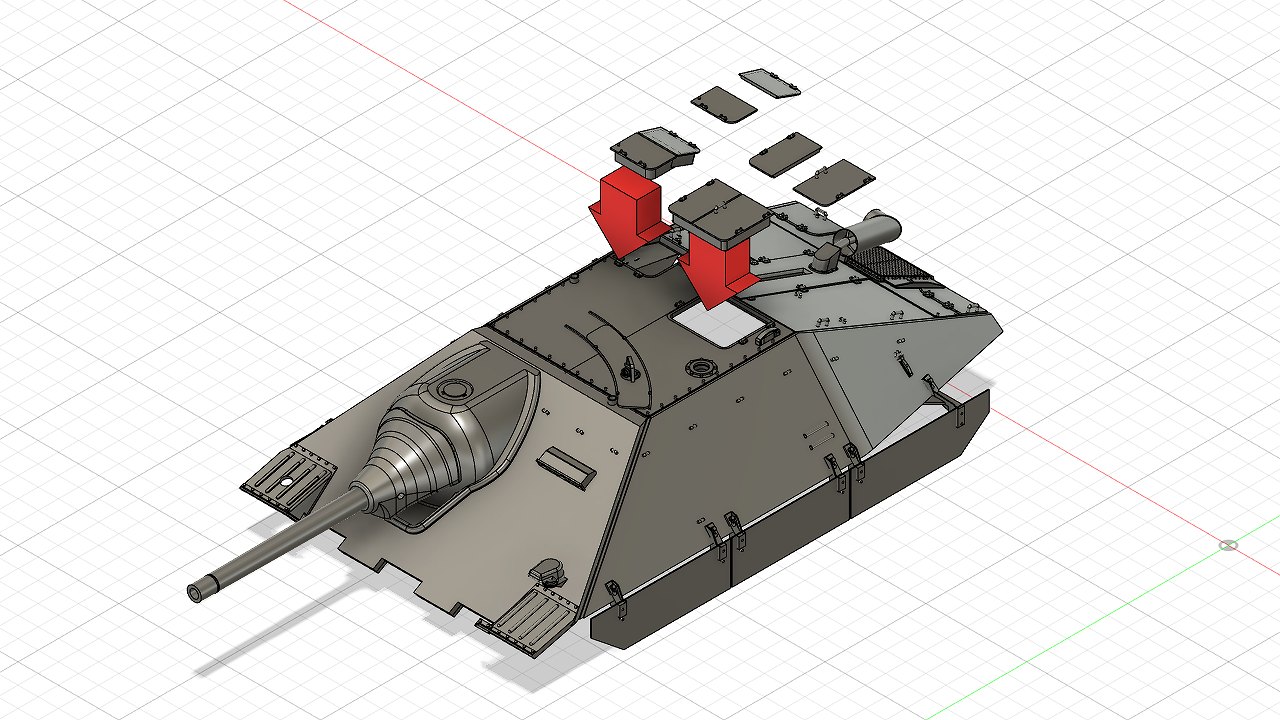
ハッチの組立てAssembling the hatches
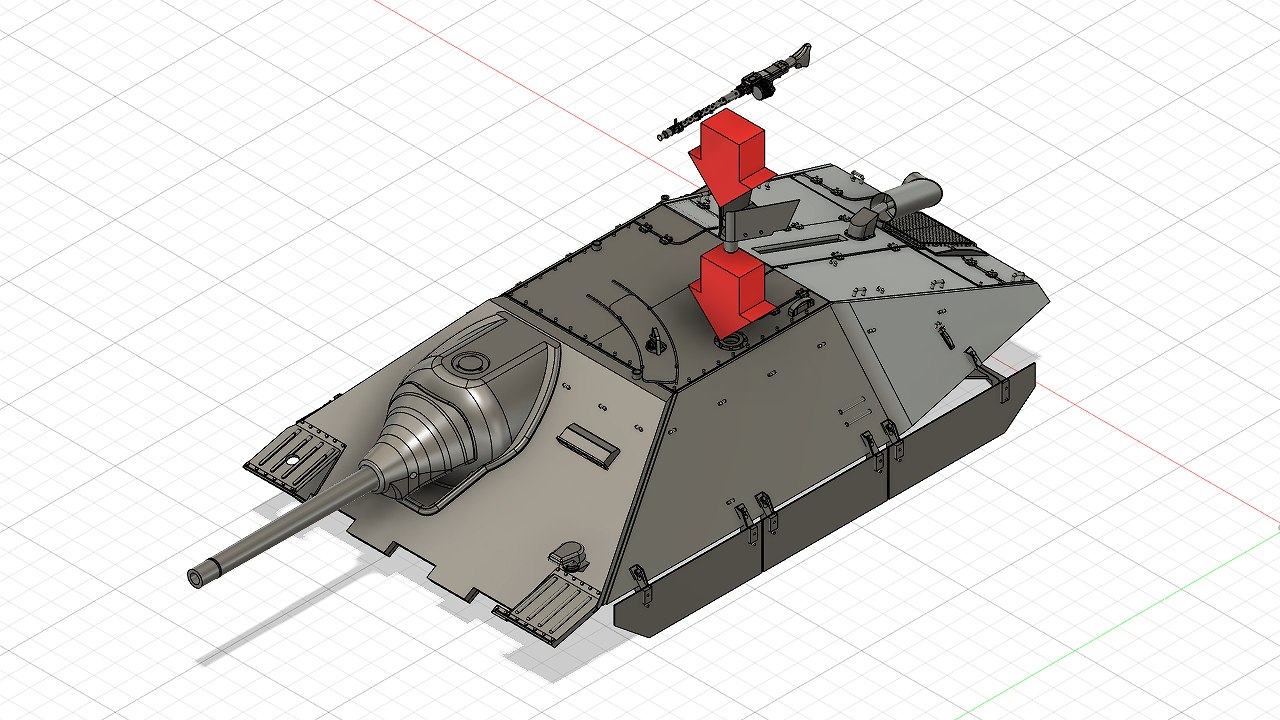
MG34の組立てAssembling the MG34
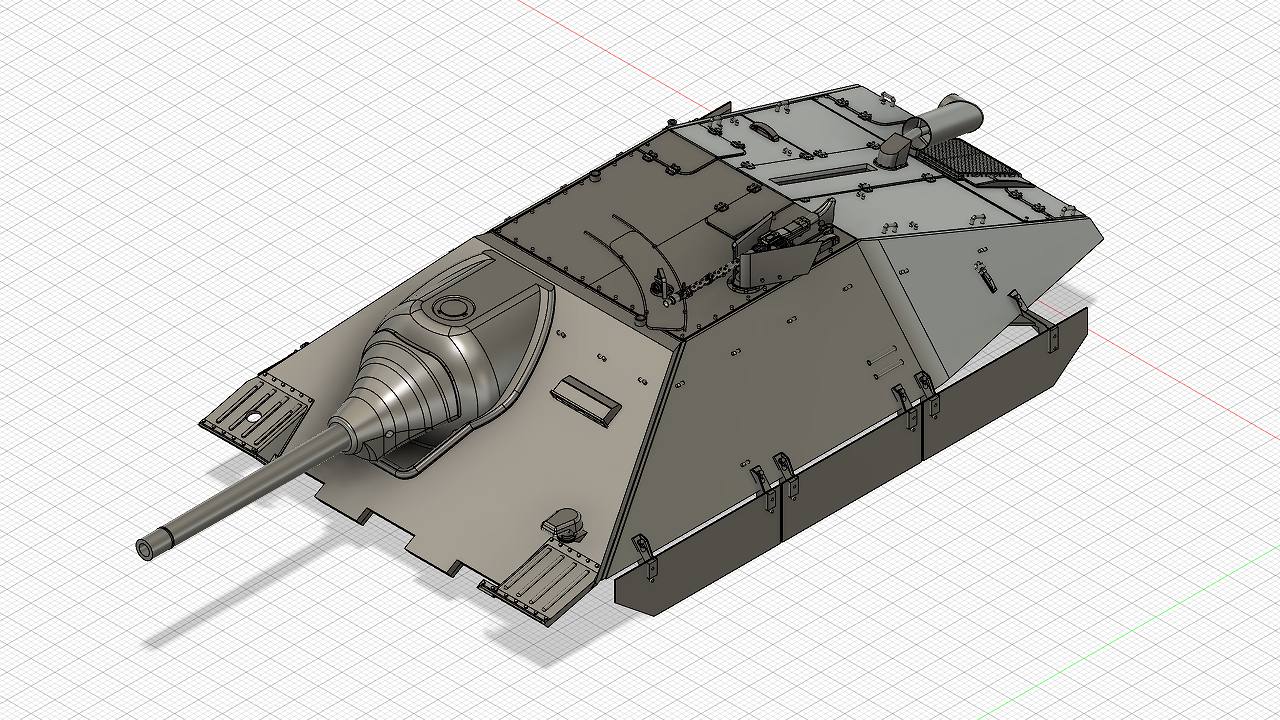
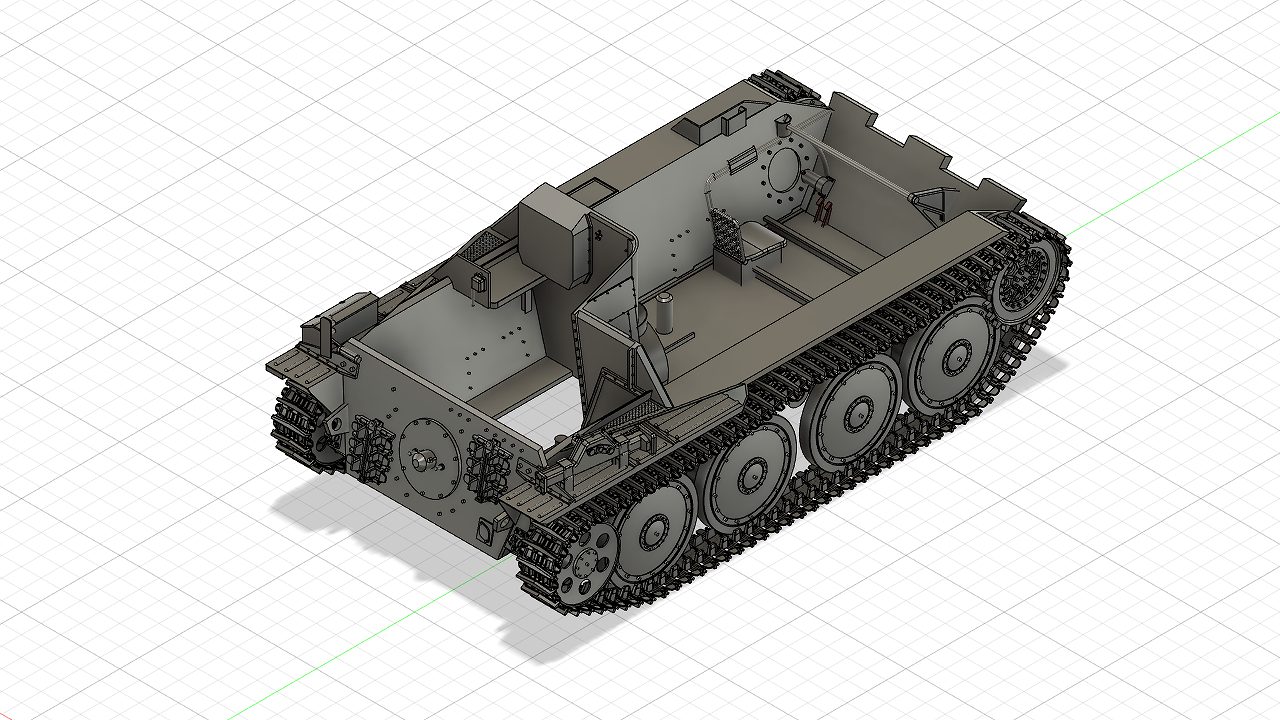
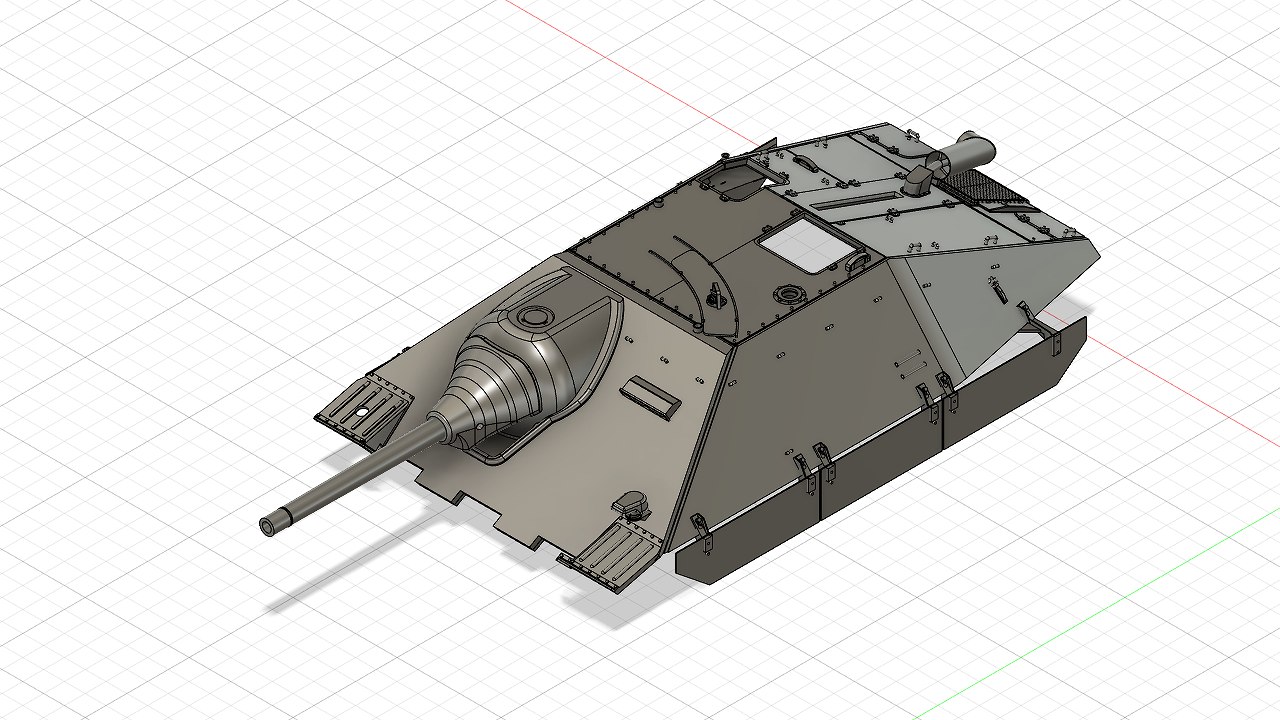
戦闘室外部の組立てAssembling the outside the body
車体上下の組立て Assembly of upper and lower body
車体上部の後端が車体下部のジャッキに当たらないように、斜めに差し込みます。接着はしません。
Insert at an angle so that the rear end of the top of the car body does not hit the jack at the bottom of the car body. No adhesion.
組立のポイント Precautions for assembly
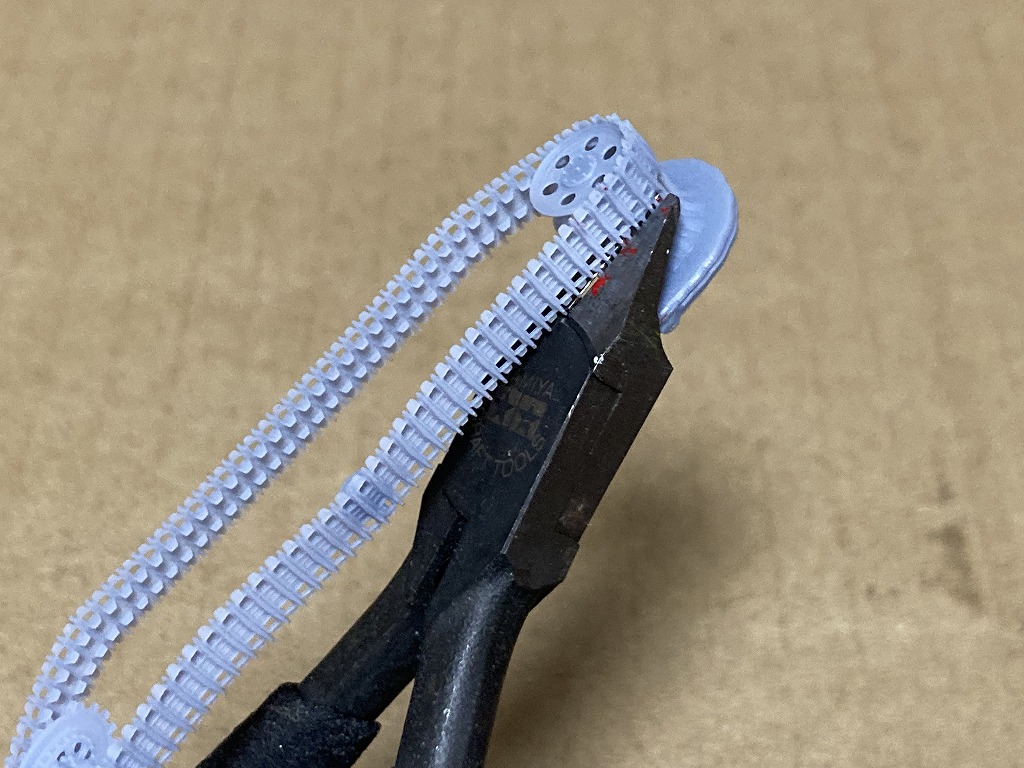
履帯のサポートの除去方法 Track support removal method
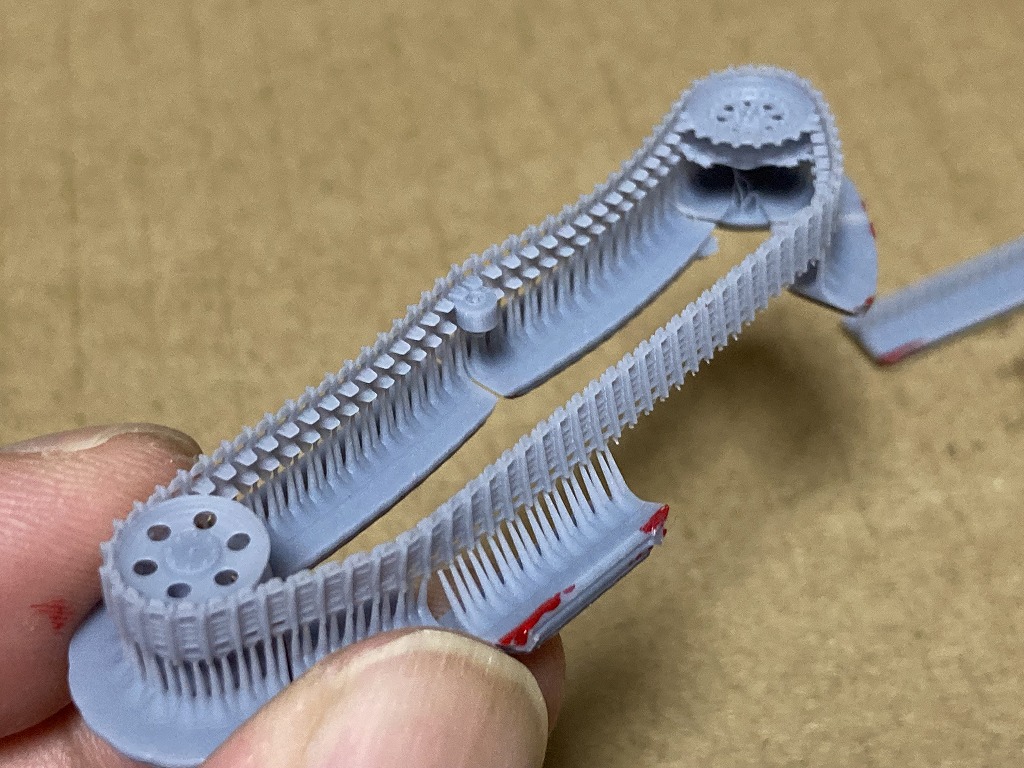
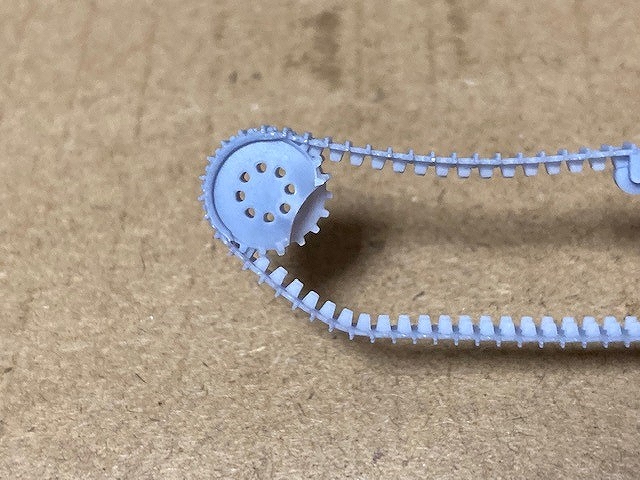
ヘッツァーは履帯が細いため、1/72に縮小した本キットにおいてとても破損しやすいパーツです。サポートを除去するためにはコツが必要です。
The Hetzer has thin tracks, which are easily damaged in this kit, which has been scaled down to 1/72. There is a trick to removing supports.
履帯パーツの赤い部分を、ニッパーで切り取ります。
Cut off the red part of the track part with a side cutter.
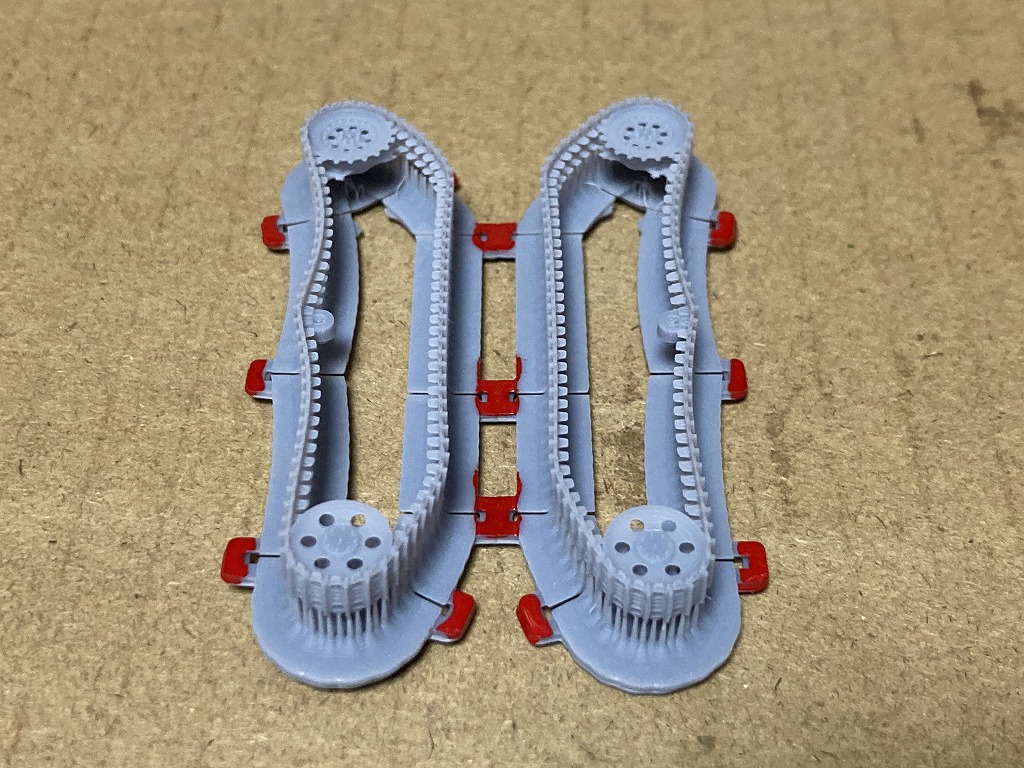
直線部分のサポートを折り曲げるようにしながら履帯から取り外します。工具は使用しません。
Bend the support on the straight part and remove it from the track. No tools are used.
曲線部分のサポートは、ニッパーで切り取ります。
Cut out curved supports with side cutters.
これで履帯のサポートは除去できました。履帯はとても破損しやすいので、細心の注意を払ってください。
The track support has now been removed. The tracks are very fragile, so be very careful.
なお、起動輪の裏側は一部欠けている箇所がありますが、これは製品不良ではありません。
Note that there is a partially chipped area on the back side of the drive wheel, but this is not a product defect.
履帯の取り付け方法 Tracks Attachment Method
ヘッツァーは履帯が細いため、1/72に縮小した本キットにおいてとても破損しやすいパーツです。また、転輪と遊動輪、起動輪が重なっているため取り付けにはコツが必要です。
The Hetzer has thin tracks, which are easily damaged in this kit, which has been scaled down to 1/72. Also, the rolling wheels, the idler wheels, and the drive wheels overlap each other, so it is necessary to have a knack for attaching them.
履帯を最も後ろの転輪に合わせます。
Align the tracks with the rearmost rolling wheel.
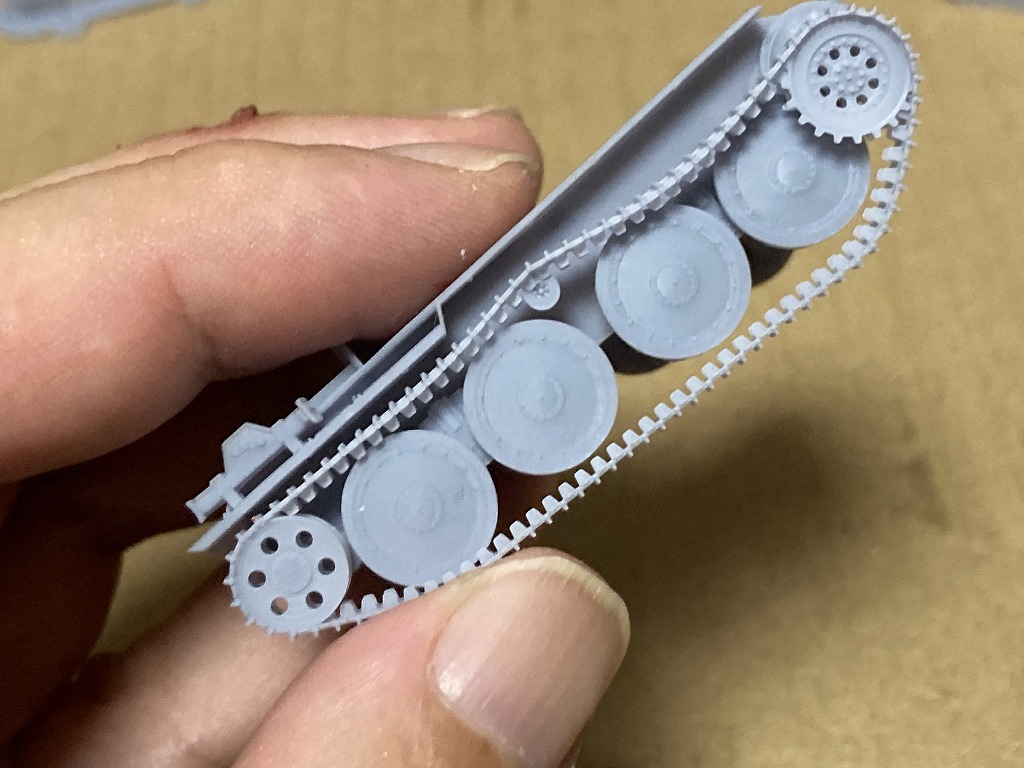
遊動輪を前に移動させながら、遊動輪の間に最も後ろの転輪を差し込みます。上部転輪が、2番目の転輪と3番目の転輪のちょうど中央になるように位置を調整します。
Insert the rear-most rolling wheel between the idler wheels while moving the play wheels forward. Adjust the position so that the upper rolling wheel is exactly centered between the second and third rolling wheels.
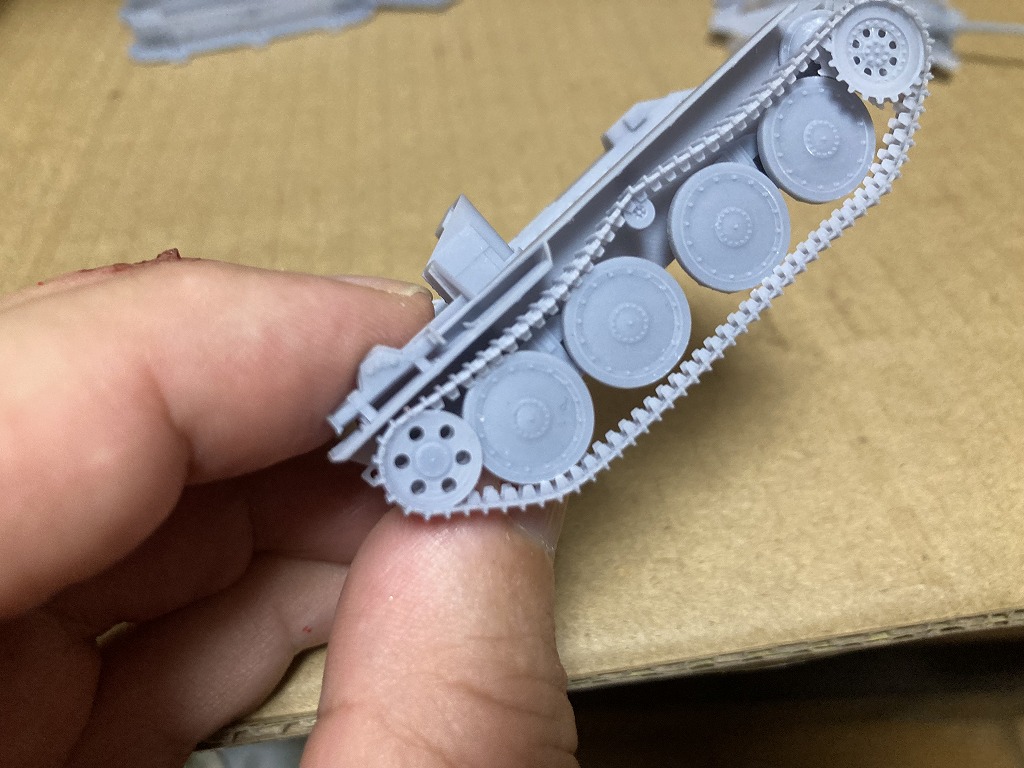
最も前の転輪に履帯を合わせます。
Align the tracks with the forward-most rolling element.
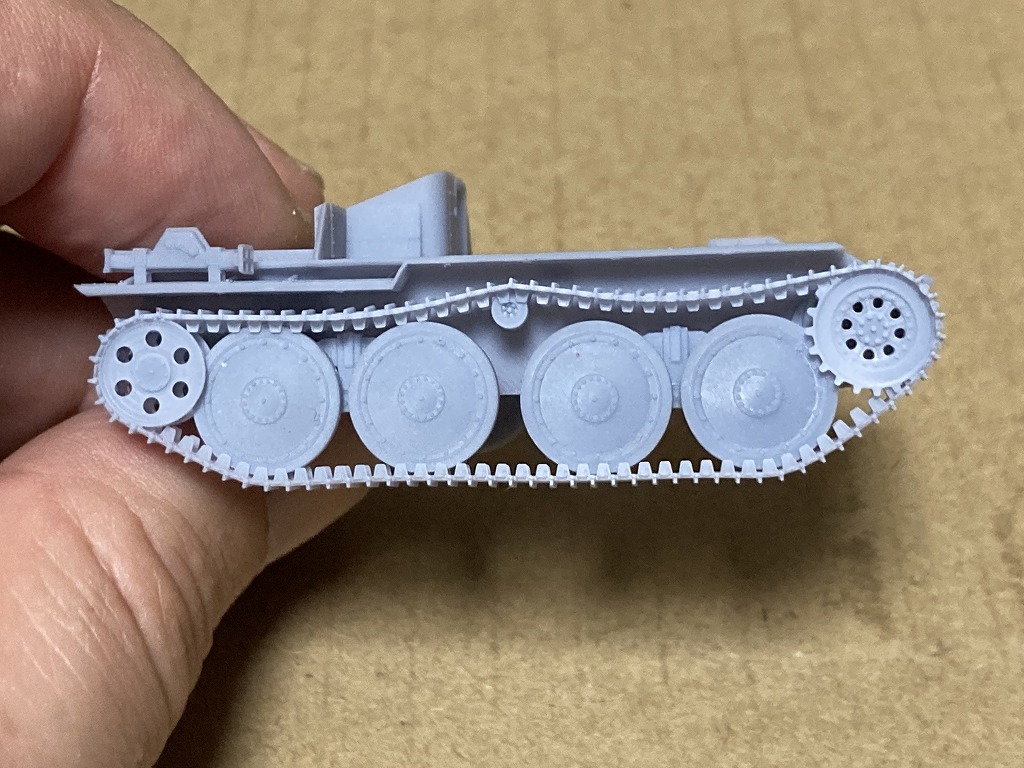
最後に接着をしてもよいですし、そのまま接着をしなくても構いません(接着しないことをお勧めします)。
You may glue them together at the end, or leave them unglued (we recommend not gluing them together).
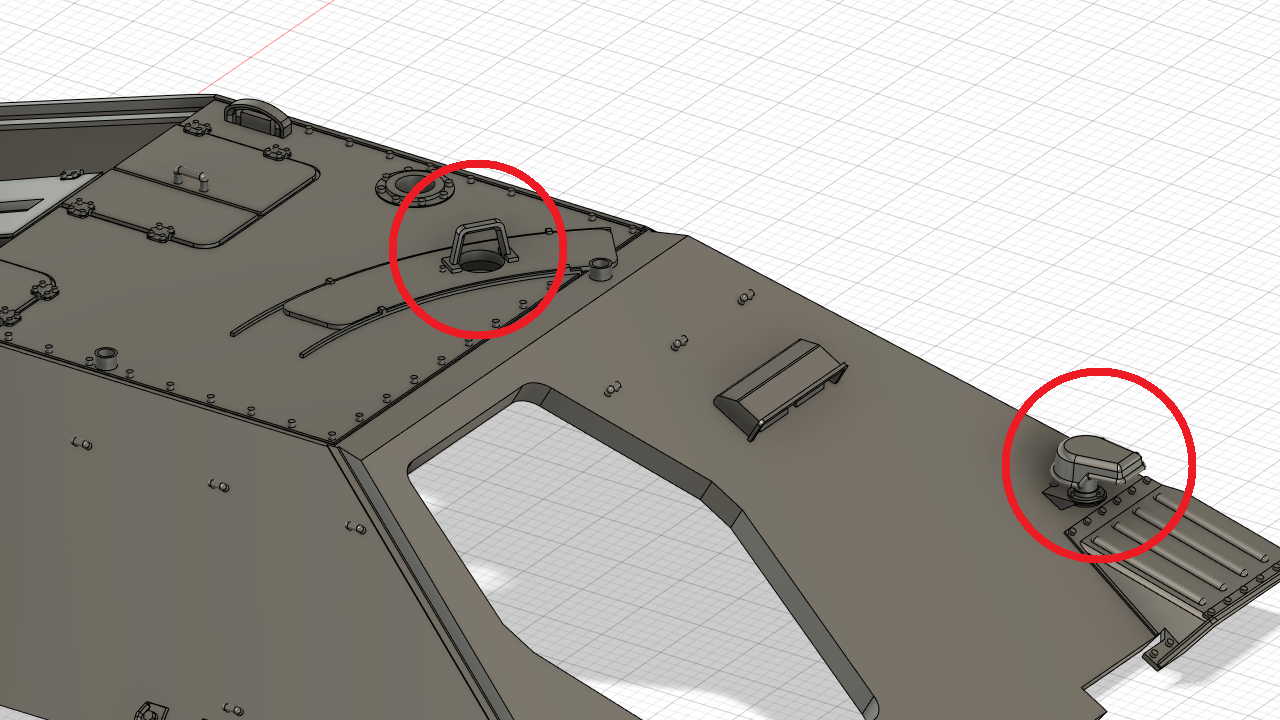
リペアパーツについて About Repair Parts
「1:車体装甲」には、破損しやすい部分があります。それは
- ライト
- 照準器ガード
です。(図の赤丸部分)
もし、組立中にこれらを破損してしまったら、破損個所を切り取り、以下のパーツを使用して修復してください。
- 6:ライト
- 7:照準器ガード
"1: Body armor" has a part that is prone to breakage. It is
- lamp
- Sighting device guard
(red circled part in the figure)
If any of these are damaged during assembly, cut out the damaged part and repair it using the following parts.
- 6:lamp (parts for repair in case of damage)
- 7:Sighting device guard (repair parts in case of damage)
ご購入者による作例 紹介
G-CARさん
G-CAR様の作品をご紹介いたします!
このヘッツァーも素晴らしい塗装と追加加工で仕上げていらっしゃいますが、その他作品も素晴らしいものばかりです!ぜひご覧ください。
1/72 ヘッツァー 後期型 - 戦車・軍用車両 - プラモデル - G-CARさんの写真 - 模型が楽しくなるホビー通販サイト【ホビコム】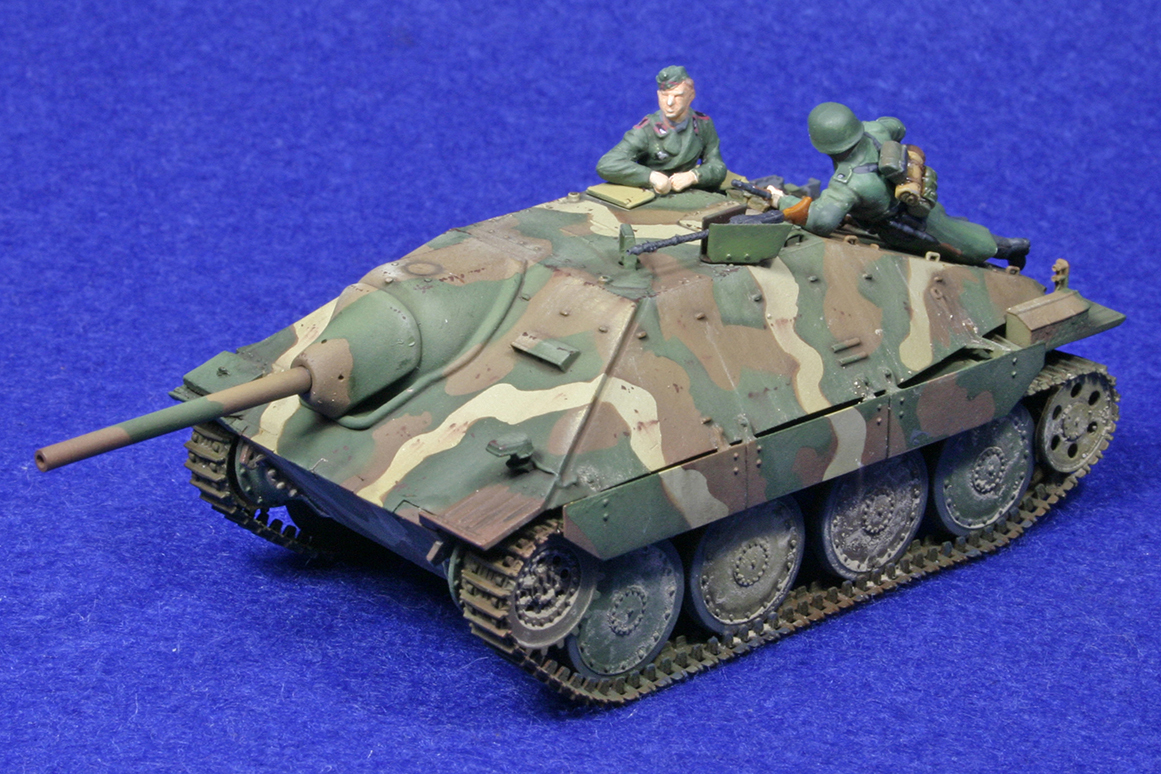
最後に

以上で自作野郎工房の開発した3Dプリンタキット「1/72 ヘッツァー ノンインテリアキット[3Dプリンタ出力品]」について概要の説明を終わります。
弊社としては2つめのフルキットとなります。引き続き、1/72のドイツ戦車を中心にフルインテリアキットを開発してまいります。
ぜひ、市販のプラスチックモデルにはないディープな世界をお手に取ってご確認ください。