1/72 パンター系後期履帯-分割型(スプロケットセット)[3Dプリンタ出力品]の作り方 How to assemble 1/72 Panther late type separate track Links & Drive wheels ,Idler wheels Set
本ページは、自作野郎工房の開発した3Dプリンタキット「1/72 パンター系後期履帯-分離型(スプロケットセット)[3Dプリンタ出力品]」について概要をまとめたものです。
This page is a summary of the 3D printer kit "1/72 Panther late type separate track Links & Drive wheels, Idler wheels Set" developed by the self-made bastard studio.
3Dプリンタキットは市販のプラスチックモデルと異なり、取り扱いに特徴があります。本キットを完成させるために必要なポイントについて解説致します。まず注意事項です。
Unlike commercially available plastic models, 3D printer kits are unique in their handling.I will explain the points necessary to complete this kit. First of all, there are notes.
- このキットはかなりのマニア、上級者向けです。決して組立難易度は高くはありませんが、かなりの集中力、根気を要求されます。
- 慣れれば片側で1時間程度、初めてでも数時間の組立時間を必要とします。
- 全てのパーツをかなり多めに梱包していますので必要以上に恐れる必要はありませんが、上記ご理解いただけた方のみのご購入をお願いいたします。
- This kit is for quite enthusiasts and advanced users. It is not difficult to assemble, but it requires a lot of concentration and patience.
- If you get used to it, it will take about 1 hour on one side, and even for the first time, it will take several hours to assemble.
- All parts are packed in a large amount, so you don't have to be afraid more than necessary, but please purchase only those who understand the above.
販売サイト You can buy from this links
ヤフーオークション
Amamzon
eBay
製品概要 Product Summary
- 1/72スケールのWW2ドイツ軍戦闘車両 パンター系列車両の後期型に適合する、履帯と起動輪、遊動輪のアップグレードキットです。
- 「ドラゴン 1/72 第二次世界大戦 ドイツ軍 Sd.Kfz.171 パンターG 後期型 プラモデル DR7206」に対応することを確認しています。他のキットに関しても、起動輪・遊動輪の取り付けさえできれば組み合わせることは可能です。
- 履帯のすべり止め、肉抜き穴を際限しています。起動輪、遊動輪も実物の写真をもとに精密に再現しています。
- 1枚単位のバラ履帯が182ピース、25枚連結履帯が6ピース含まれています。1台のパンターで必要な履帯枚数は164枚~166枚ですので、スペア履帯を含めて十分な枚数が含まれています。
- 履帯ピンには0.2mmの真鍮線等が必要です。これはキットには含まれていません。別途ご購入ください。履帯ピン切断用のガイドが含まれています。
- 1/72 scale WW2 German fighting vehicle An upgrade kit for tracks, Drive wheels, and ,Idler wheels that fits the late model of the Panther series.
- " Dragon 1/72 World War II German Army Sd.Kfz.171 Panther G Late Plastic Model DR7206 " has been confirmed to be compatible. Other kits can be combined as long as the Drive wheels and Idler wheels can be attached.
- Tracks are reproduced non-slip and lightening holes. The Drive wheels and Idler wheels are also precisely reproduced based on the actual photograph.
- Includes 182 pieces of loose tracks and 6 pieces of 25 connected tracks. The number of tracks required for one panther is 164 to 166, so a sufficient number of tracks including spare tracks are included.
- A 0.2mm brass wire etc. is required for the track pin. This is not included in the kit. Please purchase separately. Includes a guide for cutting track pins.
注意事項 Notes
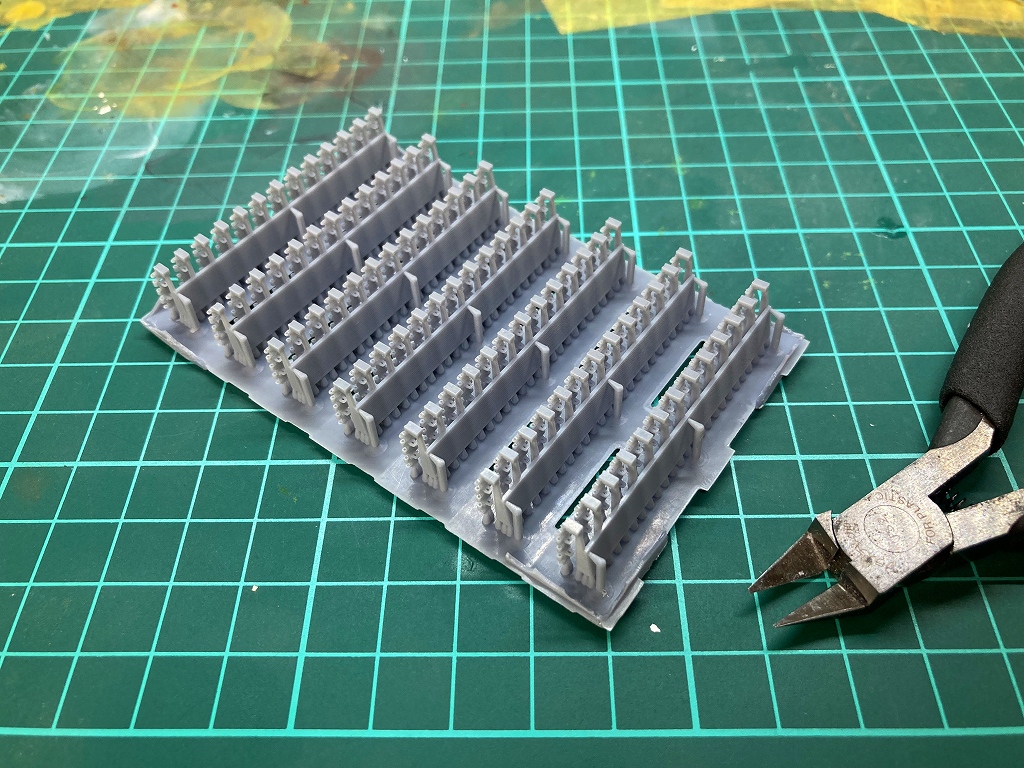
- このキットに含まれるのは以下のの写真にあるパーツです。
- 本キットにはパンターのキットは含まれていません。別途購入の必要があります。
- 本キットには履帯ピンに必要となる0.2mmの真鍮線は含まれていません。別途購入の必要があります。
- 本キットは3Dプリンタキットであるため、3Dプリンタによる出力で避けられない細かな段差・ゆがみがある程度発生します。特に履帯ピン用の穴が狭いものがどうしても含まれてしまいます。その場合、別の履帯を使用するか、0.3mmのドリル・ピンバイスで穴をさらう必要があります。
- 繊細なパーツを大量に含んでいるため、どうしても数個程度の成型不良・欠けが発生する場合があります。履帯5個までの不良は許容とさせて頂いております。大量の予備履帯を含めております故、ご容赦頂けますようよろしくお願いいたします。ご理解の方のみ、ご購入をご検討ください。
- This kit includes the parts shown in the picture below.
- This kit does not include the Panther kit. Must be purchased separately.
- This kit does not include the 0.2mm brass wire required for track pins. Must be purchased separately.
- Since this kit is a 3D printer kit, there will be some small steps and distortions that cannot be avoided when outputting with a 3D printer. Especially those with narrow holes for track pins are inevitably included. In that case, you will need to use a different track or use a 0.3mm drill pin vise to drill the hole.
- Since it contains a large amount of delicate parts, there may be some molding defects / chips. Defective tracks up to 5 tracks are not considered defective. Please forgive me because it contains a lot of spare parts. Please consider purchasing only if you understand.
組立に必要なもの What you need for assembly
3Dプリンタキット「1/72 パンター系後期履帯(スプロケットセット)[3Dプリンタ出力品]」を組み立てるためには、以下が必要です。
1.薄刃ニッパー Sharp Pointed Side Cutter
本キットのパーツは極めて繊細です。パーツを切り出すためには模型用の薄刃ニッパーが必須です。A thin blade Side Cutter is indispensable to cut out the parts.
以下のニッパーを推奨します。以後で紹介する組立ガイドでは、本製品を使用しています。I recommend this.

タミヤ クラフトツールシリーズ No.123 先細薄刃ニッパー (ゲートカット用) 74123
タミヤ模型がリリースする、模型用薄刃ニッパーです。刃が薄く、履帯とサポートの隙間に差し込むことができます。このニッパーでなくても組み立ては可能ですが、同等の薄刃を持つニッパーが必要です。
2.ピンバイス Precision Pin Vise
まれに発生する成型不良による履帯ピン穴の修正に、ピンバイスが必要です。使用するドリルは0.3mmです。A pin vise is required to correct the track pin holes. The drill used is 0.3 mm.
以下のピンバイスを推奨します。以後で紹介する組立ガイドでは、本製品を使用しています。I recommend this.

タミヤ クラフトツールシリーズ No.50 精密ピンバイス D プラモデル用工具 74050

タミヤ クラフトツール 極細ドリル刃 0.3mm 74081
3.真鍮線(0.2mm) Brass sticks(0.2mm)
履帯ピンとして使用するために、0.2mmの真鍮線、またはそれに準ずる金属線が必要です。曲がったワイヤーではなく、ストレートな金属線がお勧めです。You will need a 0.2mm brass sticks to make the track pins.
例として、以下の製品が使用できます。I recommend this.

レインボー Rb7008 0.2mm 真鍮線 (長さ:10cm、12本入り)
4.根気と熱意 Perseverance and enthusiasm
各自、ご用意ください!Please prepare your own!
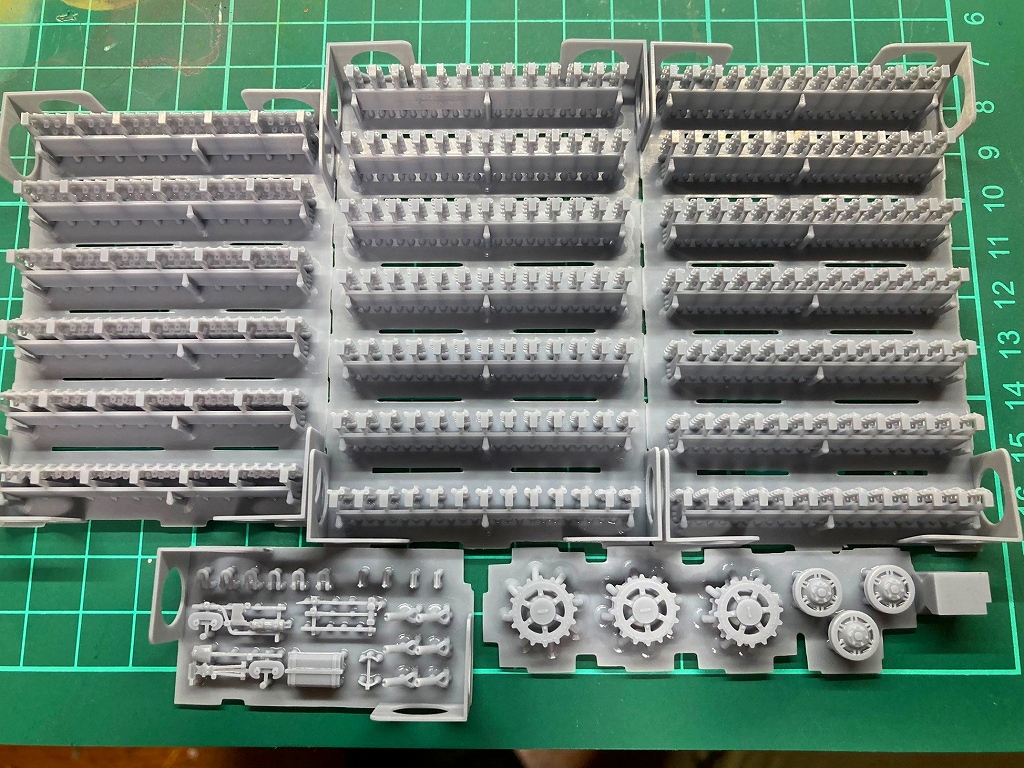
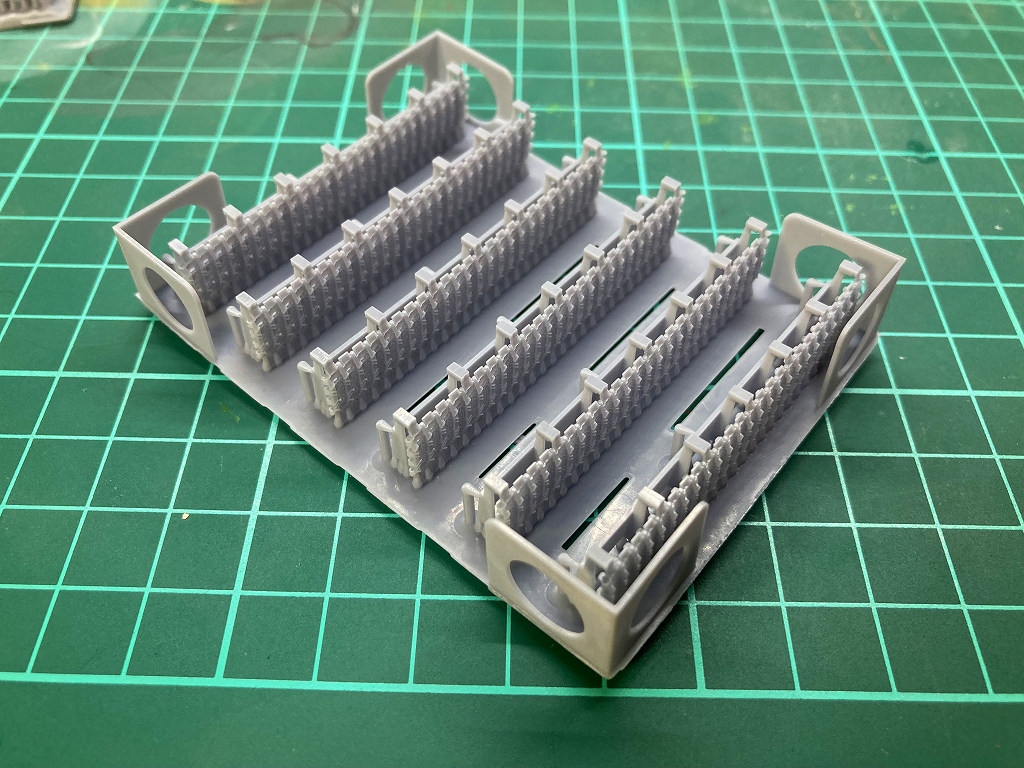
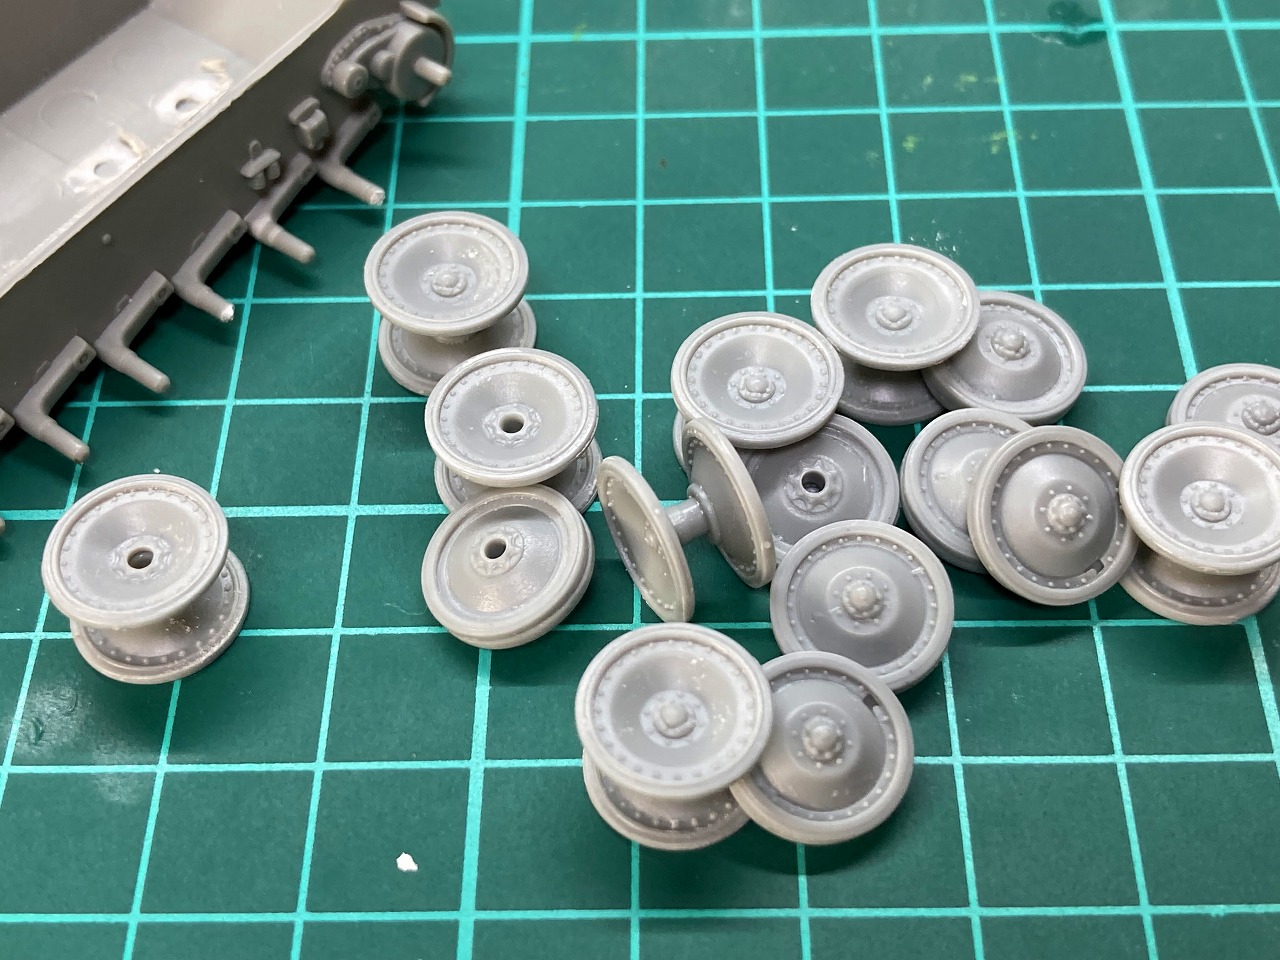
パーツ構成 Parts composition
3Dプリンタキット「1/72 パンター系後期履帯(スプロケットセット)[3Dプリンタ出力品]」のパーツ構成を解説します。I will explain the parts composition.
1.履帯(1枚) Tracks (separate)
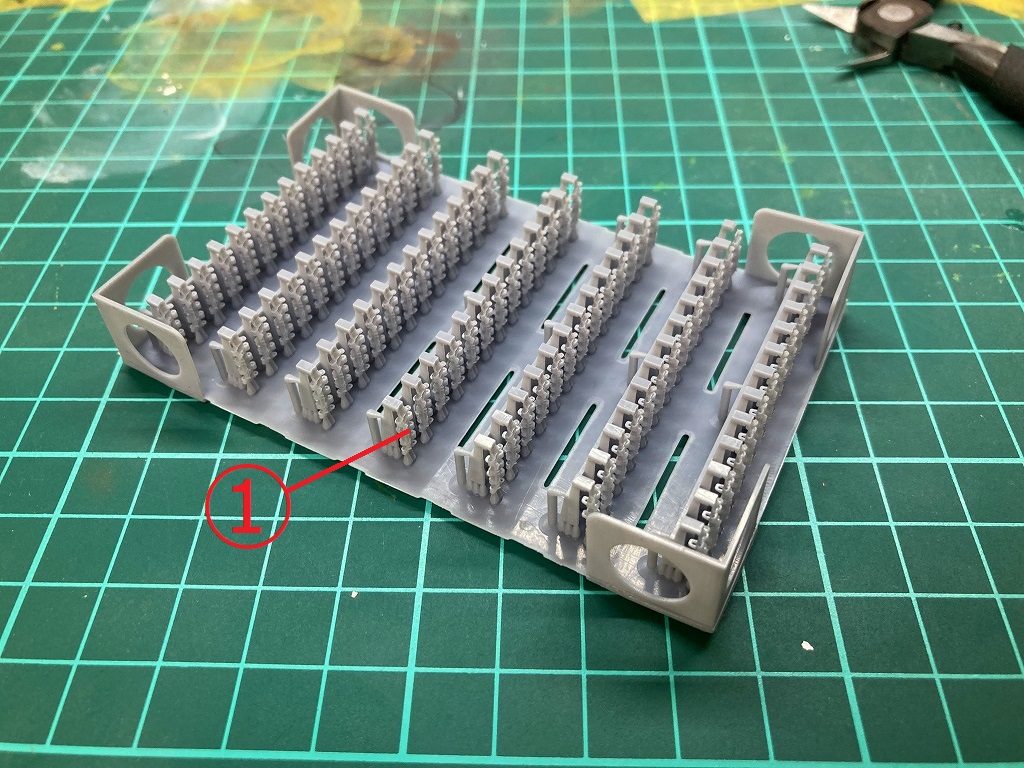
①履帯(1枚) Tracks (separate)
2.履帯(25枚連結) Tracks (25 pieces connected)
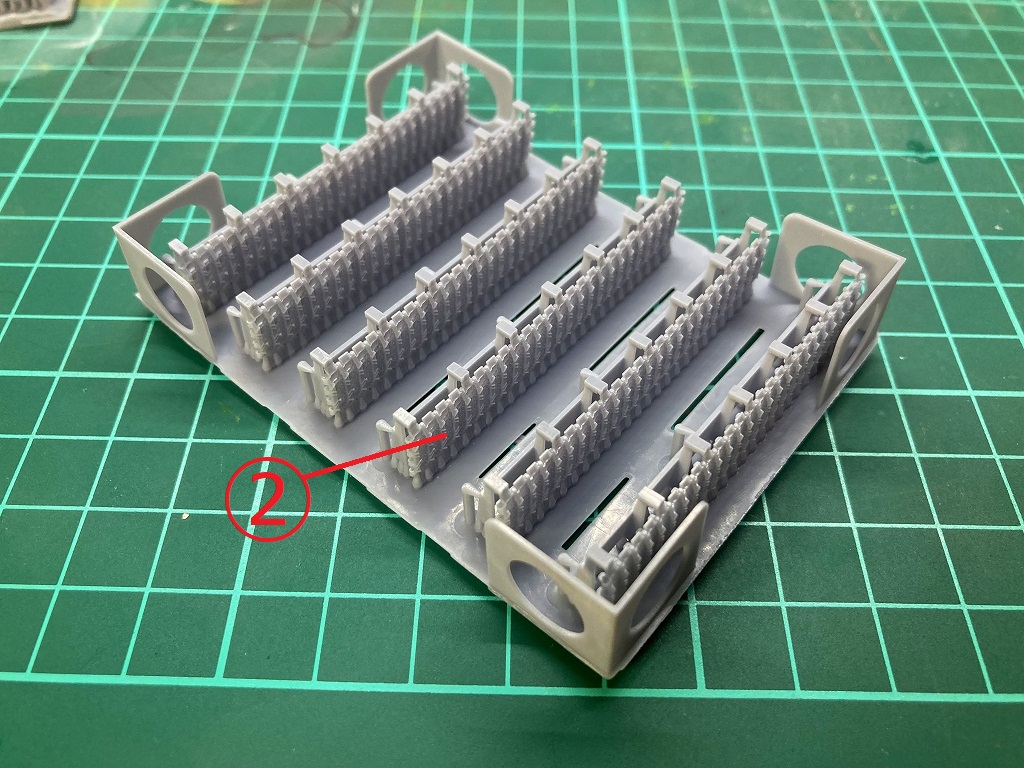
②履帯(25枚連結) Tracks (25 pieces connected)
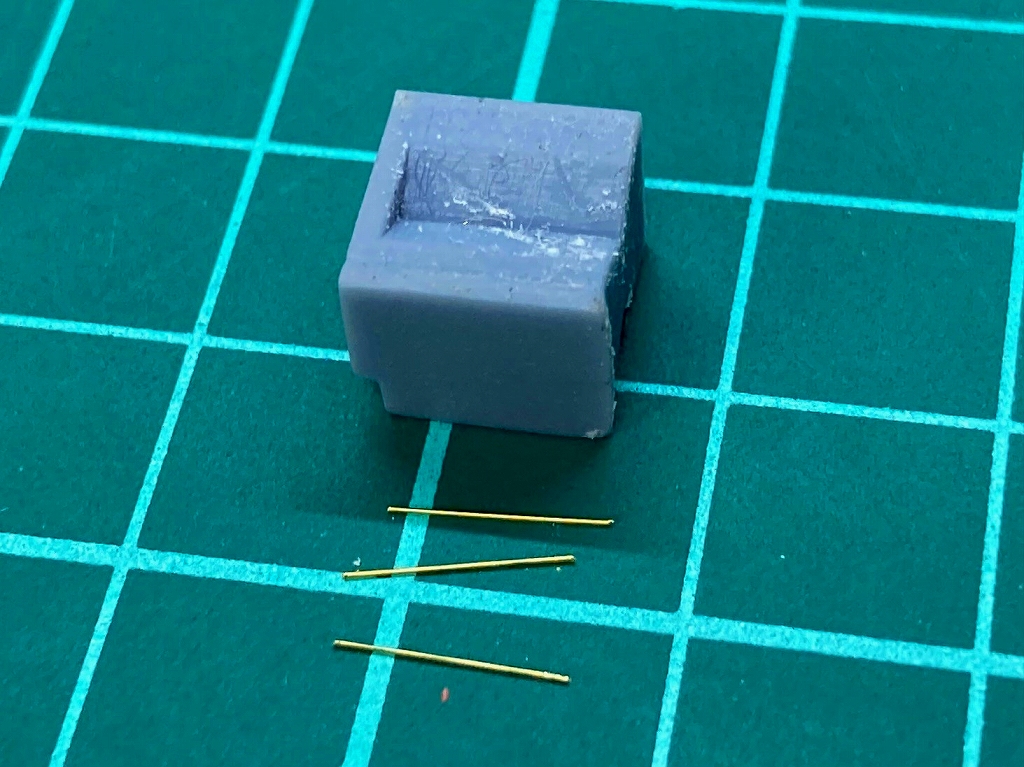
3.起動輪・遊動輪・履帯ピンガイド Drive wheels ,Idler wheels, guide for cutting track pins
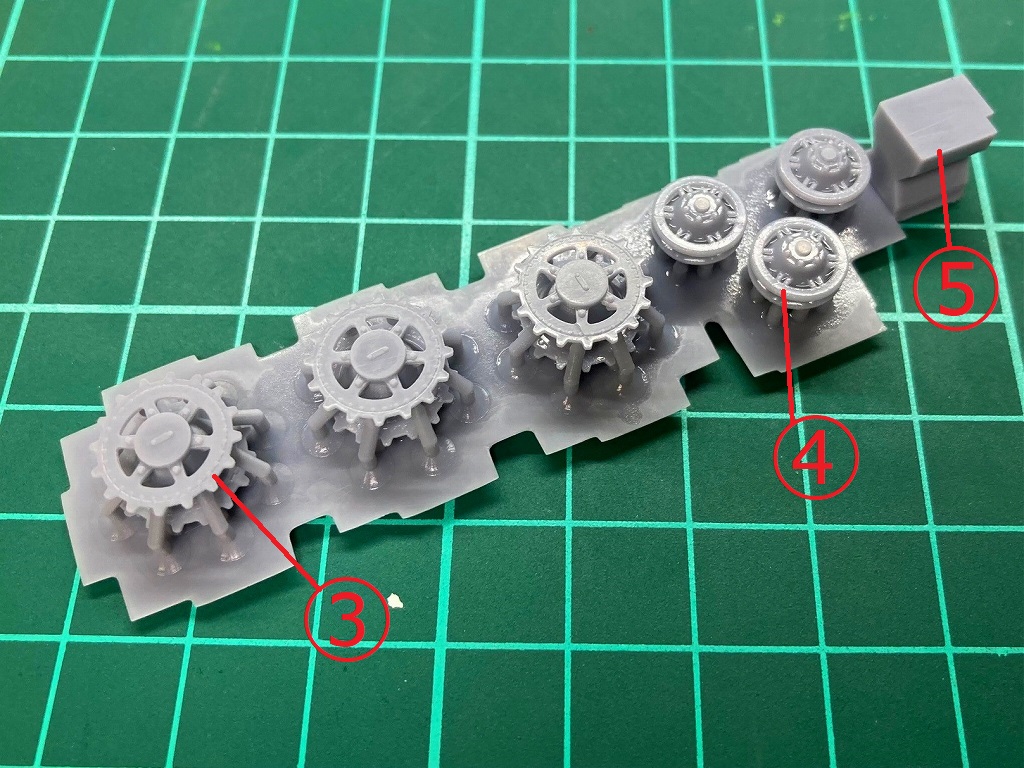
③起動輪 Drive wheels
④遊動輪 Idler wheels
⑤履帯ピンガイド guide for cutting track pins
ボーナスパーツ Bonus parts
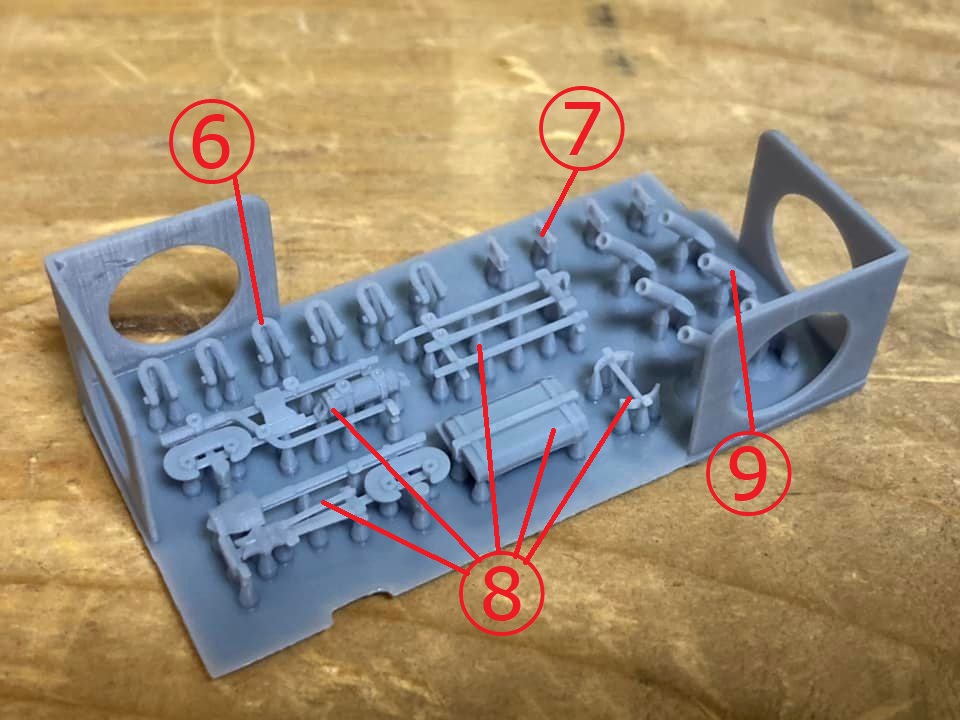
⑥シャックル Shackles
⑦車体後部用ワイヤー押さえ Wire holder for the rear of the car body
⑧OVM
⑨ワイヤーエンド Wire end
組立(assembly)
3Dプリンタキット「1/72 パンター系後期履帯(スプロケットセット)[3Dプリンタ出力品]」の組立方法を解説します。I will explain the assembly method.
1.パーツの切り出し Cutting out parts
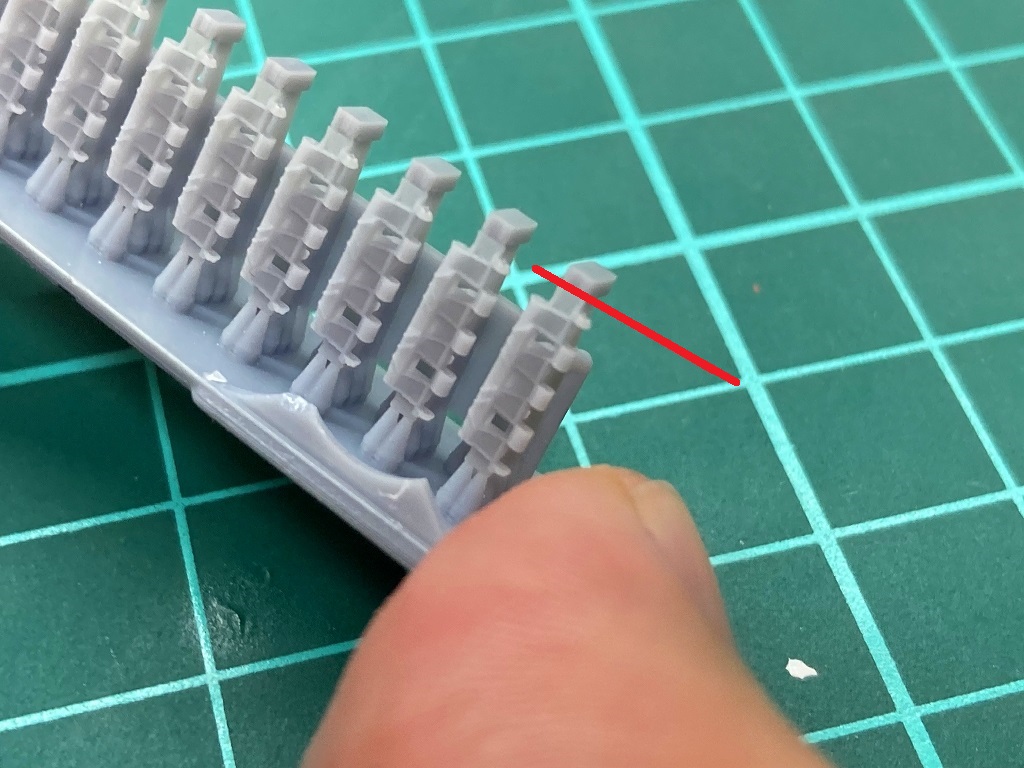
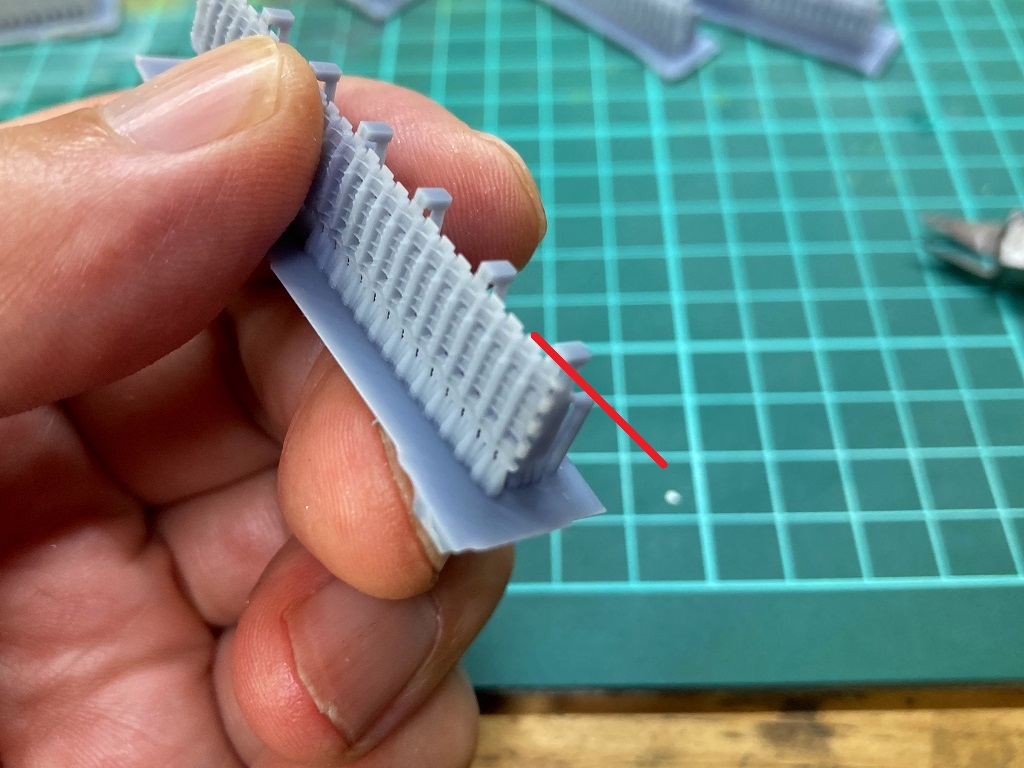
1)履帯(1枚) Tracks (separate)

パーツシートの角にある保護用ガイドを切り取ります。Cut out the protective guide at the corner.
パーツシートを分割します。Split it.

以降の作業はそれぞれのシートに対して行います。
赤線に沿って、履帯上部の接続部を切り離します。Cut off along the red line.
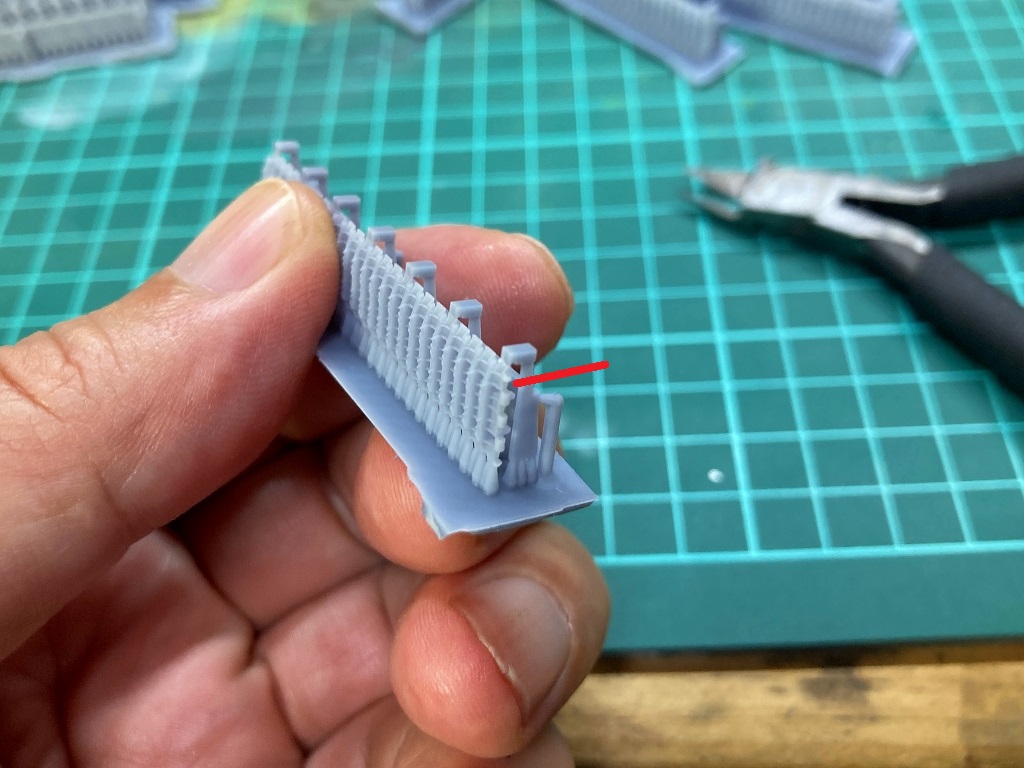
赤線に沿って、履帯上部のガイドを切り離します。Cut off along the red line.
以下の画像のようになります。It should look like the image below.
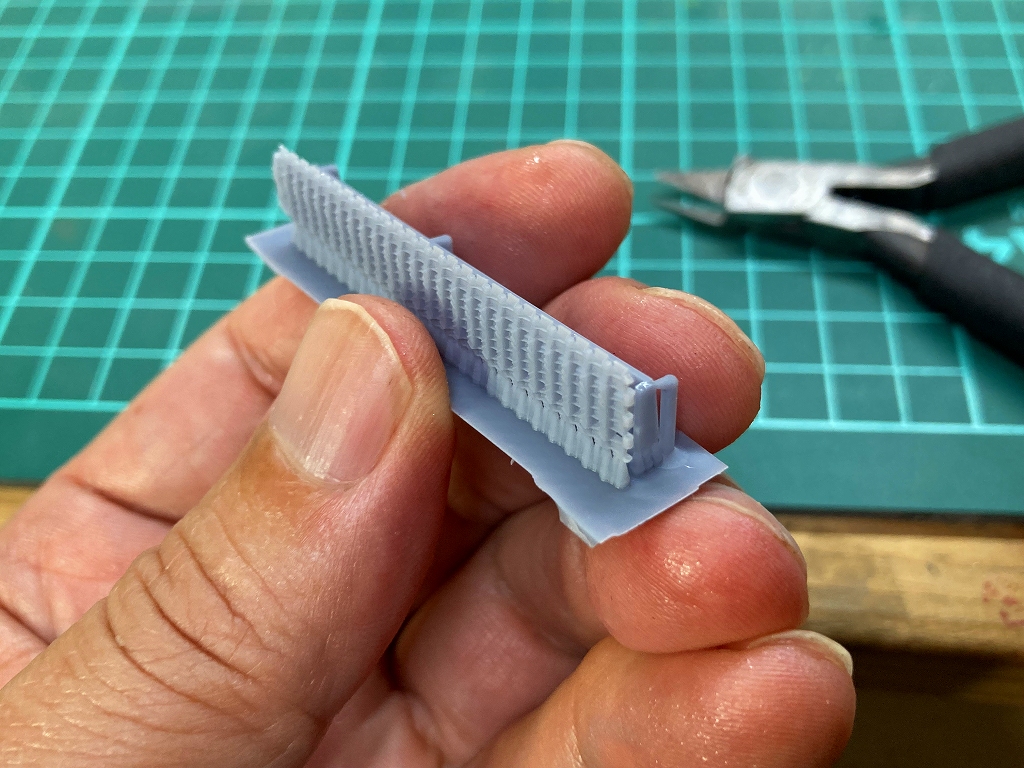
履帯下部のサポート下部を切り離します。Separate the lower support at the bottom of the track.
履帯下部のサポートを切り離します。Separate the support at the bottom of the track.
これで履帯の切り離しは完了です。This completes the track separation.
これを必要回数だけ繰り返します。全てをバラ履帯で組む場合は164枚~166枚、履帯(25枚連結)を使用する場合は114枚~116枚を切り出します。Repeat this as many times as necessary. If you assemble everything with separate tracks, cut out 164 to 166 sheets, and if you use connected tracks, cut out 114 to 116 sheets.
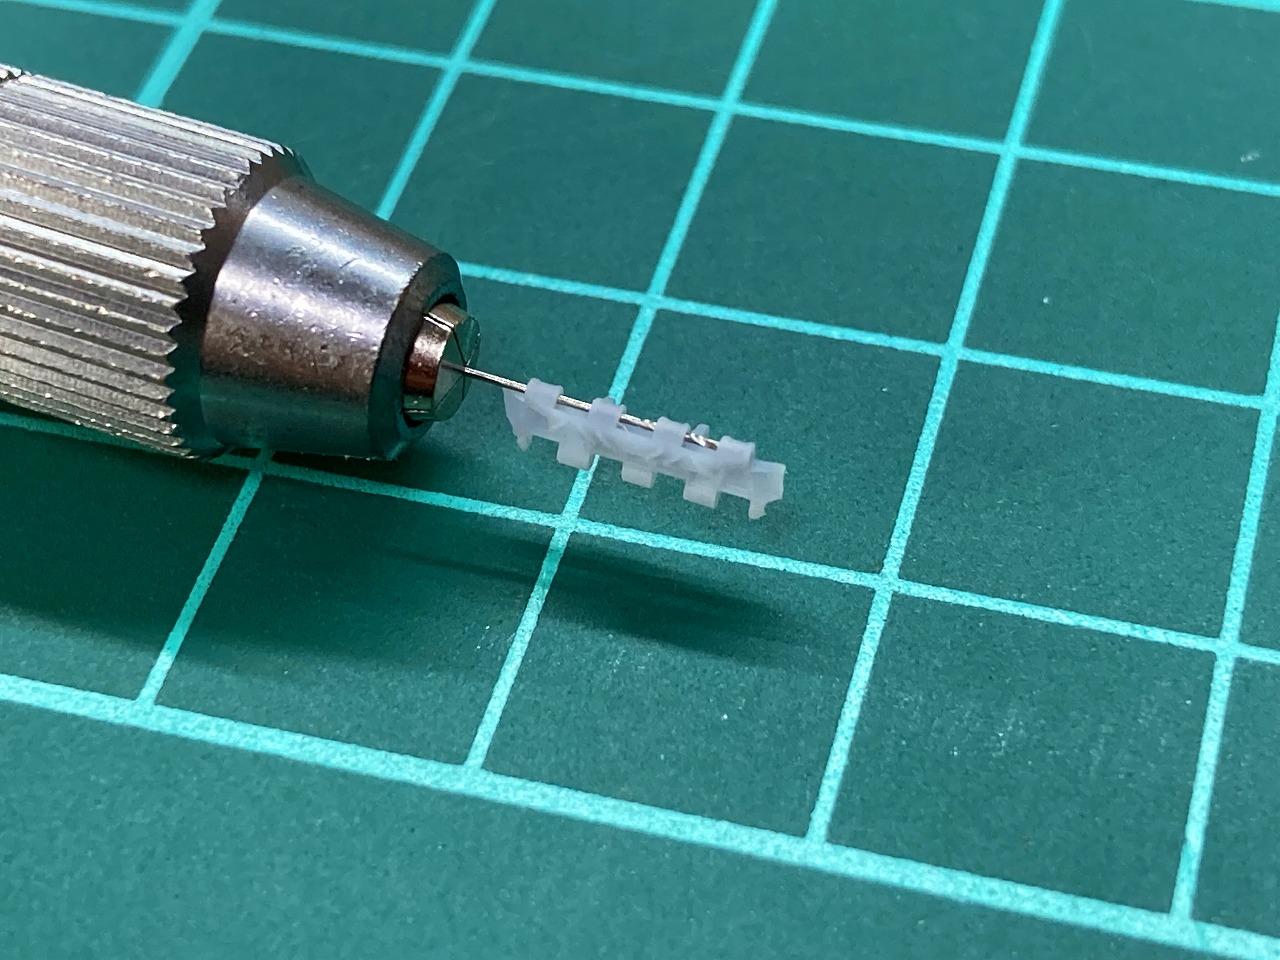
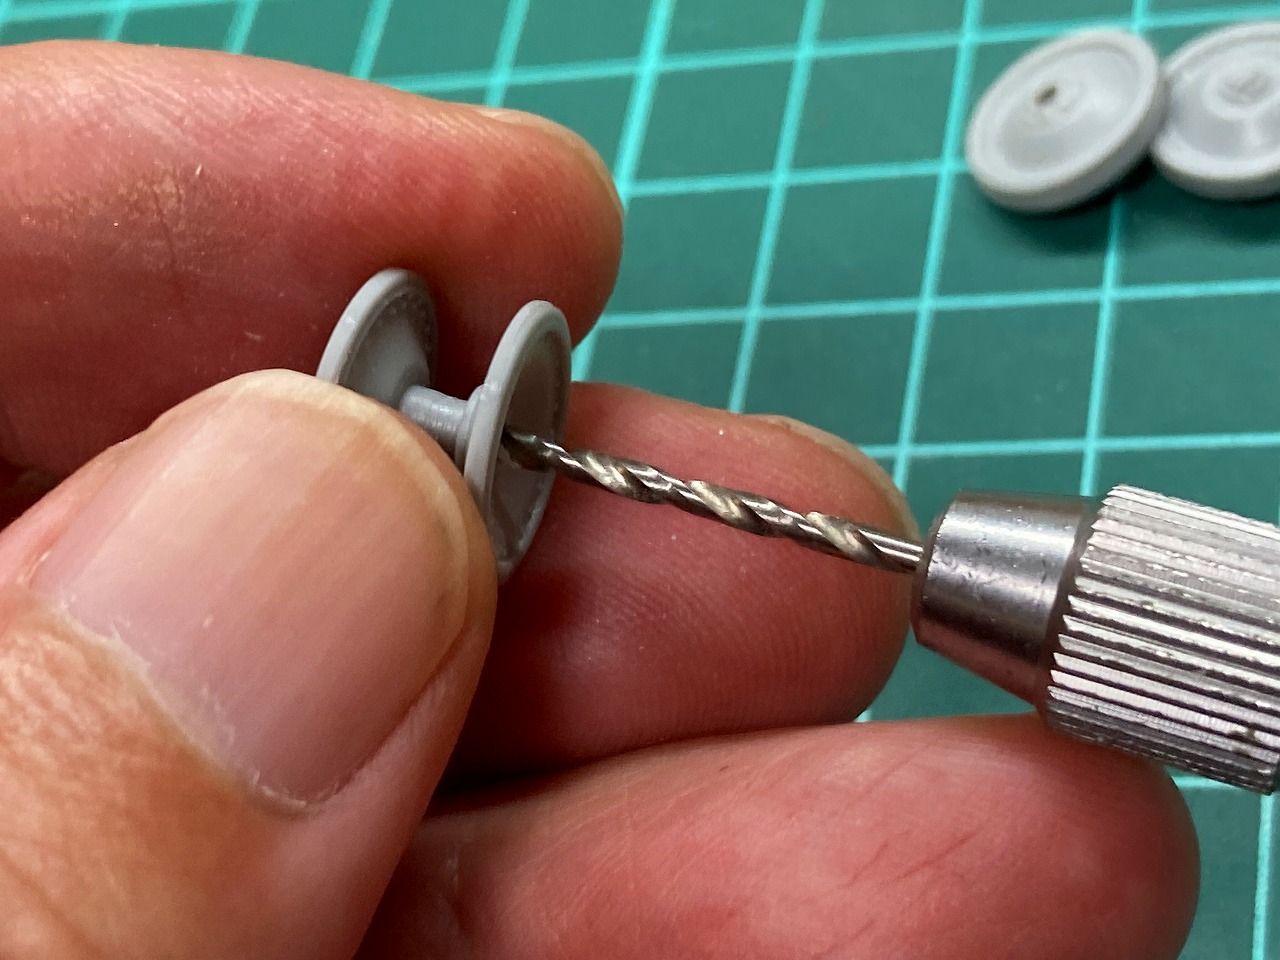
全ての履帯の履帯ピン穴を、0.3mmのピンバイスで穴をさらってください。Clean the track pin holes on all tracks with a 0.3 mm pin vise.
製品の製造に十分留意しておりますが、なにぶん繊細な造形のため、どうしても穴が細い・貫通していない場合が発生してしまいます。ご理解とご容赦をお願いいたします。
I pay close attention to the manufacturing of the product, but due to the delicate modeling, there may be cases where the holes are thin or do not penetrate. Thank you for your understanding and forgiveness.
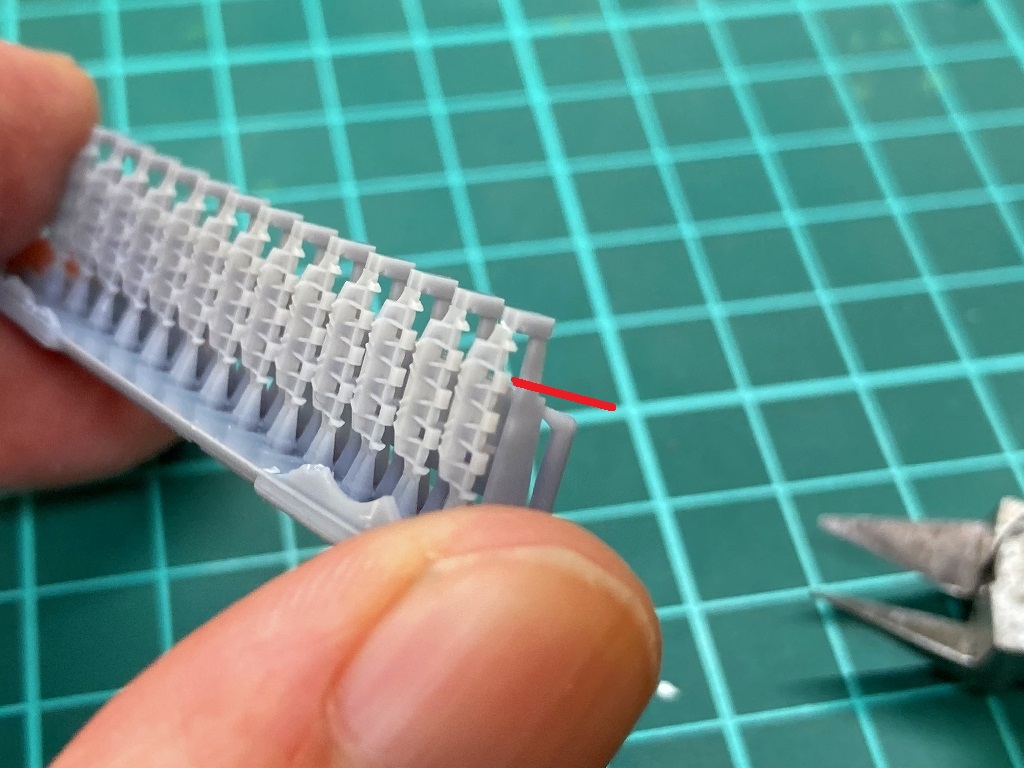
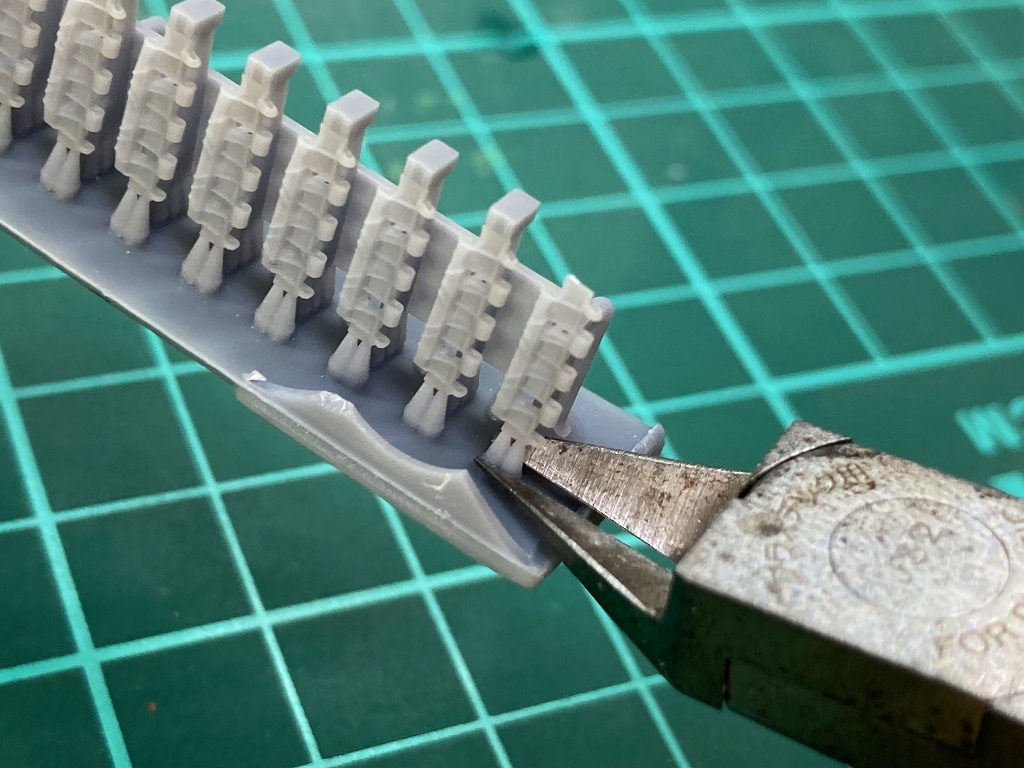
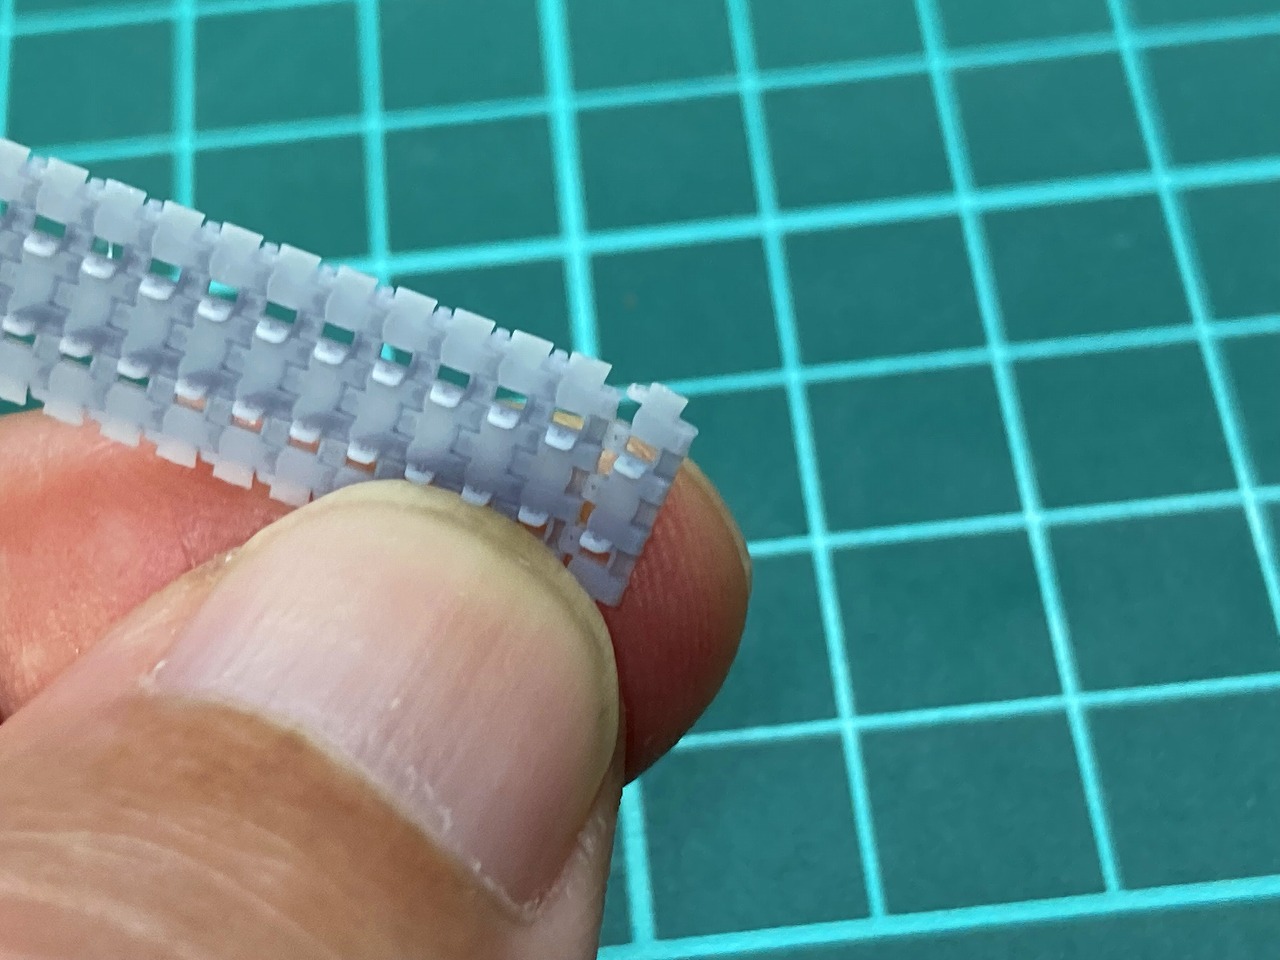
2)履帯(25枚連結) Tracks (25 pieces connected)
パーツシートの角にある保護用ガイドを切り取り、パーツシートを分割します。Cut out the protective guide at the corner. And Split it.

以降の作業はそれぞれのシートに対して行います。
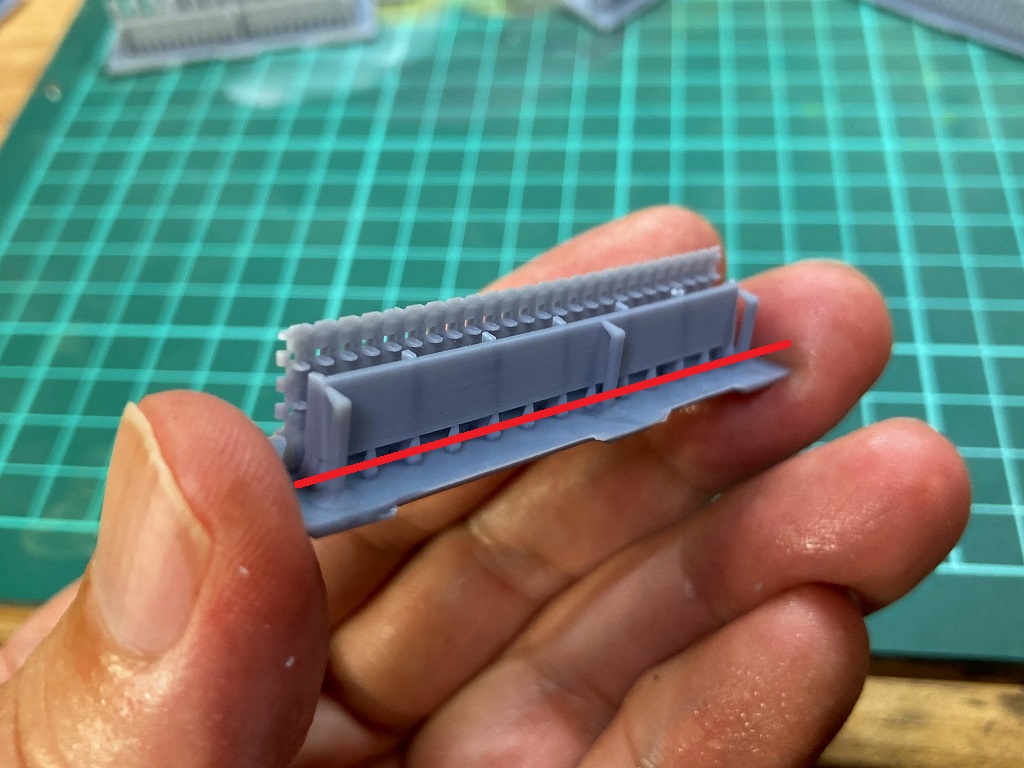
赤線に沿って、履帯上部の接続部を切り離します。Cut off along the red line.
赤線に沿って、履帯上部のガイドを切り離します。Cut off along the red line.
これを、全ての履帯上部ガイドに対して行います。以下の画像のようになります。Do this for all track top guides. It should look like the image below.
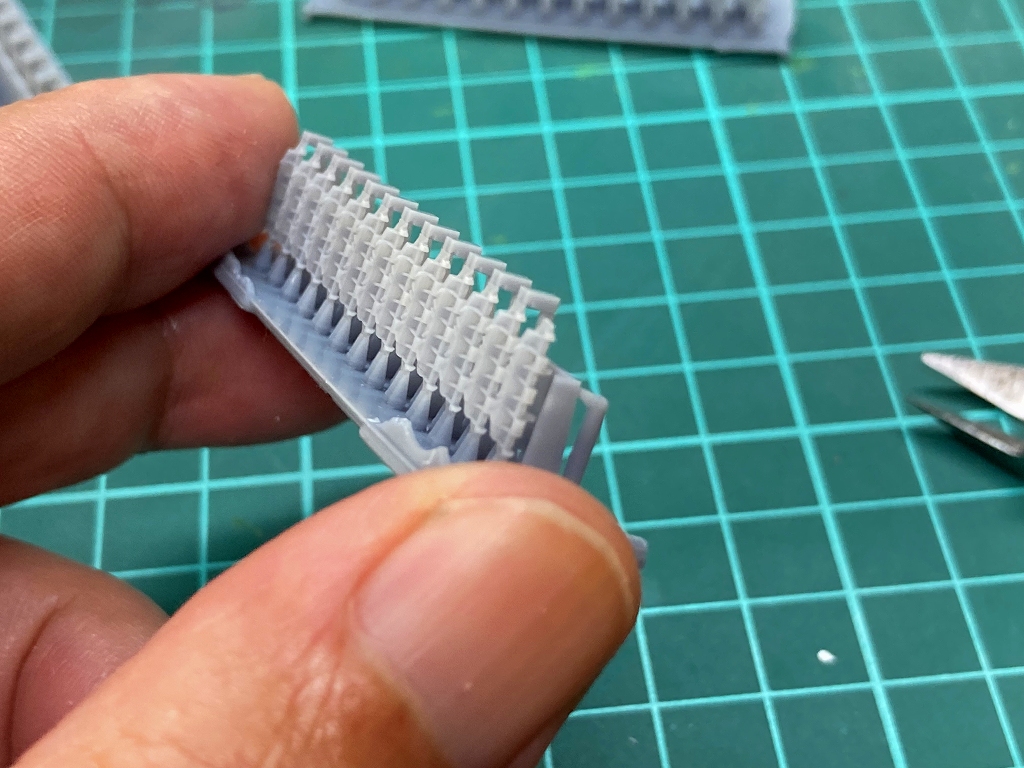
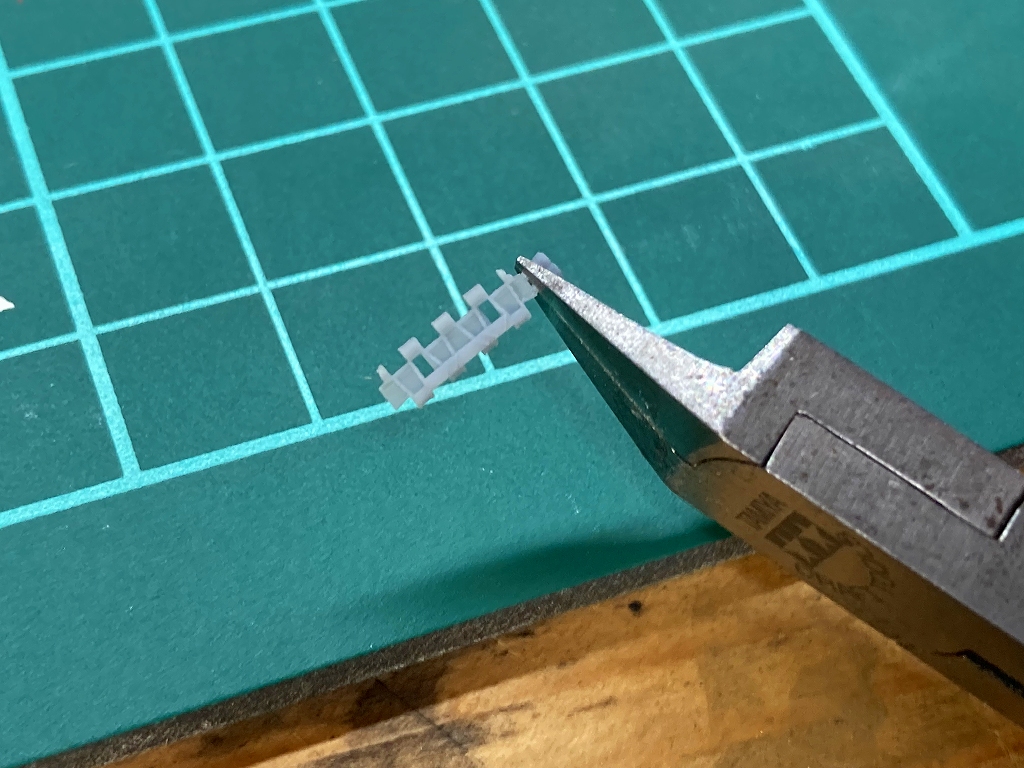
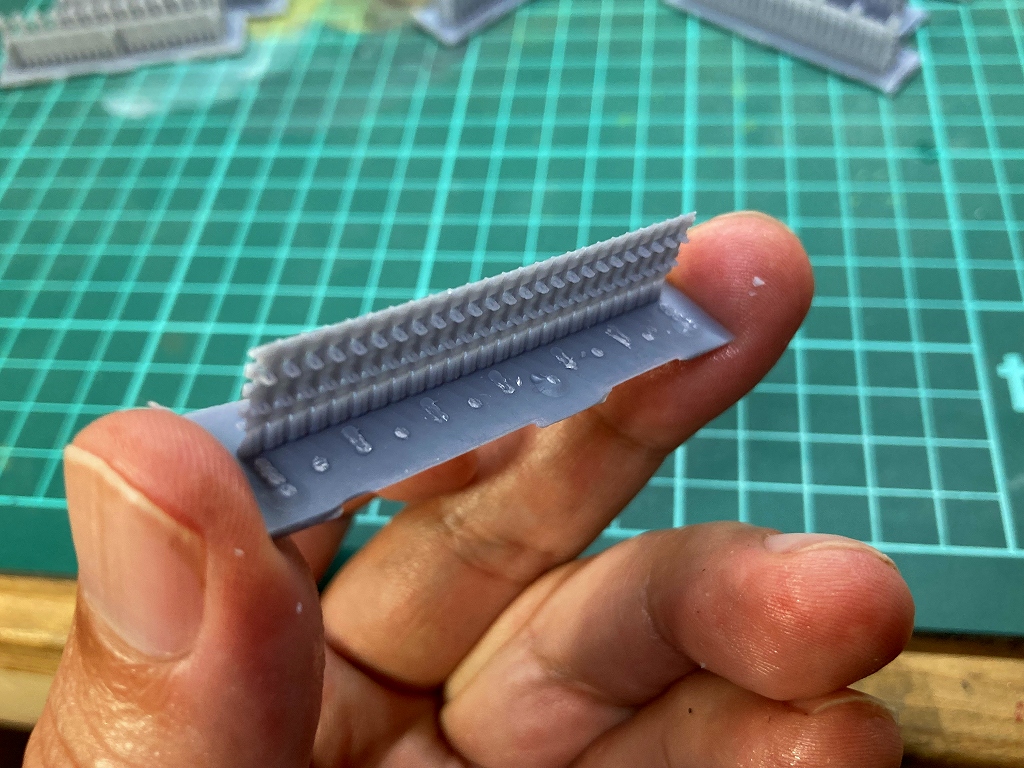
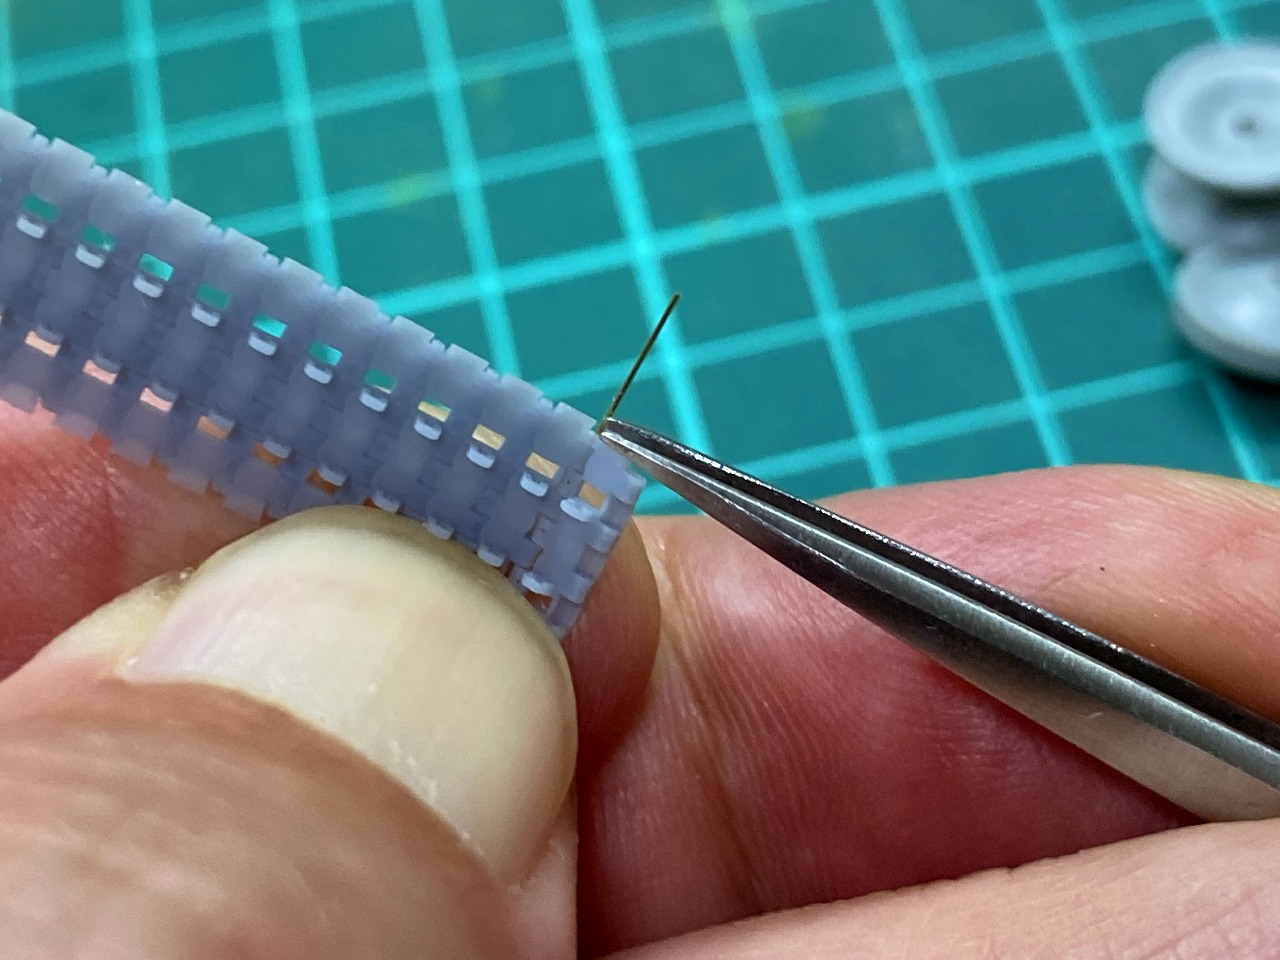
履帯の裏側の下部のサポート下部を全て切り離します。Cut off all the bottom of the support at the bottom of the back side.
以下の画像のようになります。It should look like the image below.
履帯上部の端から、軽く力を入れて折り取っていきます。切り取り部にカッターで軽く筋を入れるとうまくいきます。From the top edge of the track, lightly force it to break it off. It works well if you lightly make a streak in the cut part with a cutter.
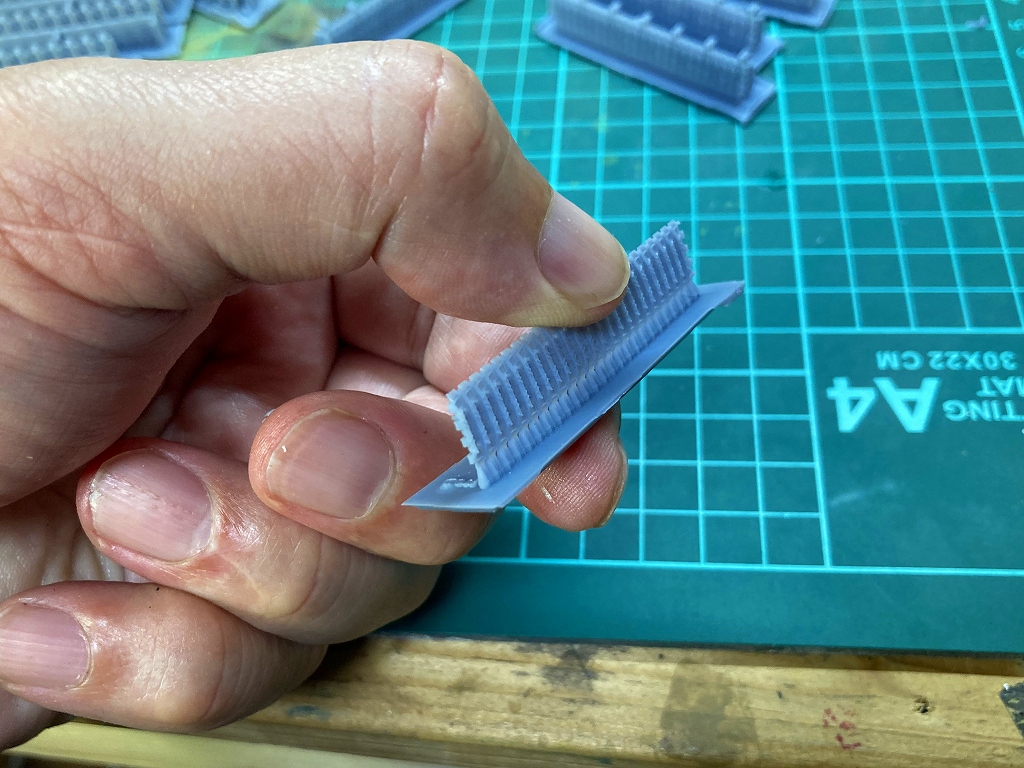
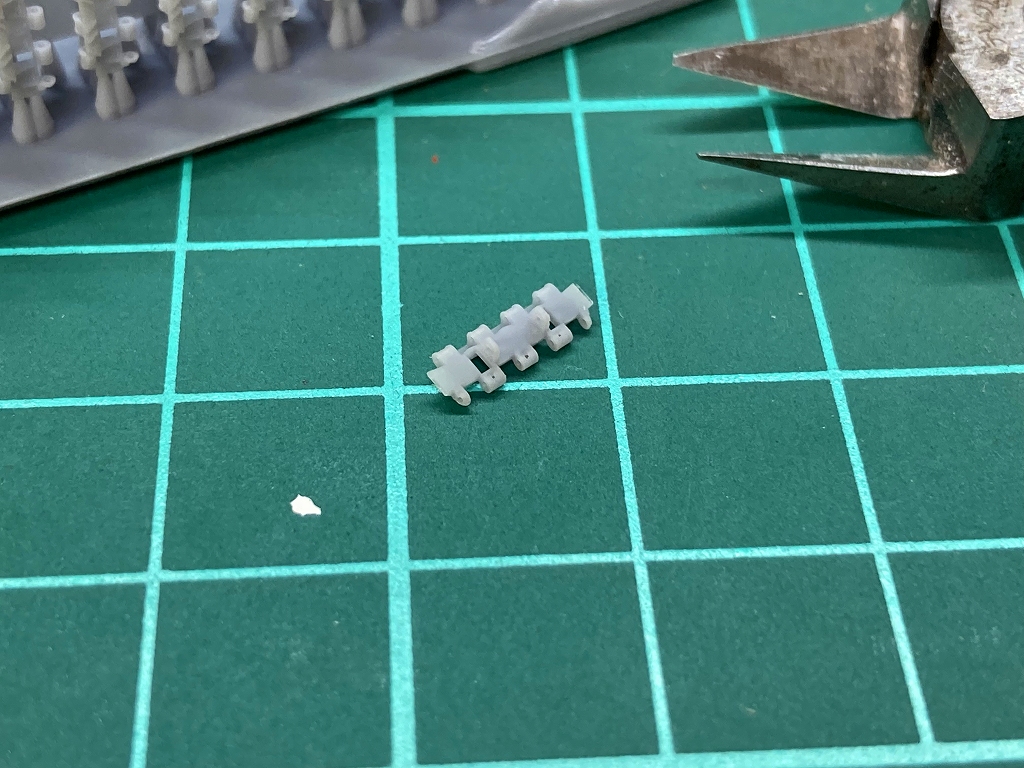
これで履帯の切り離しは完了です。2枚切り離します。This completes the disconnection of the connected tracks. Separate the two.
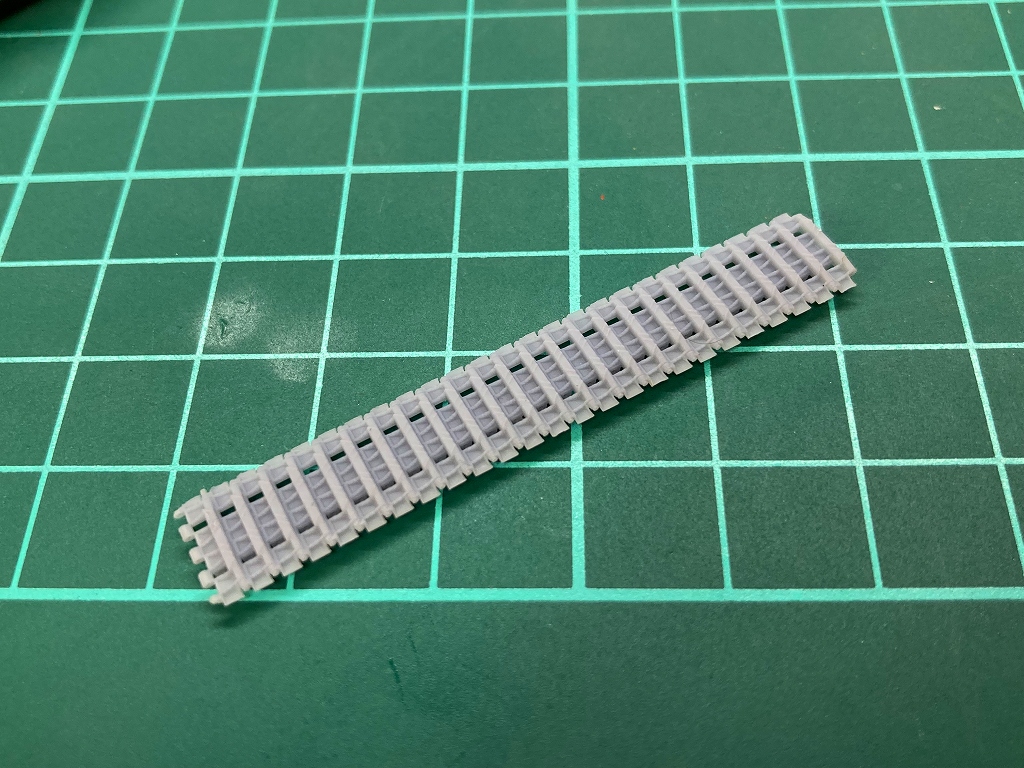
両端の履帯の履帯ピン穴を、0.3mmのピンバイスで穴をさらってください。Clean the track pin holes on both ends of the tracks with a 0.3 mm pin vise.
3)起動輪 Drive wheels
特に注意事項はありません。
There are no particular precautions.
丁寧にニッパーで切り離し、紙やすりなどで仕上げます。
Carefully separate it with nippers and finish it with sandpaper.
4)遊動輪 Idler wheels
特に注意事項はありません。
There are no particular precautions.
丁寧にニッパーで切り離し、紙やすりなどで仕上げます。
Carefully separate it with nippers and finish it with sandpaper.
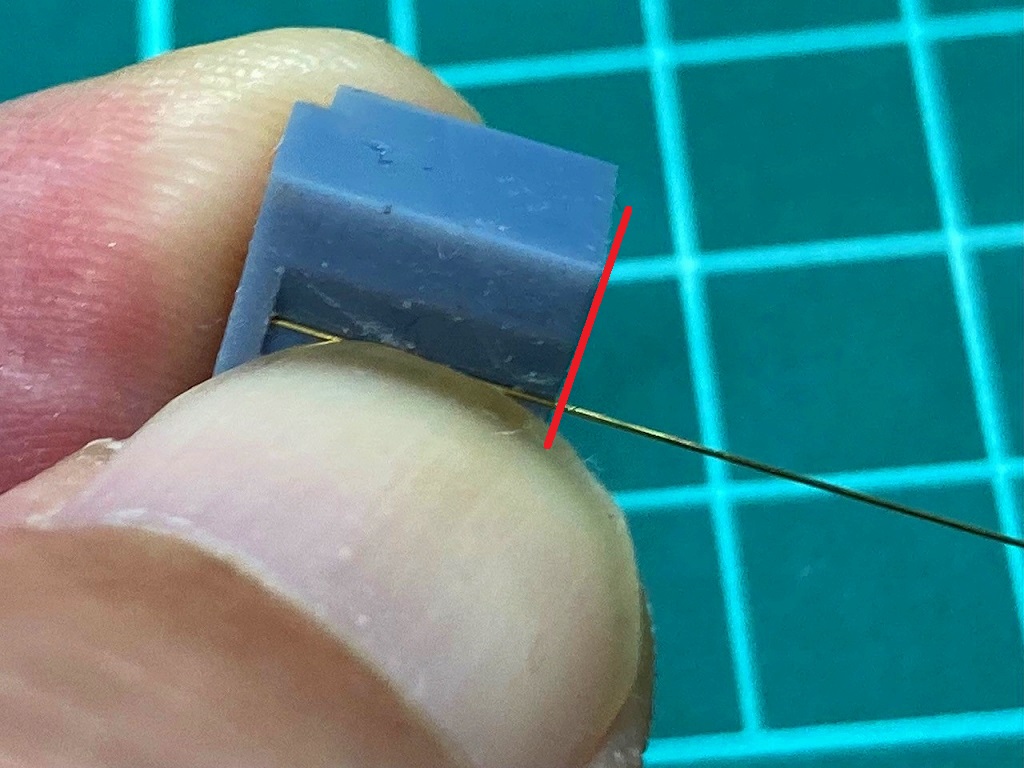
5)履帯ピンガイドguide for cutting track pins
特に注意事項はありません。
There are no particular precautions.
丁寧にニッパーで切り離し、紙やすりなどで仕上げます。
Carefully separate it with nippers and finish it with sandpaper.
2.履帯の組み立て Tracks assembly
1)履帯ピンの作成 Creating track pins
0.2mm真鍮線を履帯ピンガイドに当てます。Place a 0.2mm brass stick on the track pin guide.
はみ出した部分を、よく切れるワイヤーカッターで切断します。これを必要回数だけ繰り返します。全てをバラ履帯で組む場合は164本~166本、履帯(25枚連結)を使用する場合は114本~116本を切り出します。Cut the protruding part with a wire cutter that cuts well. Repeat this as many times as necessary.
注意!切り出した履帯ピンは紛失等に十分気を付けてください。うっかり足で踏んだりすると、とても危険です!万が一ケガ等をされても本サイトは一切責任を負いません。自己責任で作業頂けますようお願いいたします。
caution! Be careful not to lose the cut out track pins. If you inadvertently step on it, it is very dangerous! This site is not responsible for any injuries. Please work at your own risk.
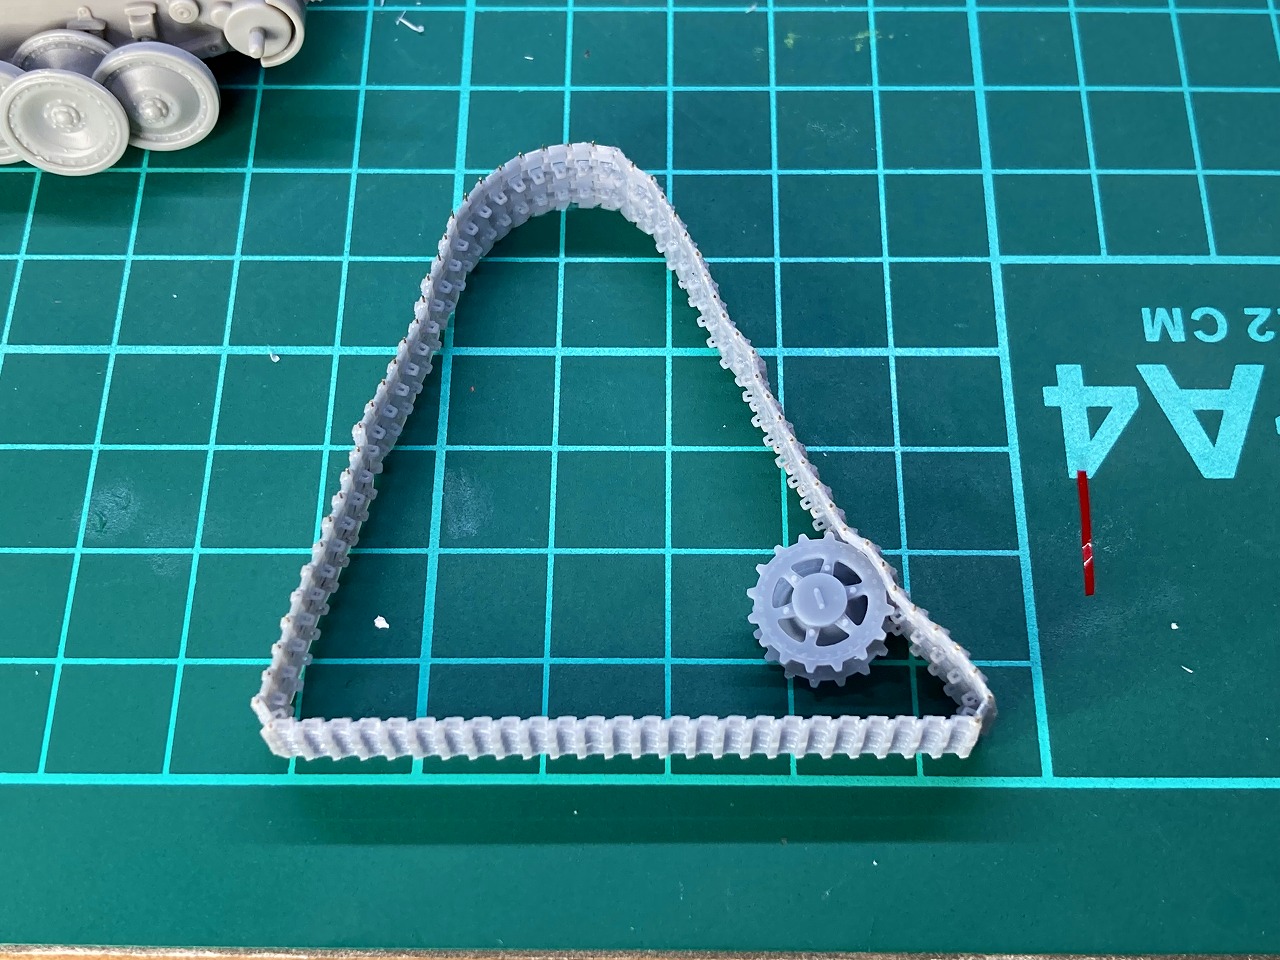
2)履帯の組立て Tracks assembly
履帯をはめ合わせます。Fit the tracks.
はめ合わせた履帯に、履帯ピンを差し込みます。Insert the track pin into the fitted track.
全てをバラ履帯で組み立てる場合、片側で82枚~83枚を連結します。連結履帯を使用する場合、バラ履帯を57枚~58枚を連結し、さらに連結履帯を連結します。When assembling everything with "Tracks (separate)", connect 82 to 83 sheets on one side. When using "connected tracks", connect 57 to 58 "Tracks (separate)" and then connect "connected tracks".
3)起動輪の組み合わせ Attach the Drive wheels
起動輪を履帯に取り付けます。接着はしません。25枚連結履帯を使用する場合は連結履帯の前方8~9枚の位置に起動輪を配置してください。Attach the Drive wheels to the track. It does not adhere.
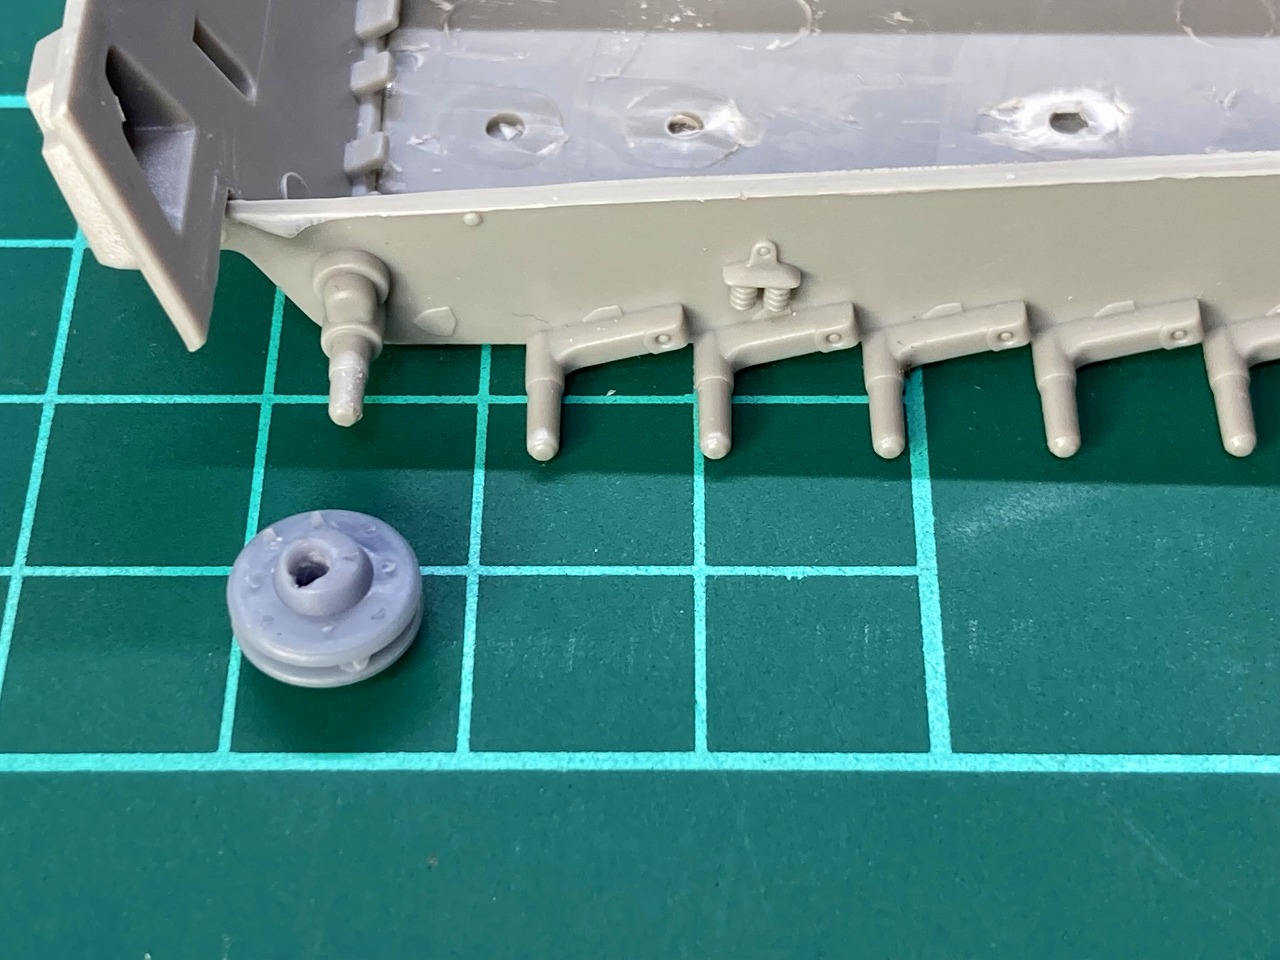
4)遊動輪の組み合わせ Attach the Idler wheels
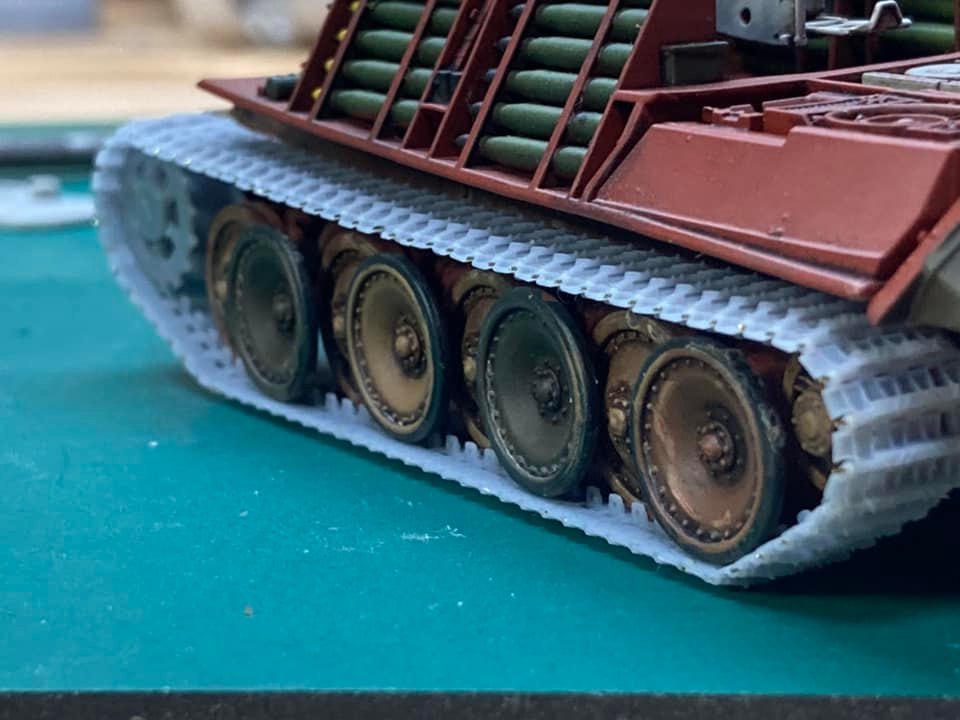
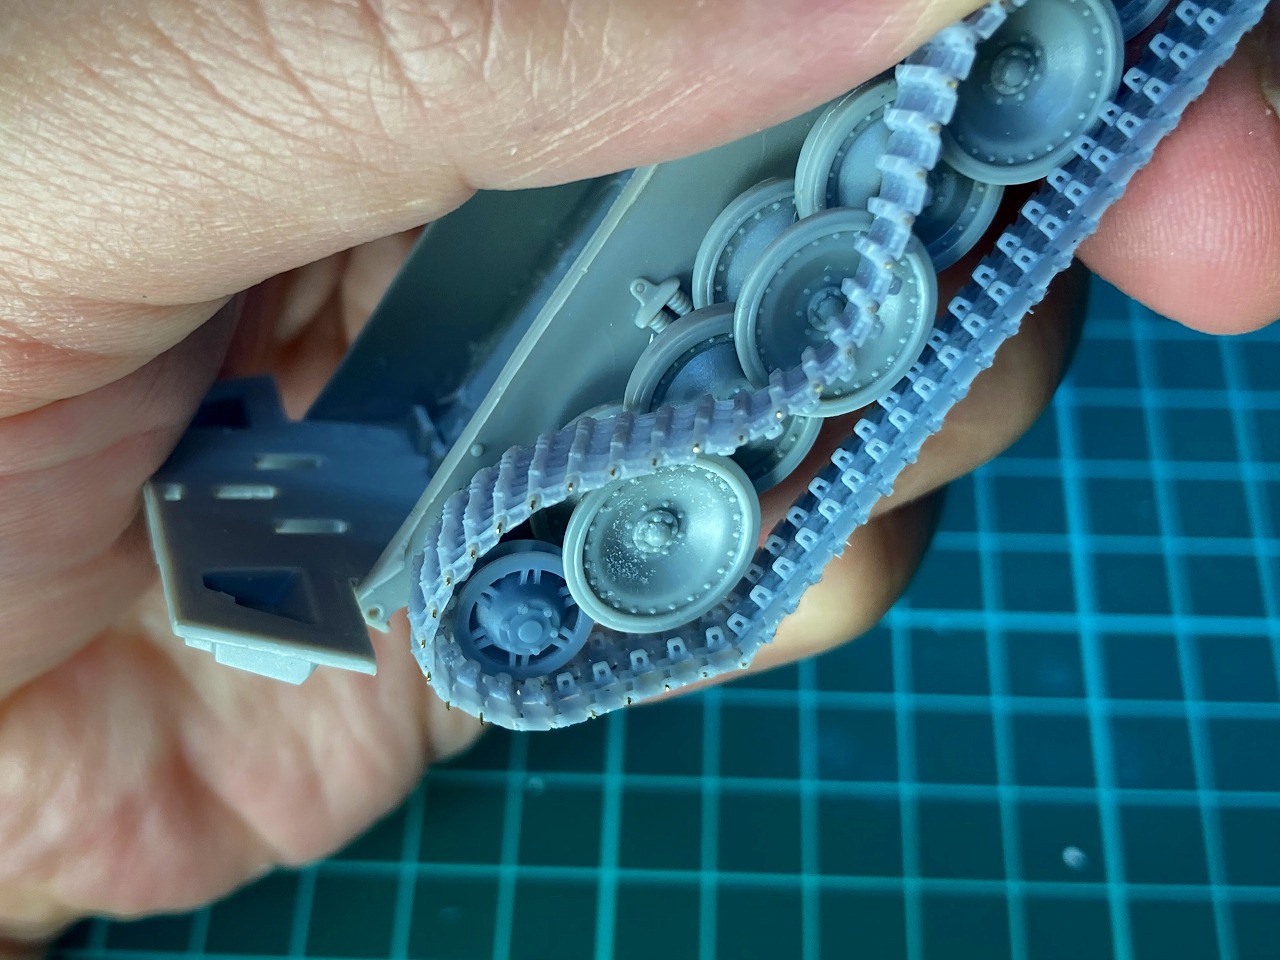
遊動輪を取り付けます。接着はしません。この時、偏芯した穴が車体後部に向くように取り付けます。差込みがきつい場合は軸を紙やすり等で削ってください。Attach the Idler wheels to the car body. It does not adhere. At this time, install so that the eccentric hole faces the rear of the car body.
この状態で、一番履帯が弛む状態になります。In this state, the tracks are the most loose.
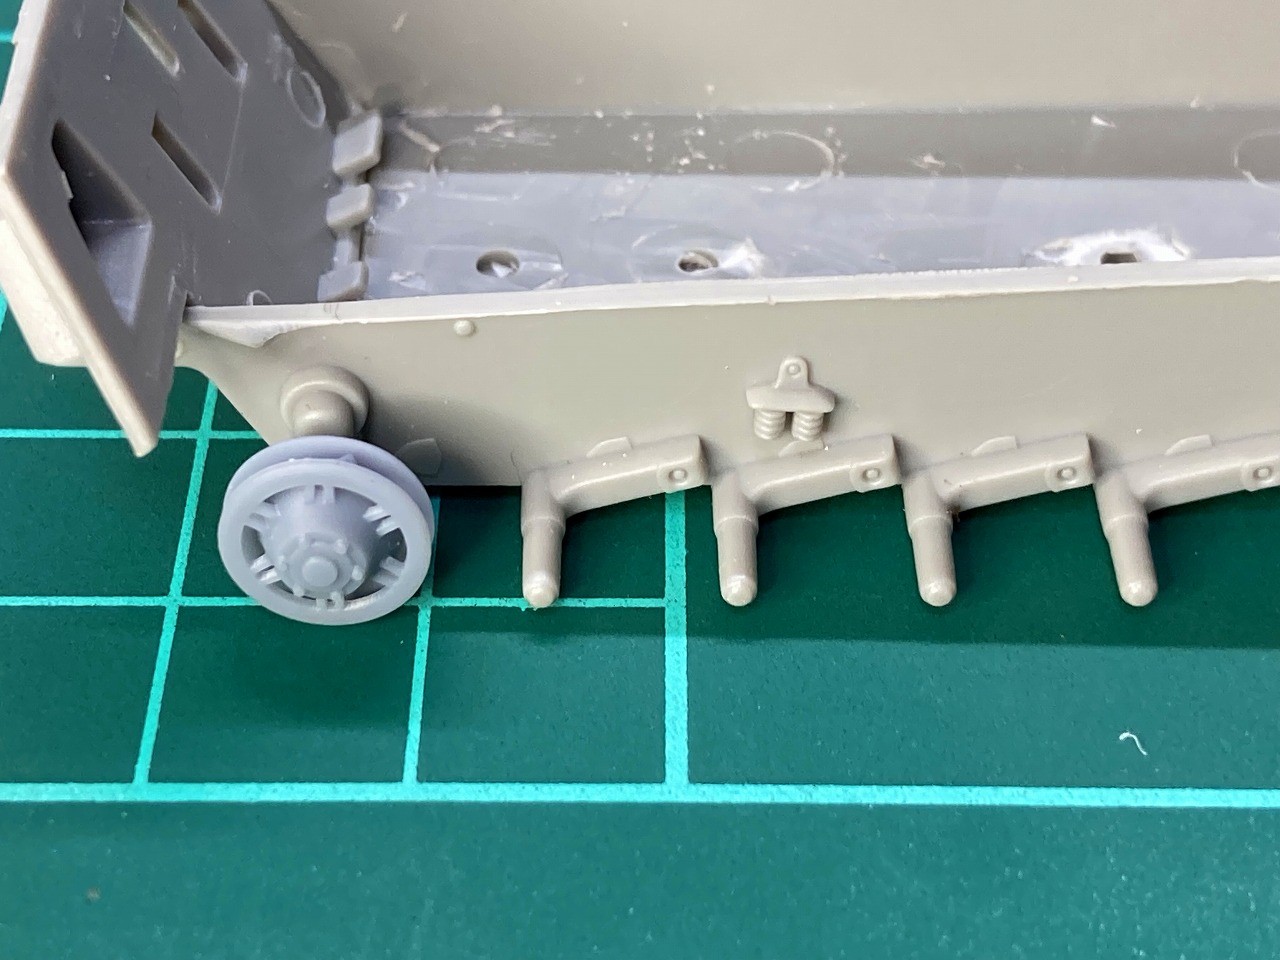
5)転輪の取り付け Attach the Wheels
キットパーツの転輪を取り付けます。確実に一列に並ぶように注意してください。曲がっていると、履帯ガイドにハマりません。Attach the wheels of the kit parts. Make sure to line up in a row. If it is bent, the tracks will break.
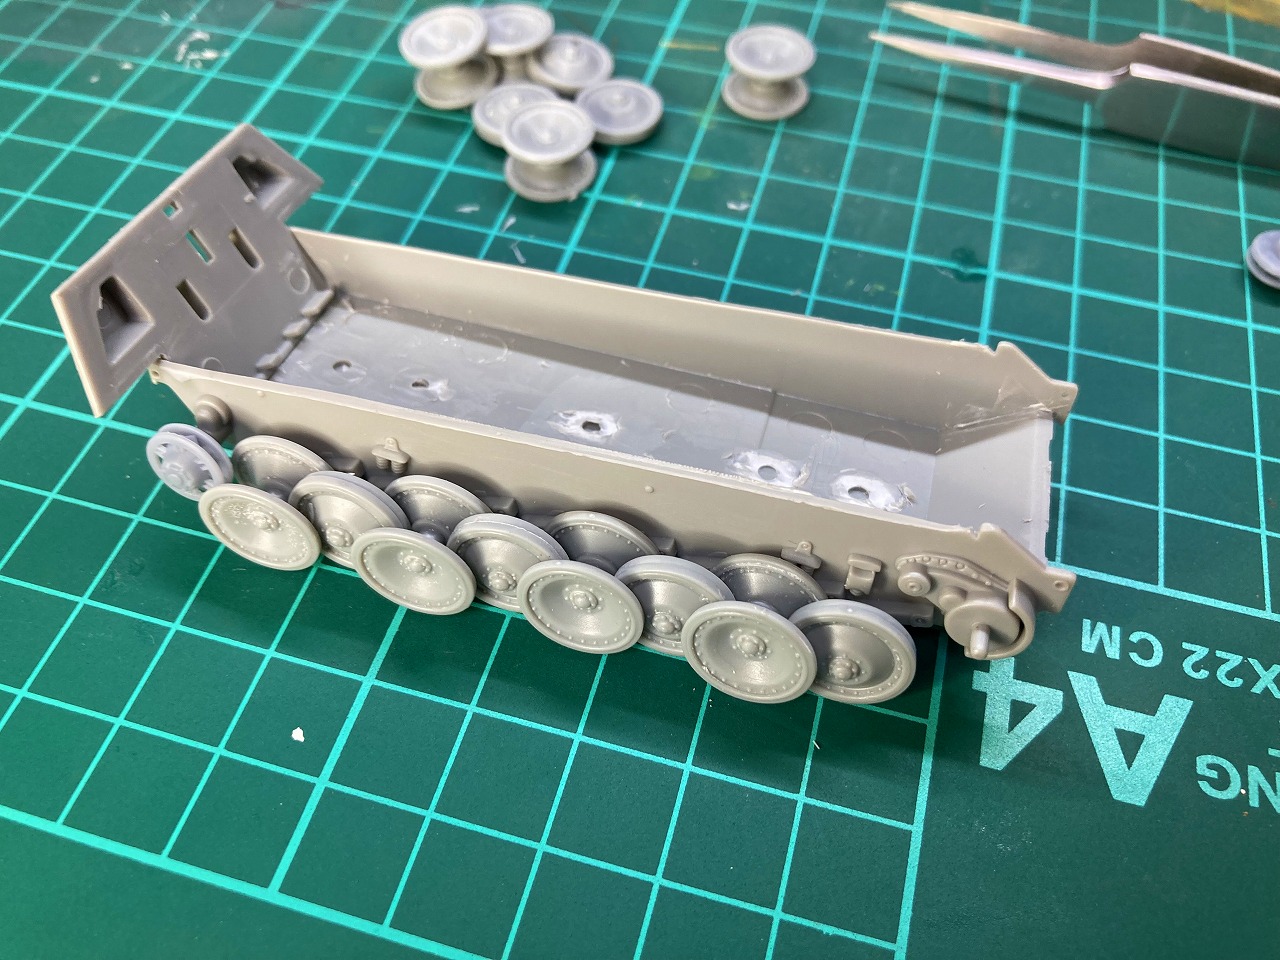
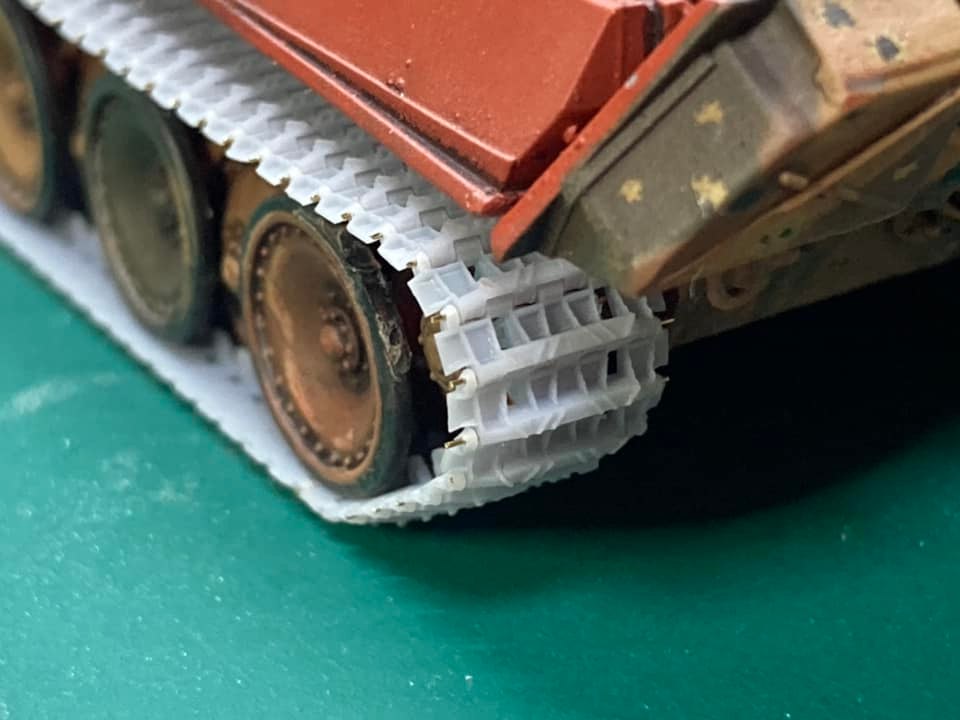
5)履帯の取り付け Attach the tracks
遊動輪から履帯を合わせ、履帯を取り付けます。Attach the tracks.
6)履帯のテンション調整 Tracks tension adjustment
最後に遊動輪を回転させ、好みの弛みになるように調整してください。この状態は、片側83枚でもっとも緩めた状態です。Rotate the Idler wheels and adjust to the desired slack. This state is the most loosened state with 83 tracks.
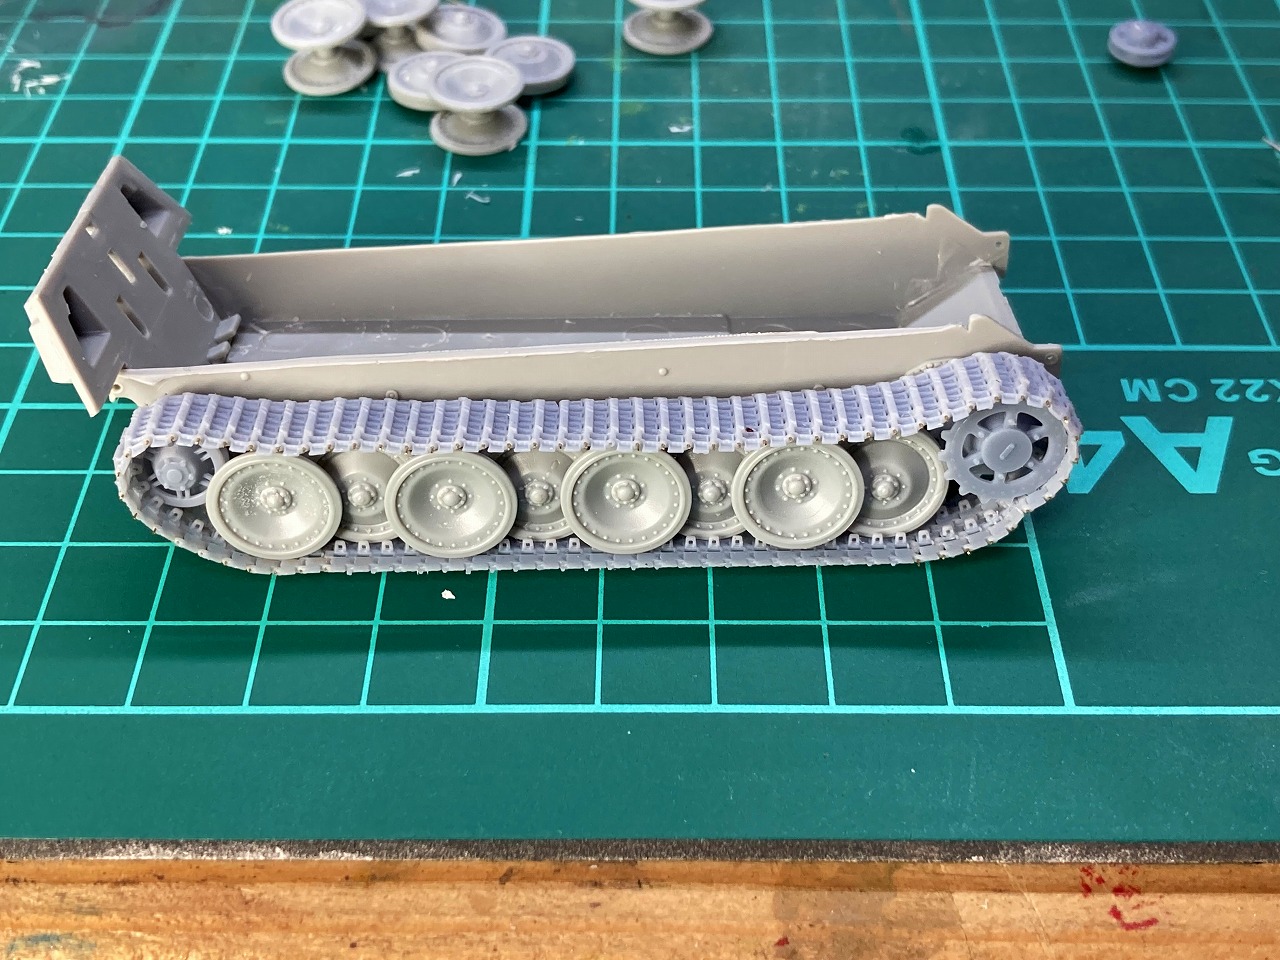
この状態は、片側83枚でもっとも張った状態です。This state is the most stretched state with 83 tracks.
この状態は、片側82枚でもっとも緩めた状態です。This state is the most loosened state with 82 tracks.

この状態は、片側82枚でもっとも張った状態です。This state is the most stretched state with 82 tracks.
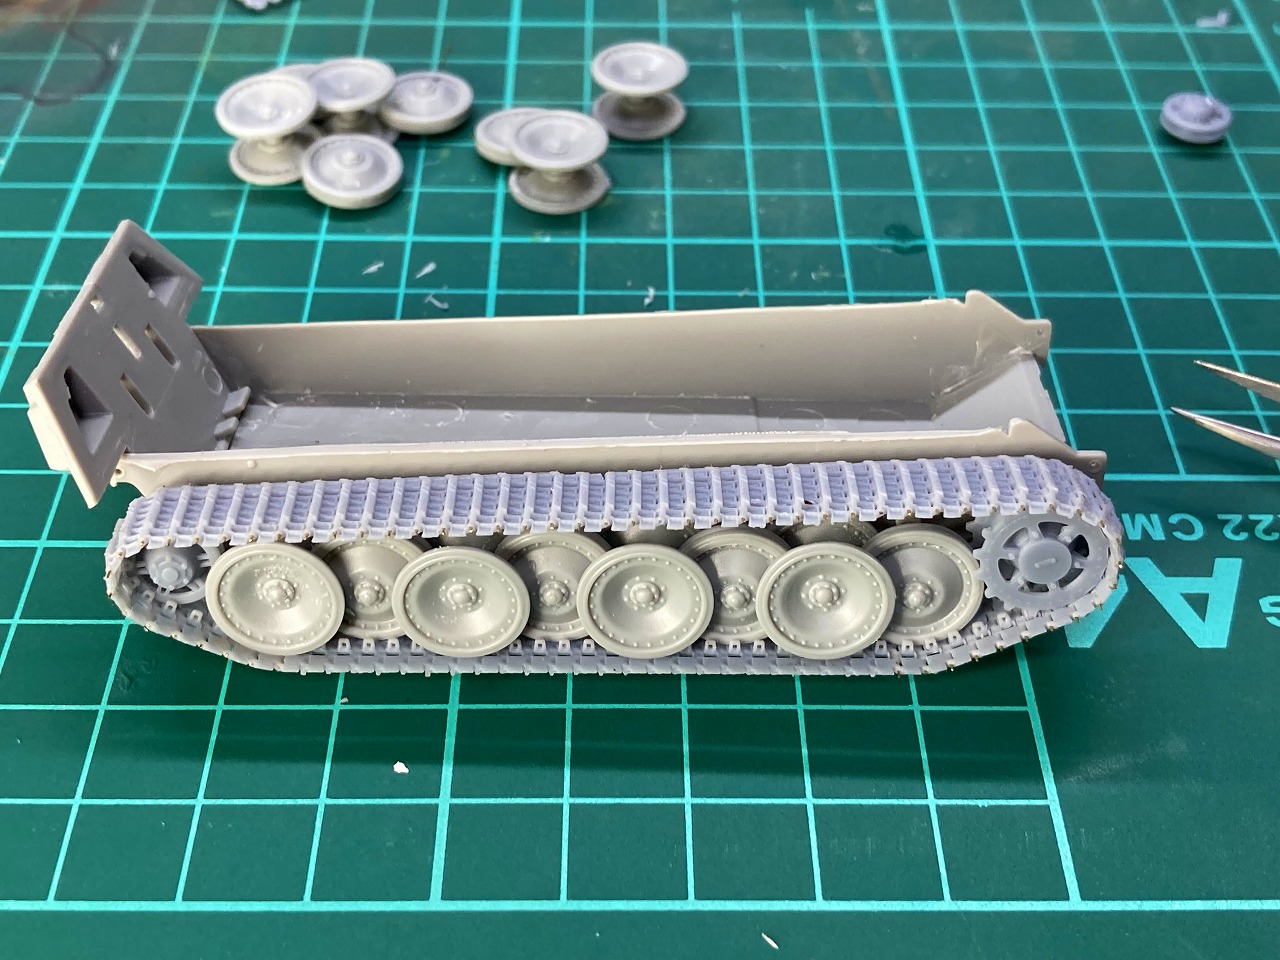
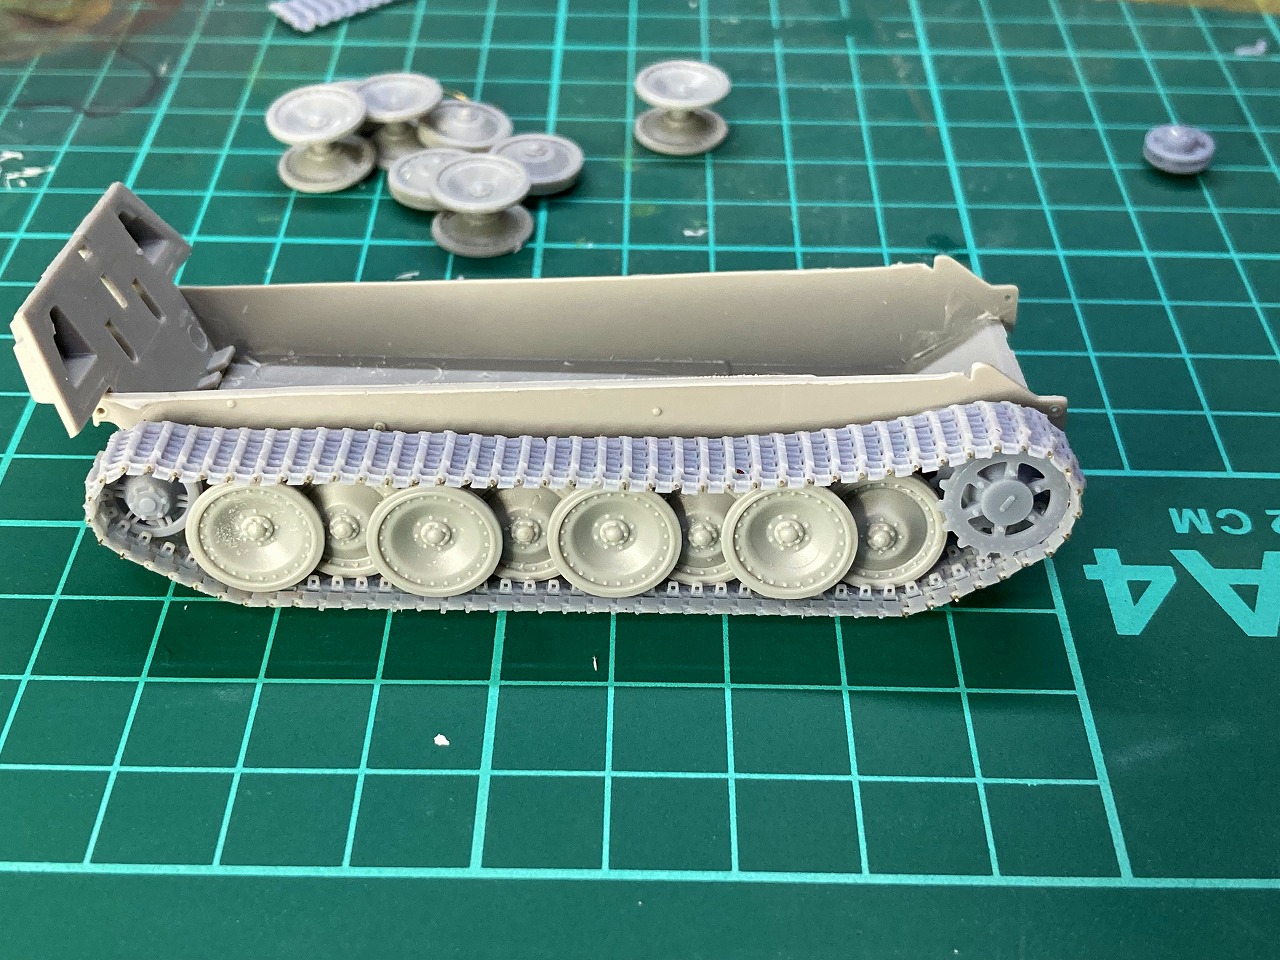
7)起動輪・遊動輪の接着 Adhesion of Drive wheels and Idler wheels
瞬間接着剤を流し込み、起動輪・遊動輪を接着します。この作業は任意です。接着しなくても構いません。If necessary, glue the drive wheel and idler wheel together.
以上で履帯の車体への取り付けは完了です。The work is completed.
ポイント ドラゴン社のキットと組み合わせる場合 When combined with a Dragon kit
本3Dプリンタキット「1/72 パンター系後期履帯(スプロケットセット)[3Dプリンタ出力品」は、履帯、起動輪、遊動輪とボーナスパーツのみを同梱しています。
戦車本体、ドラゴン社、または他社のキットを別途購入・使用する必要があります。また、一部パーツには加工が必要となりますので、その方法等を解説します。
適合するドラゴン社キット
例として、以下のキットはと組み合わせることができます。
ドラゴン 1/72 第二次世界大戦 ドイツ軍 Sd.Kfz.171 パンターG 後期型 プラモデル DR7206

ドラゴン社キットを使用する場合の加工個所
ドラゴン社のキットを使用する場合は、転輪パーツの加工を行うことを推奨します。
When using the Dragon kit, it is recommended to process the wheel parts.
キットの説明に従って、転輪を必要数組み立てます。Assemble the required number of wheels.
転輪の軸穴をピンバイスで拡大します。これは転輪の差込を緩めにし、容易に転輪を直列に配置できるようにするためです。私自身の実績では、1.6mmのドリルで拡大するとうまく行きました。Enlarge the shaft hole of the wheel with a pin vise. This is to loosen the insertion of the wheels so that the wheels can be easily placed in series. In my own experience, magnifying with a 1.6mm drill worked well.
軸穴を拡大した転輪を車体に差し込みます。塗装等を考慮し、接着しません。Assemble them.
最後に Finally
以上で自作野郎工房の開発した3Dプリンタキット「1/72 パンター系後期履帯(スプロケットセット)[3Dプリンタ出力品]」について説明を終わります。
引き続き、1/72のドイツ戦車を中心にフルインテリアキット・アップグレードパーツを開発してまいります。
ぜひ、市販のプラスチックモデルにはないディープな世界をお手に取ってご確認ください。
This is the end of the explanation. I hope you enjoy it.