- 1/72 4号戦車 インテリアキット for フライホークモデル(3Dプリンタ)の作り方 How to assemble 1/72 Panzerkampfwagen IV Interior Kit for Flyhawk
- 3Dプリンタキットの基礎について
- パーツ構成 Parts composition
- 組立(Painting and assembly)
- エアクリーナーボックスの組立て Assembling the Air Cleaner Box
- エンジンの組立てAssembling the Engine
- ラジエターの組立てAssembling the Radiator
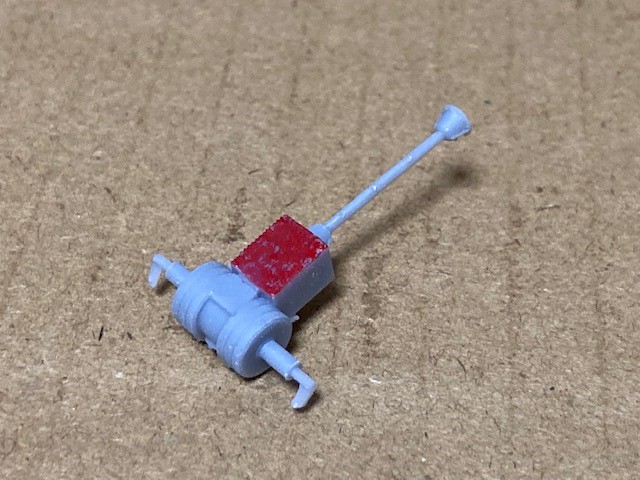
- シリンダ-ヘッドカバーの組立てAssembling the Cylinder head cover
- 無線機の組立てAssembling the Radio equipment
- トランスミッションの組立てAssembling the Transmission
- ブレーキユニットの組立てAssembling the Brake unit
- 操縦席の組立てAssembling the Driver's seat
- 無線手席の組立てAssembling the Radio operator seatt
- 変圧器の組立てAssembling the Transformer
- 消火器の組立てAssembling the Fire extinguisher
- 砲弾の組立てAssembling the Cannon shell
- バッテリーの組立てAssembling the Battery
- 通話スイッチの組立てAssembling the Call Switch
- 砲弾の組立てAssembling the Cannon shell
- 主砲の組立てAssembling the Main gun
- シートクッションの組立てAssembling the Seat cushion
- 同軸機銃の組立てAssembling the Coaxial machine gun
- 完成 Finished
- フライホークキットの加工部分 Parts of the Flyhawk kit that require modification
- 組立のポイント Precautions for assembly
- ご購入者による作例 紹介
- 最後に
- 販売サイト
1/72 4号戦車 インテリアキット for フライホークモデル(3Dプリンタ)の作り方 How to assemble 1/72 Panzerkampfwagen IV Interior Kit for Flyhawk

本ページは、自作野郎工房の開発した3Dプリンタキット「1/72 4号戦車 インテリアキット for フライホークモデル(3Dプリンタ)」について概要をまとめたものです。
3Dプリンタキットは市販のプラスチックモデルと異なり、取り扱いに特徴があります。
本キットを完成させるために必要なポイントについて解説致します。本キットは改造キットであり、3Dプリンタキット特有の難しさがあります。本サイトをよく読んで、慎重に組み立てを行ってください。
This page outlines the 3D printer kit "1/72 Panzerkampfwagen IV Interior Kit for Flyhawk (3D Printer)" developed by the self-made bastard studio.
Unlike commercially available plastic models, 3D printer kits are unique in handling.
We will explain the points necessary to complete this kit. This kit is a modified kit and has the difficulties unique to 3D printer kits. Please read this website carefully and assemble carefully.

販売サイト Sales site
ヤフーオークション Yahoo auction
Amamzon Japan
eBay
製品概要 Product Summary

- 1/72スケールのWW2ドイツ軍戦闘車両 4号戦車(F2以降)のインテリアキットです。
- 本キットはインテリアパーツのみのキットです。このキットを完成させるためには、フライホークモデルの4号戦車のキット「FH 3025」または「FH 3027」が必要です。
- エンジンルーム、トランスミッション、機銃、無線機などがリアルに再現されています。
- 塗装の容易さ、リアルさを追求するためパーツ分割がなされています。
- 本キットは上級者向けです。3Dプリンタキットをすでに作成した経験がある方を対象としています。できる限り、弊社の他製品で3Dプリンタキットに慣れて頂いてから、本キットをご購入されることをお勧めいたします。
- This is a 1/72 scale interior kit for the WWII German combat vehicle Panzer IV (F2 and later).
- This kit is only for the interior parts. To complete this kit, you will need the Flyhawk Models Panzer IV kit,FH 3025 or FH 3027.
- The engine room, transmission, machine gun, radio, etc. are realistically reproduced.
- The parts are divided to make painting easier and more realistic.
- This kit is for advanced users. It is intended for those who already have experience creating 3D printer kits. We recommend that you become familiar with 3D printer kits using our other products before purchasing this kit.
特徴 Features
- 3Dプリンタ初心者の方のために、練習用として小さな部品、壊れやすい部品は計2セット同梱しています(練習用のパーツはサポートが割れている等のB級品が梱包されている場合があります)。
- 底面には3Dプリンタ特有のサポートが多数あるため丁寧な作業が必要です。また、レジンは一般のプラモデルの素材と比較し欠けやすいため、サポートの除去は薄刃ニッパー等で丁寧な除去が必要となります。
- モノクロの高解像度3Dプリンタに、有名メーカーの水洗いレジンを使用して出力しています。
- 丁寧に専用機材を使用しきちんと2次硬化を行っています。3Dプリンタ製品にありがちなべたつき等はありません。
- For beginners of 3D printers, a total of 2 sets of small parts and fragile parts for practice are included (Practice parts are packed with B-class products such as broken supports. There may be).
- There are many 3D printer-specific supports on the bottom, so careful work is required. In addition, since resin is more easily chipped than general plastic model materials, it is necessary to carefully remove the support with a thin blade nipper or the like.
- A monochrome high-resolution 3D printer is output using a water-washing resin from a well-known manufacturer.
- We carefully use special equipment to perform secondary curing properly. There is no stickiness that is typical of 3D printer products.

注意事項 important points
- このキットに含まれるのは以下の写真にあるパーツです。
- 本キットは3Dプリンタキットであるため、3Dプリンタによる出力で避けられない細かな段差・ゆがみがある程度発生します。その状態は商品写真でご確認ください。
- 塗装されているものは作例です。
- This kit includes the parts shown in the picture below.
- Since this kit is a 3D printer kit, there will be some small steps and distortions that cannot be avoided when outputting with a 3D printer. Please check the product photo for the condition.
- The painted one is an example.

3Dプリンタキットの基礎について

3Dプリンタキットは市販のプラスチックモデルと異なる素材・製法で作成されています。
3Dプリンタキットの特徴や注意事項は以下にまとめてありますので、そちらをご覧ください。
The 3D printer kit is made with a different material and manufacturing method from the commercially available plastic model.
Please refer to the following for the features and precautions of the 3D printer kit.
ポイント1 3Dプリンタキットについて Point 1 About 3D printer kit
ポイント2 パーツの切り出し Point 2 How to cut out parts
パーツ構成 Parts composition

4号戦車 インテリアキット for フライホークモデル [3Dプリンタ出力品]のパーツ構成を解説します。いくつかのパーツは、壊してしまったときのために予備が入っています(梱包ミスではありません)。
I will explain the parts composition of the 1/72 Panzerkampfwagen IV Interior Kit for Flyhawk [3D printer output product]. Some parts have spares in case they break (not a packaging mistake).

1:車体 Body
2:バッテリー Battery
3:背もたれ Backrest
4:消火器 Fire extinguisher

5:エンジン Engine
6:ラジエター Radiator
7:砲塔旋回用エンジン Turret rotation engine
8,9::リンダヘッドカバー Cylinder head cover
10:冷却ファン Cooling fan
11:エアクリーナーボックス Air cleaner box

12:砲弾(操縦手背面) Cannon shell (driver's back)
13:砲弾(中央) Cannon shell (Center)
14:徹甲弾(右後方) Armor-piercing ammunition (Right rear)
15:徹甲弾(左後方) Armor-piercing ammunition (Left rear)
16:徹甲弾(左前方) Armor-piercing ammunition (Left front)
17砲弾ラック蓋 :Shell rack cover
18:榴弾(右後方) Howitzer (Right rear)
19:榴弾(左後方) Howitzer (Left rear)
20:榴弾(左前方) Howitzer (Left front)
21砲弾ラック :Shell rack
22:MG34
23:操縦室前面パネル Cockpit front panel
24:トランスミッションメンテナンスハッチ Transmission maintenance hatch
25:メンテナンスパネル(開) Maintenance Panel(Open)
26:メンテナンスパネル(閉) Maintenance Panel(Close)

27:トランスミッション Transmission
28:操縦席 Driver's seat
29:ブレーキユニット(左) Brake unit (left)
30:ブレーキユニット(右) Brake unit (right)
31:変圧器1 Transformer1
32:変圧器2 Transformer2
33:変圧器3 Transformer3
34:シートクッション1 Seat cushion1
35:シート Seat
36:無線機 Radio equipment
37:空薬莢 Empty cartridges
38:徹甲弾 Armor-piercing ammunition
39:榴弾 Howitzer

40:主砲 Main gun
41:砲塔バスケット Turret basket
42:シートクッション2 Seat cushion2
43:シートクッション3 Seat cushion3
44: 同軸機銃 Coaxial machine gun
45:通話スイッチ Call Switch
46: MG34

これらのパーツ群は、フライホークモデルのキットのスペアパーツです。必要に応じ使用してください。
These parts are spare parts for the Flyhawk Model kit. Please use them as needed.
47:エンジンメンテナンスハッチ(左) Engine maintenance hatch (left)
48:エンジンメンテナンスハッチ(右) Engine maintenance hatch (right)
49:車載機銃 Vehicle-mounted machine gun
タブがついている側が下になります。
The side with the tab faces down.
50:前照灯 Headlights
51:スモークキャンドルランチャー(右) Smoke Candle Launcher (right)
52:スモークキャンドルランチャー(左) Smoke Candle Launcher (left)
53:車体前面牽引装置 Front towing device
54:雑具箱蓋(開) Tool box lid (open)
組立(Painting and assembly)
それぞれのパーツを、組み立てる前に全て塗装します。その後、各パーツを組み立てます。
素材がレジンであるため、事前にサフェーサーを塗布することをお勧めします。
Since the material is resin, it is recommended to apply the surfacer in advance.
以下の画像をクリックすると、大きな画像を開くことができます。
You can open a larger image by clicking on the image.
エアクリーナーボックスの組立て Assembling the Air Cleaner Box


エンジンの組立てAssembling the Engine


ラジエターの組立てAssembling the Radiator
接着しません。Do not glue.


シリンダ-ヘッドカバーの組立てAssembling the Cylinder head cover
接着しません。Do not glue.


無線機の組立てAssembling the Radio equipment


トランスミッションの組立てAssembling the Transmission
まだ接着しません。Do not glue yet.


ブレーキユニットの組立てAssembling the Brake unit
このタイミングでトランスミッションtブレーキユニットを同時に接着します。
At this point, the body, transmission, and brake unit are glued together.


操縦席の組立てAssembling the Driver's seat


無線手席の組立てAssembling the Radio operator seatt


変圧器の組立てAssembling the Transformer


消火器の組立てAssembling the Fire extinguisher


砲弾の組立てAssembling the Cannon shell


傾斜が急な側が下側です。The steeper side is the bottom.


傾斜が急な側が下側です。The steeper side is the bottom.


バッテリーの組立てAssembling the Battery


通話スイッチの組立てAssembling the Call Switch


砲弾の組立てAssembling the Cannon shell


主砲の組立てAssembling the Main gun


シートクッションの組立てAssembling the Seat cushion


同軸機銃の組立てAssembling the Coaxial machine gun


完成 Finished


フライホークキットの加工部分 Parts of the Flyhawk kit that require modification
このキットには、インテリアパーツのみが含まれており、戦車本体は含まれていません。このキットを完成させるためには、フライホークモデルの4号戦車のキット「FH 3025」または「FH 3027」が必要です。
また、これらのキットにいくつかの加工を行う必要があります。具体的な加工方法を以下に記載します。
This kit includes only the interior parts, not the tank itself. To complete this kit, you will need the Flyhawk Models IV Tank Kit "FH 3025" or "FH 3027".
You will also need to do some processing on these kits. The specific processing method is described below.
車体パーツの加工 Machining of body parts
車体パーツの内部にあるすべての突起を削り落とします。
Scrape off all protrusions on the inside of the body parts.


フェンダーパーツの加工 Machining of Fender parts
フェンダーの内側を赤い線のように削ります。フェンダーを車体パーツに接着したときに、面が一致するように削ります。
Scrape the inside of the fender as shown in the red lines so that the surfaces will match when the fender is glued to the body parts.


排気ダクトパーツの加工 Machining of Exhaust duct parts
前方の突起を赤い線のように削ります。
Scrape the front protrusion as shown in the red line.


主砲基部パーツの加工 Machining of Main gun base
主砲基部裏面の突起を全て削り落とします。
Scrape off all the protrusions on the back of the main gun base.


組立のポイント Precautions for assembly
パーツ下面のふくらみについて About the bulge on the bottom of the parts
弊社の製品は可能な限り正しい寸法で印刷できるよう、最大限の注意を払っています。しかし、光造形式3Dプリンタの特性上、どうしても部品の下面はふくらみが残ります。
大変お手数をおかけいたしますが、この赤い個所は板ヤスリ等を使用し、正しい面を出して頂けますようよろしくお願いいたします。
We take the utmost care to ensure that our products are printed with the most correct dimensions possible. However, due to the characteristics of optical 3D printers, the underside of the parts will inevitably remain bulged.
We apologize for the inconvenience, but we ask that you please use a board file or similar tool to correct this red area.
特に、完成した車体インテリアを組み込む際は車体と接する面(以下の図の青い面)を丁寧にヤスリを使って平滑な面を作るようにしてください。
In particular, when installing the completed vehicle interior, be sure to carefully file the surface that comes into contact with the vehicle body (the blue surface in the diagram below) to make it smooth.

ご購入者による作例 紹介
みにすけ屋さん
説明不要、1/72のエアモデル、AFVモデルをオール筆塗りで仕上げるスーパーテクニシャン、みにすけ屋さんが4号戦車インテリアを使用して素晴らしい作例を仕上げてくださいました。1
スキャンメル タンク トランスポーターとのそろい踏み。スキャンメルも超絶な加工と塗装が施されています。これからさらにフィギュアを追加して行くそうです。完成の暁にはさらに画像追加いたしますっ!刮目せよ!
みにすけ屋さんサイトはこちら:https://hinemogura.web.fc2.com/
製作記はこちら:https://hinemogura.at-ninja.jp/mokuji.html
遂にジオラマ完成!ギャラリーはこちら:https://hinemogura.web.fc2.com/scammell.html


自作野郎
みにすけ屋さんの後に紹介するのもお恥ずかしいのですが、私もン十年ぶりにジオラマに仕上げてみました!ご照覧くださいませ。
ストラボクレーンは私が開発したオリジナルキットです。もう少ししたら販売されるはずです。たぶん・・・(欲しい方いるのかしら


最後に

以上で自作野郎工房の開発した3Dプリンタキット「1/72 4号戦車 インテリアキット for フライホークモデル(3Dプリンタ)[3Dプリンタ出力品]」について概要の説明を終わります。
引き続き、1/72のドイツ戦車を中心にフルインテリアキットを開発してまいります。
ぜひ、市販のプラスチックモデルにはないディープな世界をお手に取ってご確認ください。